Question 3
A company has migrated most of its business to AWS Cloud using Amazon EC2 instances for Windows to host its applications. The domain services used by these applications are built on Active Directory servers which have been retained as on-premises servers. The company has issued guidelines to enable GuardDuty for all its applications.
While analyzing GuardDuty reports, the security team realized that DNS logs are not being tracked/reported by GuardDuty. How will you fix this issue?
-
GuardDuty analyzes your DNS logs from the stream of data provided through the Route 53 Resolver query logging feature. Check the path specified in this configuration
-
If you use a custom DNS resolver, then GuardDuty cannot access and process data from this data source
-
GuardDuty reports only on VPC Flow Logs, CloudTrail global events, and Kubernetes audit logs. GuardDuty does not analyze DNS logs
-
Check the permissions attached on the IAM role used by GuardDuty for accessing DNS logs
custom DNS resolver 사용하면 GuardDuty는 DNS 로그 접근하지 못한다.
GuardDuty는 Route 53 Resolver query logging 기능과 무관하게 작동함.
Overall explanation
Correct option:
If you use a custom DNS resolver, then GuardDuty cannot access and process data from this data source
If you use AWS DNS resolvers for your Amazon EC2 instances (the default setting), then GuardDuty can access and process your request and response DNS logs through the internal AWS DNS resolvers. If you use another DNS resolver, such as OpenDNS or GoogleDNS, or if you set up your own DNS resolvers, then GuardDuty cannot access and process data from this data source.
Incorrect options:
GuardDuty reports only on VPC Flow Logs, CloudTrail global events, and Kubernetes audit logs. GuardDuty does not analyze DNS logs - This statement is incorrect. GuardDuty can analyze DNS logs for AWS DNS resolvers.
GuardDuty analyzes your DNS logs from the stream of data provided through the Route 53 Resolver query logging feature. Check the path specified in this configuration - This statement is incorrect. When you enable GuardDuty, it immediately starts analyzing your DNS logs from an independent stream of data. This data stream is separate from the data provided through the Route 53 Resolver query logging feature. Configuration of this feature does not affect GuardDuty analysis.
Check the permissions attached on the IAM role used by GuardDuty for accessing DNS logs - This is a made-up option, given only as a distractor.
Reference:
https://docs.aws.amazon.com/guardduty/latest/ug/guardduty_data-sources.html
Domain
Domain 3: Infrastructure Security
Question 6
A Systems Administrator is no longer able to access the Windows Amazon EC2 instance because the Windows administrator password is lost. As a Security Engineer, you have been tasked with the job of resetting the password of the instance.
Which of the following steps would you suggest to reset the password using EC2Launch v2? (Select three)
-
To reset the administrator password, Download the EC2Rescue for Windows Server zip file, extract the contents, and run
EC2Rescue.exe -
Select Offline Instance Option → Diagnose and Rescue → Reset Administrator Password. Reattach the volume to the original instance, then restart the instance
-
Verify that the EC2Launch v2 service is running. Detach the EBS root volume from the instance
-
Reattach the volume to the original instance as the root volume and connect to the instance using its key pair to retrieve the administrator password. Connect to the instance using its current public DNS name
-
Launch a temporary instance and attach the volume to it as a secondary volume. Delete the
.run-oncefile from the instance, located at%ProgramData%/Amazon/EC2Launch/state/.run-once -
When you launch the temporary instance, to avoid disk signature collisions, you must select an AMI for the same version of Windows
disk signature collisions을 피하기 위해서는 임시 인스턴스에 다른 버전의 윈도우를 설치해야 함.
Overall explanation
Correct options:
Verify that the EC2Launch v2 service is running. Detach the EBS root volume from the instance
Launch a temporary instance and attach the volume to it as a secondary volume. Delete the .run-once file from the instance, located at %ProgramData%/Amazon/EC2Launch/state/.run-once
Reattach the volume to the original instance as the root volume and connect to the instance using its key pair to retrieve the administrator password. Connect to the instance using its current public DNS name
If you have lost your Windows administrator password and are using a supported Windows AMI that includes the EC2Launch v2 agent, you can use EC2Launch v2 to generate a new password.
The steps to be followed are as follows: 1. Verify that the EC2Launch v2 service is running
-
Detach the root volume from the instance - You can’t use EC2Launch v2 to reset an administrator password if the volume on which the password is stored is attached to an instance as the root volume. You must detach the volume from the original instance before you can attach it to a temporary instance as a secondary volume.
-
Attach the volume to a temporary instance - Launch a temporary instance and attach the volume to it as a secondary volume. This is the instance you use to modify the configuration file. The temporary instance must be in the same Availability Zone as the original instance.
-
Delete the
.run-oncefile - After you have attached the volume to the temporary instance as a secondary volume, delete the.run-oncefile from the instance, located at%ProgramData%/Amazon/EC2Launch/state/.run-once. This directs EC2Launch v2 to run all tasks with a frequency of once, which includes setting the administrator password. -
Restart the original instance - After you have deleted the .run-once file, reattach the volume to the original instance as the root volume and connect to the instance using its key pair to retrieve the administrator password.
Incorrect options:
To reset the administrator password, Download the EC2Rescue for Windows Server zip file, extract the contents, and run EC2Rescue.exe
Select Offline Instance Option → Diagnose and Rescue → Reset Administrator Password. Reattach the volume to the original instance, then restart the instance
These two steps are part of resetting the Windows administrator password using EC2Launch when EC2Launch v2 is not installed on the instance.
When you launch the temporary instance, to avoid disk signature collisions, you must select an AMI for the same version of Windows - To avoid disk signature collisions, you must select an AMI for a different version of Windows. For example, if the original instance runs Windows Server 2019, launch the temporary instance using the base AMI for Windows Server 2016. So, this option is incorrect.
References:
https://docs.aws.amazon.com/AWSEC2/latest/WindowsGuide/ResettingAdminPassword_EC2Launchv2.html
Domain
Domain 2: Incident Response
Question 10
The security team at a company needs to analyze the AWS Web Application Firewall (AWS WAF) logs quickly and it wants to build multiple dashboards using a serverless architecture. The logging process should be automated so that the log data for dashboards is available on a real-time or near-real-time basis.
Which of the following represents the most optimal solution for this requirement?
-
Configure AWS Web Application Firewall (AWS WAF) to send your web ACL traffic logs to Amazon S3 bucket. Use Amazon Redshift Spectrum to query data directly from files on Amazon S3. Using the existing integration of RedShift Spectrum with Amazon QuickSight, generate visualizations to be used in manager dashboards
-
Configure AWS Web Application Firewall (AWS WAF) to feed logs to Amazon S3 bucket via Amazon Kinesis Data Firehose. Set up an AWS Glue crawler job and an Amazon Athena table to query for required data and create visualizations using Amazon QuickSight dashboards
-
Configure AWS Web Application Firewall (AWS WAF) to feed logs to Amazon S3 bucket via Amazon Kinesis Data Streams. Set up an AWS Glue crawler job and an Amazon Athena table to query for required data and create visualizations using Amazon QuickSight dashboards
-
Configure AWS Web Application Firewall (AWS WAF) to send logs to CloudWatch Logs. Use CloudWatch Logs Insights to interactively search and analyze your log data. Publish logs data to Amazon QuickSight dashboards through direct CloudWatch integration with QuickSight
WAF 로그는 Kinesis Data Firehose 통해서 S3로 보낼 수 있다. AWS Glue cralwer job으로 S3의 파일을 Athena가 읽을 수 있게 처리하고, 대시보드는 QuickSight로 구성하면 됨.
CloudWatch와 QuickSight는 직접 연결할 수 없고 중간에 S3와 Athena가 필요하다. Athena 테이블의 데이터를 갱신하기 위해 AWS Glue crawler job이 필요하고.
Overall explanation
Correct option:
Configure AWS Web Application Firewall (AWS WAF) to feed logs to Amazon S3 bucket via Amazon Kinesis Data Firehose. Set up an AWS Glue crawler job and an Amazon Athena table to query for required data and create visualizations using Amazon QuickSight dashboards
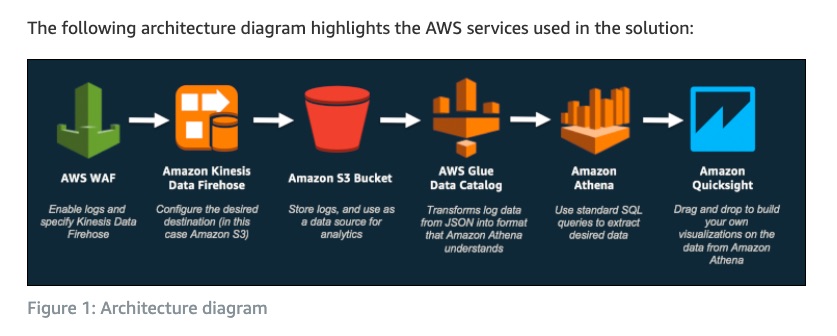
This solution will show you how to analyze AWS Web Application Firewall (AWS WAF) logs and quickly build multiple dashboards, without booting up any servers.
With the new AWS WAF full logs feature, you can log all traffic inspected by AWS WAF into Amazon Simple Storage Service (Amazon S3) buckets by leveraging Amazon Kinesis Data Firehose. First, you need to enable AWS WAF logging for the given web ACL(s). You can then create an Amazon Kinesis Data Firehose delivery stream into which the AWS WAF full logs are delivered. Then you need to set up an AWS Glue crawler job and an Amazon Athena table. Finally, you’ll set up Amazon QuickSight dashboards to read the logs data by querying the Athena tables and thereby help you visualize the web traffic traversing through the AWS WAF layer.
Incorrect options:
Configure AWS Web Application Firewall (AWS WAF) to send logs to CloudWatch Logs. Use CloudWatch Logs Insights to interactively search and analyze your log data. Publish logs data to Amazon QuickSight dashboards through direct CloudWatch integration with QuickSight - It is possible to send web ACL traffic logs to a CloudWatch Logs log group. However, CloudWatch and Amazon QuickSight cannot directly connect and will need Amazon Athena as part of the solution. Hence, this option is incorrect.
Configure AWS Web Application Firewall (AWS WAF) to feed logs to Amazon S3 bucket via Amazon Kinesis Data Streams. Set up an AWS Glue crawler job and an Amazon Athena table to query for required data and create visualizations using Amazon QuickSight dashboards - AWS WAF logs only support the following logging destinations - Amazon CloudWatch Logs, Amazon Simple Storage Service, and Amazon Kinesis Data Firehose. So this option is incorrect.
Configure AWS Web Application Firewall (AWS WAF) to send your web ACL traffic logs to the Amazon S3 bucket. Use Amazon Redshift Spectrum to query data directly from files on Amazon S3. Using the existing integration of RedShift Spectrum with Amazon QuickSight, generate visualizations to be used in manager dashboards - To use Redshift Spectrum, you need an Amazon Redshift cluster and a SQL client that’s connected to your cluster, so that you can run SQL commands. Since the required solution should be serverless, this option is not the right fit.
References:
https://docs.aws.amazon.com/waf/latest/developerguide/logging-destinations.html
https://docs.aws.amazon.com/quicksight/latest/user/supported-data-sources.html
https://docs.aws.amazon.com/redshift/latest/dg/c-getting-started-using-spectrum.html
Domain
Domain 1: Detection
Question 12
A company manages separate AWS accounts for each of its business units. An enhanced monitoring solution has been proposed by the security team that mandates tracking all the API calls using CloudTrail for all the AWS accounts. The centralized monitoring logs will be available in a new AWS account created for security and audit purposes. Logs of one business unit should be distinguishable from others via its own top-level prefix. Also, any updates to the log files should be traceable.
As a Security Engineer, which of the following options will you combine to implement this requirement? (Select two)
-
Apply a bucket policy to the new centralized S3 bucket that permits the CloudTrail service to use the
s3 PutObjectaction and thes3 GetBucketACLaction, and specify the appropriate resource ARNs for the CloudTrail trails -
Create a new Amazon S3 bucket in each of the AWS accounts. Use S3 bucket replication to copy the CloudTrail logs to the S3 bucket in the centralized account. Enable log file validation on all Trails in all of the AWS accounts used. Use unique log file prefixes for trails in each AWS account
-
Create a new Amazon S3 bucket in the centralized account to store all the CloudTrail log files. Enable log file validation on all Trails in AWS accounts of all business units. Use unique log file prefixes for trails in each AWS account
-
Apply a bucket policy to all S3 buckets to permit the CloudTrail service to use the
s3 PutObjectaction,s3 GetObjectAclaction, and thes3 GetObjectaction. Specify the appropriate resource ARNs for the CloudTrail trails -
Create a new Amazon S3 bucket in the centralized account to store all the CloudTrail log files. Enable log file validation on all Trails in all AWS accounts including the centralized account. Use unique log file prefixes for trails in each AWS account
여러 계정의 CloudTrail 로그를 하나의 계정의 S3에 바로 넣는게 가능하다
CloudTrail에서 S3의 로그를 읽을 필요는 없기 때문에 s3 GetObject action은 없어도 됨..
Overall explanation
Correct options:
Create a new Amazon S3 bucket in the centralized account to store all the CloudTrail log files. Enable log file validation on all Trails in AWS accounts of all business units. Use unique log file prefixes for trails in each AWS account
Apply a bucket policy to the new centralized S3 bucket that permits the CloudTrail service to use the “s3 PutObject” action and the “s3 GetBucketACL” action, and specify the appropriate resource ARNs for the CloudTrail trails -
A new S3 bucket should be created in the centralized account as per the given requirements. Log file validation on CloudTrail logs is necessary to determine whether a log file was modified, deleted, or unchanged after CloudTrail delivered it. This feature is built using industry-standard algorithms: SHA-256 for hashing and SHA-256 with RSA for digital signing. This makes it computationally infeasible to modify, delete or forge CloudTrail log files without detection.
A complete log file object name with Top-level prefix: bucket_name/prefix_name/AWSLogs/Account ID/CloudTrail/region/YYYY/MM/DD/file_name.json.gz
It helps in identifying the logs of a business unit at the top level without having to filter for it at the log file level.
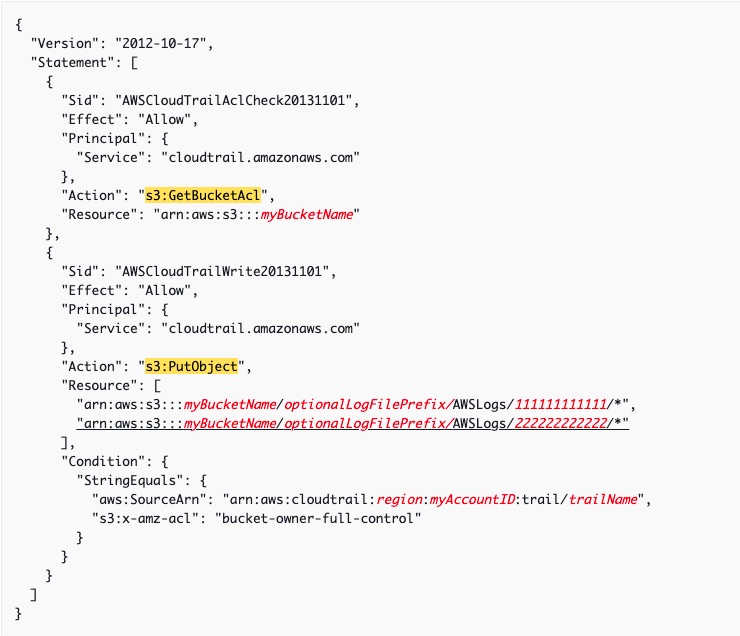
For a bucket to receive log files from multiple accounts, its bucket policy must grant CloudTrail permission to write log files from all the accounts you specify. This means that you must modify the bucket policy on your destination bucket to grant CloudTrail permission to write log files from each specified account.
S3 bucket policy so that files can be received from multiple accounts:
Incorrect options:
Create a new Amazon S3 bucket in the centralized account to store all the CloudTrail log files. Enable log file validation on all Trails in all AWS accounts including the centralized account. Use unique log file prefixes for trails in each AWS account - Enabling Log file validation in the centralized account is not required for the given use case.
Create a new Amazon S3 bucket in each of the AWS accounts. Use S3 bucket replication to copy the CloudTrail logs to the S3 bucket in the centralized account. Enable log file validation on all Trails in all of the AWS accounts used. Use unique log file prefixes for trails in each AWS account - AWS provides a straightforward solution for logging Trails from different AWS accounts. The S3 bucket that receives the log files from multiple accounts should have a bucket policy that must grant CloudTrail permission to write log files from all the accounts you specify. There is no reason to use S3 bucket replication and complicate the process.
Apply a bucket policy to all S3 buckets to permit the CloudTrail service to use the “s3 PutObject” action, “s3 GetObjectAcl” action, and the “s3 GetObject” action. Specify the appropriate resource ARNs for the CloudTrail trails - As discussed above, the S3 bucket policy should permit the CloudTrail service to use the “s3 PutObject” action and the “s3 GetBucketACL” action only.
References:
https://docs.aws.amazon.com/awscloudtrail/latest/userguide/cloudtrail-log-file-validation-intro.html
https://docs.aws.amazon.com/awscloudtrail/latest/userguide/cloudtrail-find-log-files.html
Domain
Domain 1: Detection
Question 14
A company uses an Amazon S3 bucket to store its business-critical data. Recently, all the members of the development team, that access the given S3 bucket, have been given MFA devices. A security engineer must configure permissions such that access to the given S3 bucket is allowed only after MFA authentication.
How will you implement this requirement?
Create an IAM group having the development team users. Add a customer-managed policy with Allow Effect to the group for all s3:*actions with the condition defined as "Condition" : { "BoolIfExists" : { "aws:MultiFactorAuthPresent" : "false" } }
Create an IAM group having the development team users. Add a customer-managed policy with Deny Effect to the group for all s3:*actions with the condition defined as "Condition" : { "BoolIfExists" : { "aws:MultiFactorAuthPresent" : "false" } }
Create an IAM group having the development team users. Add a customer-managed policy with Deny Effect to the group for all s3:*actions with the condition defined as "Condition" : { "Bool" : { "aws:MultiFactorAuthPresent" : "false" } }
Create an IAM group having the development team users. Add a customer managed policy with Allow Effect to the group for all s3:*actions with the condition defined as "Condition": {"BoolIfExists": {"aws:MultiFactorAuthPresent": "true"}}
API나 CLI 커맨드같은 long-term credential을 사용하는 요청은 aws:MultiFactorAuthPresent key가 없으므로 BoolIfExists 를 사용해야 한다.
Overall explanation
Correct option:
*Create an IAM group having the development team users. Add a customer-managed policy with Deny Effect to the group for all s3:actions with the condition defined as "Condition" : { "BoolIfExists" : { "aws:MultiFactorAuthPresent" : "false" } }
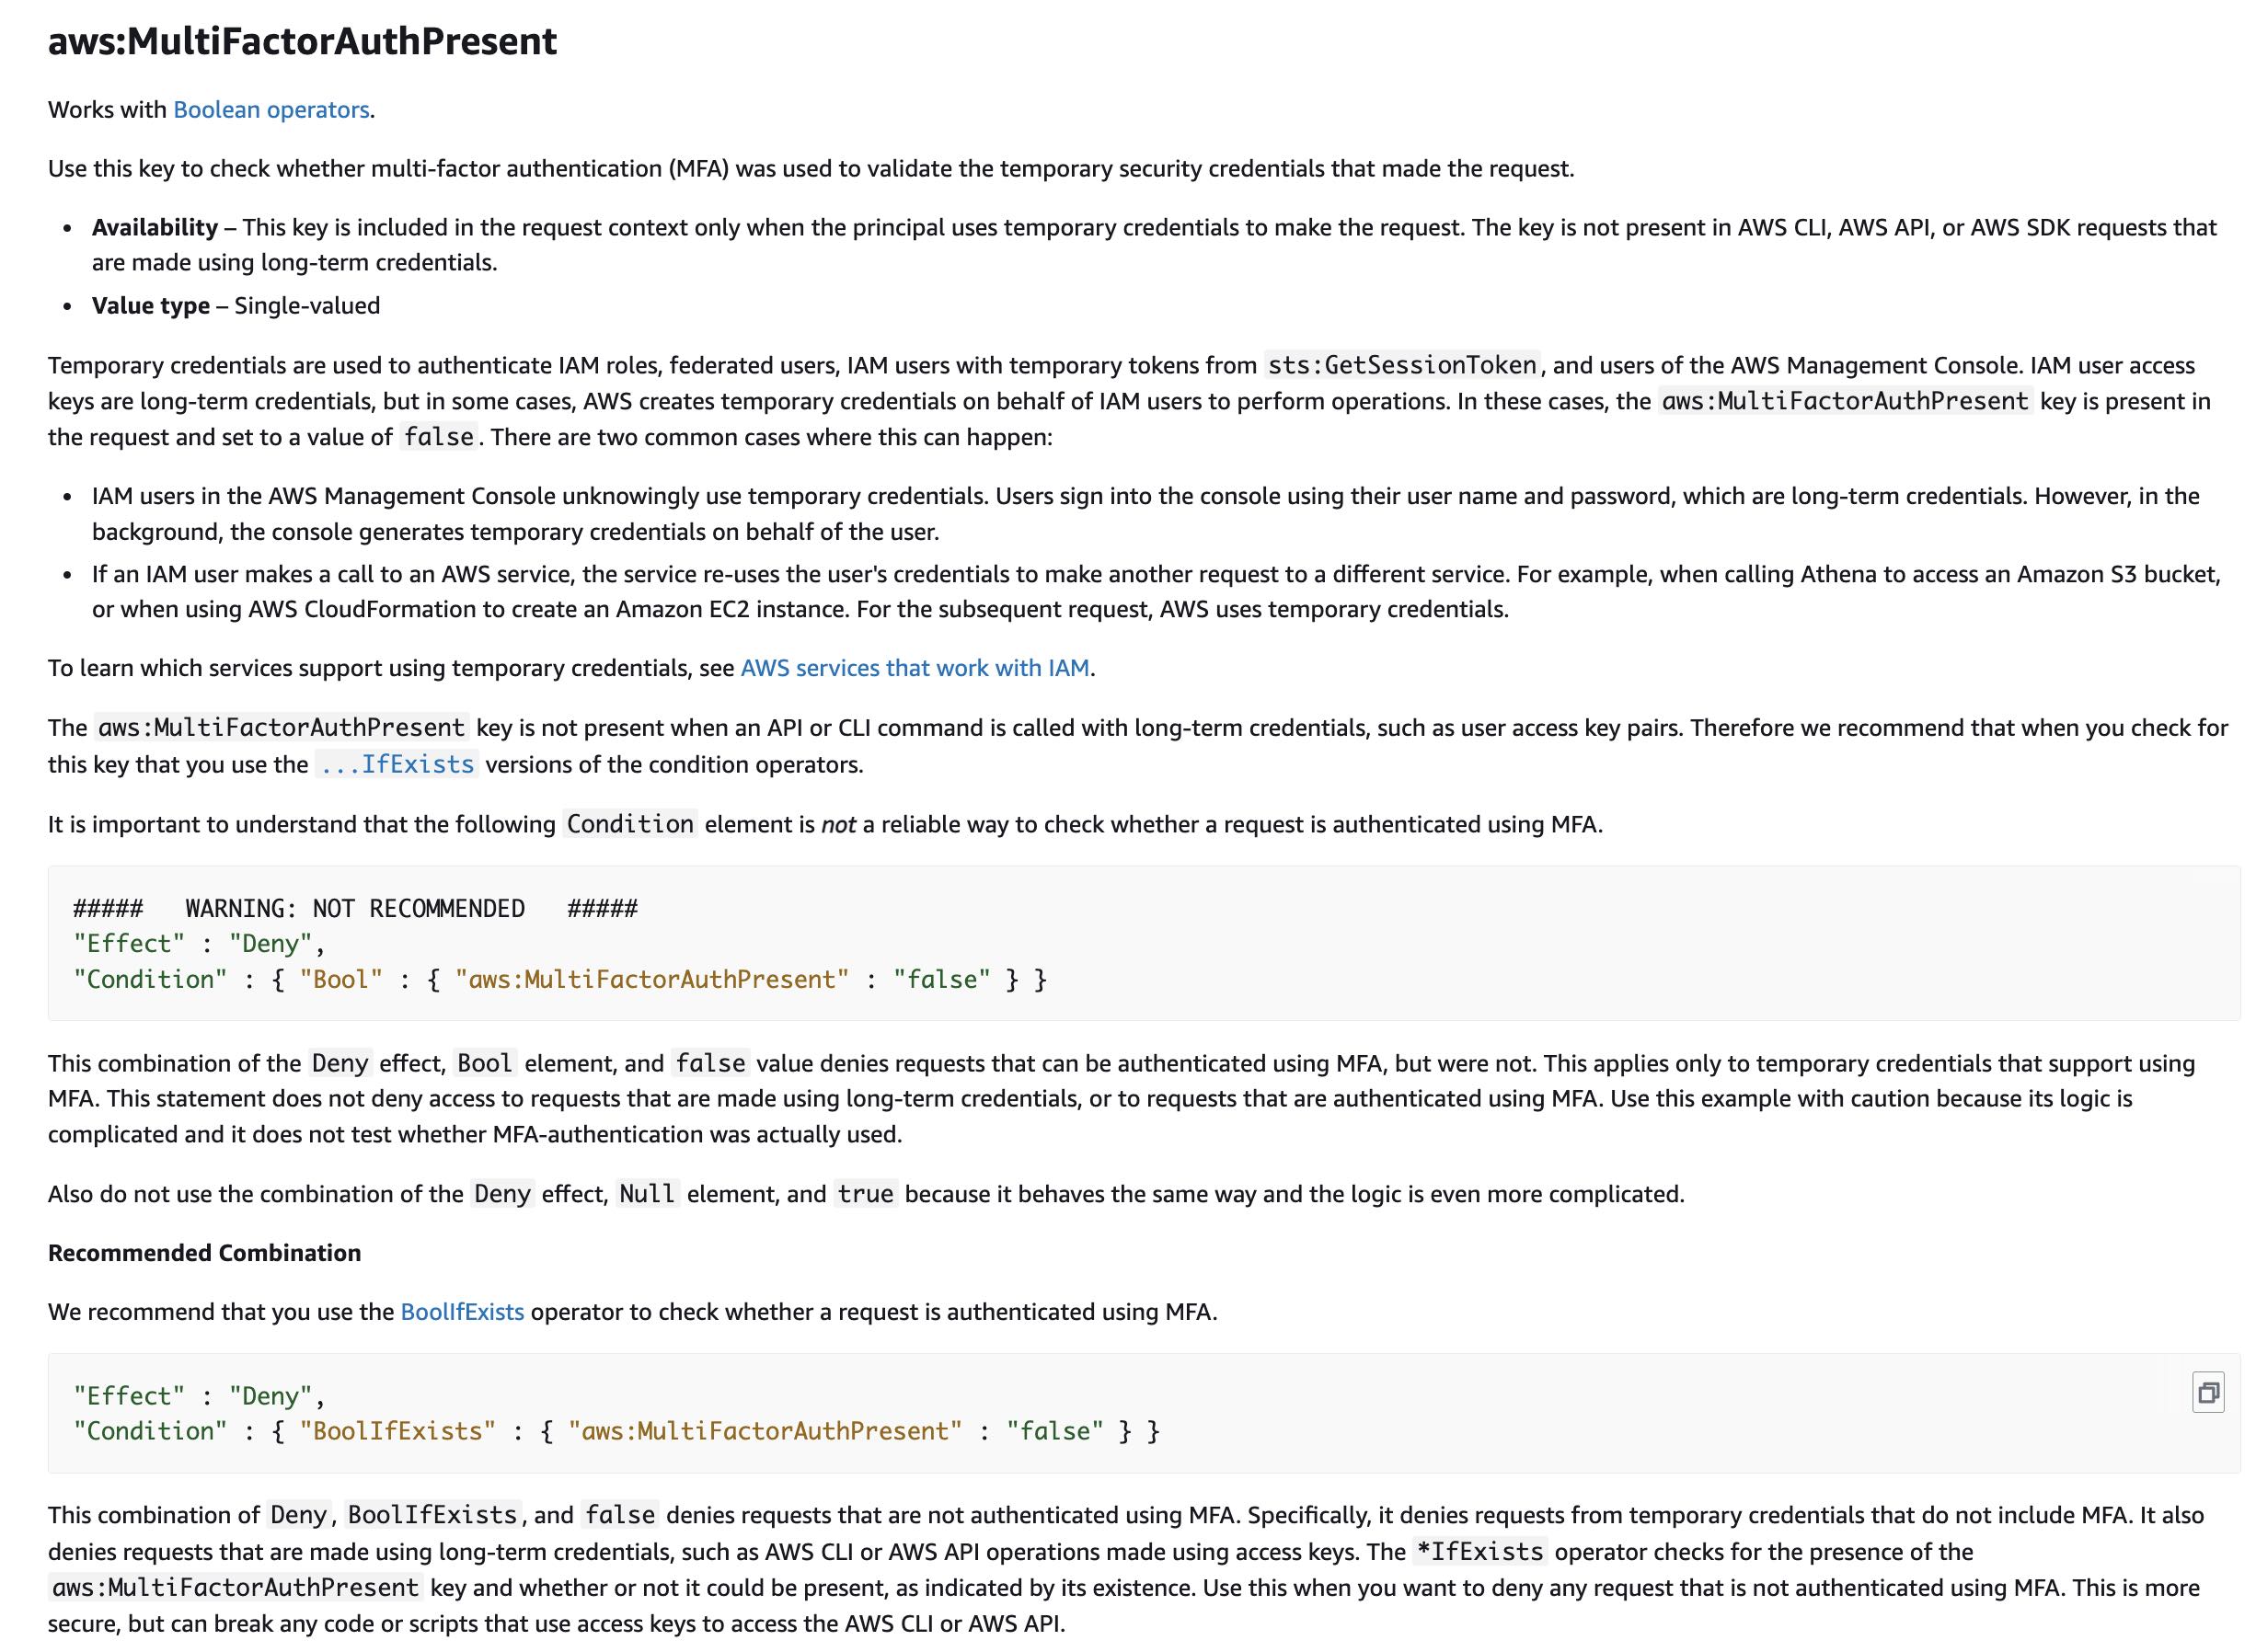
AWS recommends the use of BoolIfExists operator to check whether a request is authenticated using MFA. The aws:MultiFactorAuthPresent key is not present when an API or CLI command is called with long-term credentials, such as user access key pairs. Therefore AWS recommends that when you check for this key that you use the IfExists versions of the condition operators, like so:
    "Effect" : "Deny",
    "Condition" : { "BoolIfExists" : { "aws:MultiFactorAuthPresent" : "false" } }
This combination of Deny, BoolIfExists, and false denies requests that are not authenticated using MFA. Specifically, it denies requests from temporary credentials that do not include MFA. It also denies requests that are made using long-term credentials, such as AWS CLI or AWS API operations made using access keys. The *IfExists operator checks for the presence of the aws:MultiFactorAuthPresent key and whether or not it could be present, as indicated by its existence. Use this when you want to deny any request that is not authenticated using MFA. This is more secure but can break any code or scripts that use access keys to access the AWS CLI or AWS API.
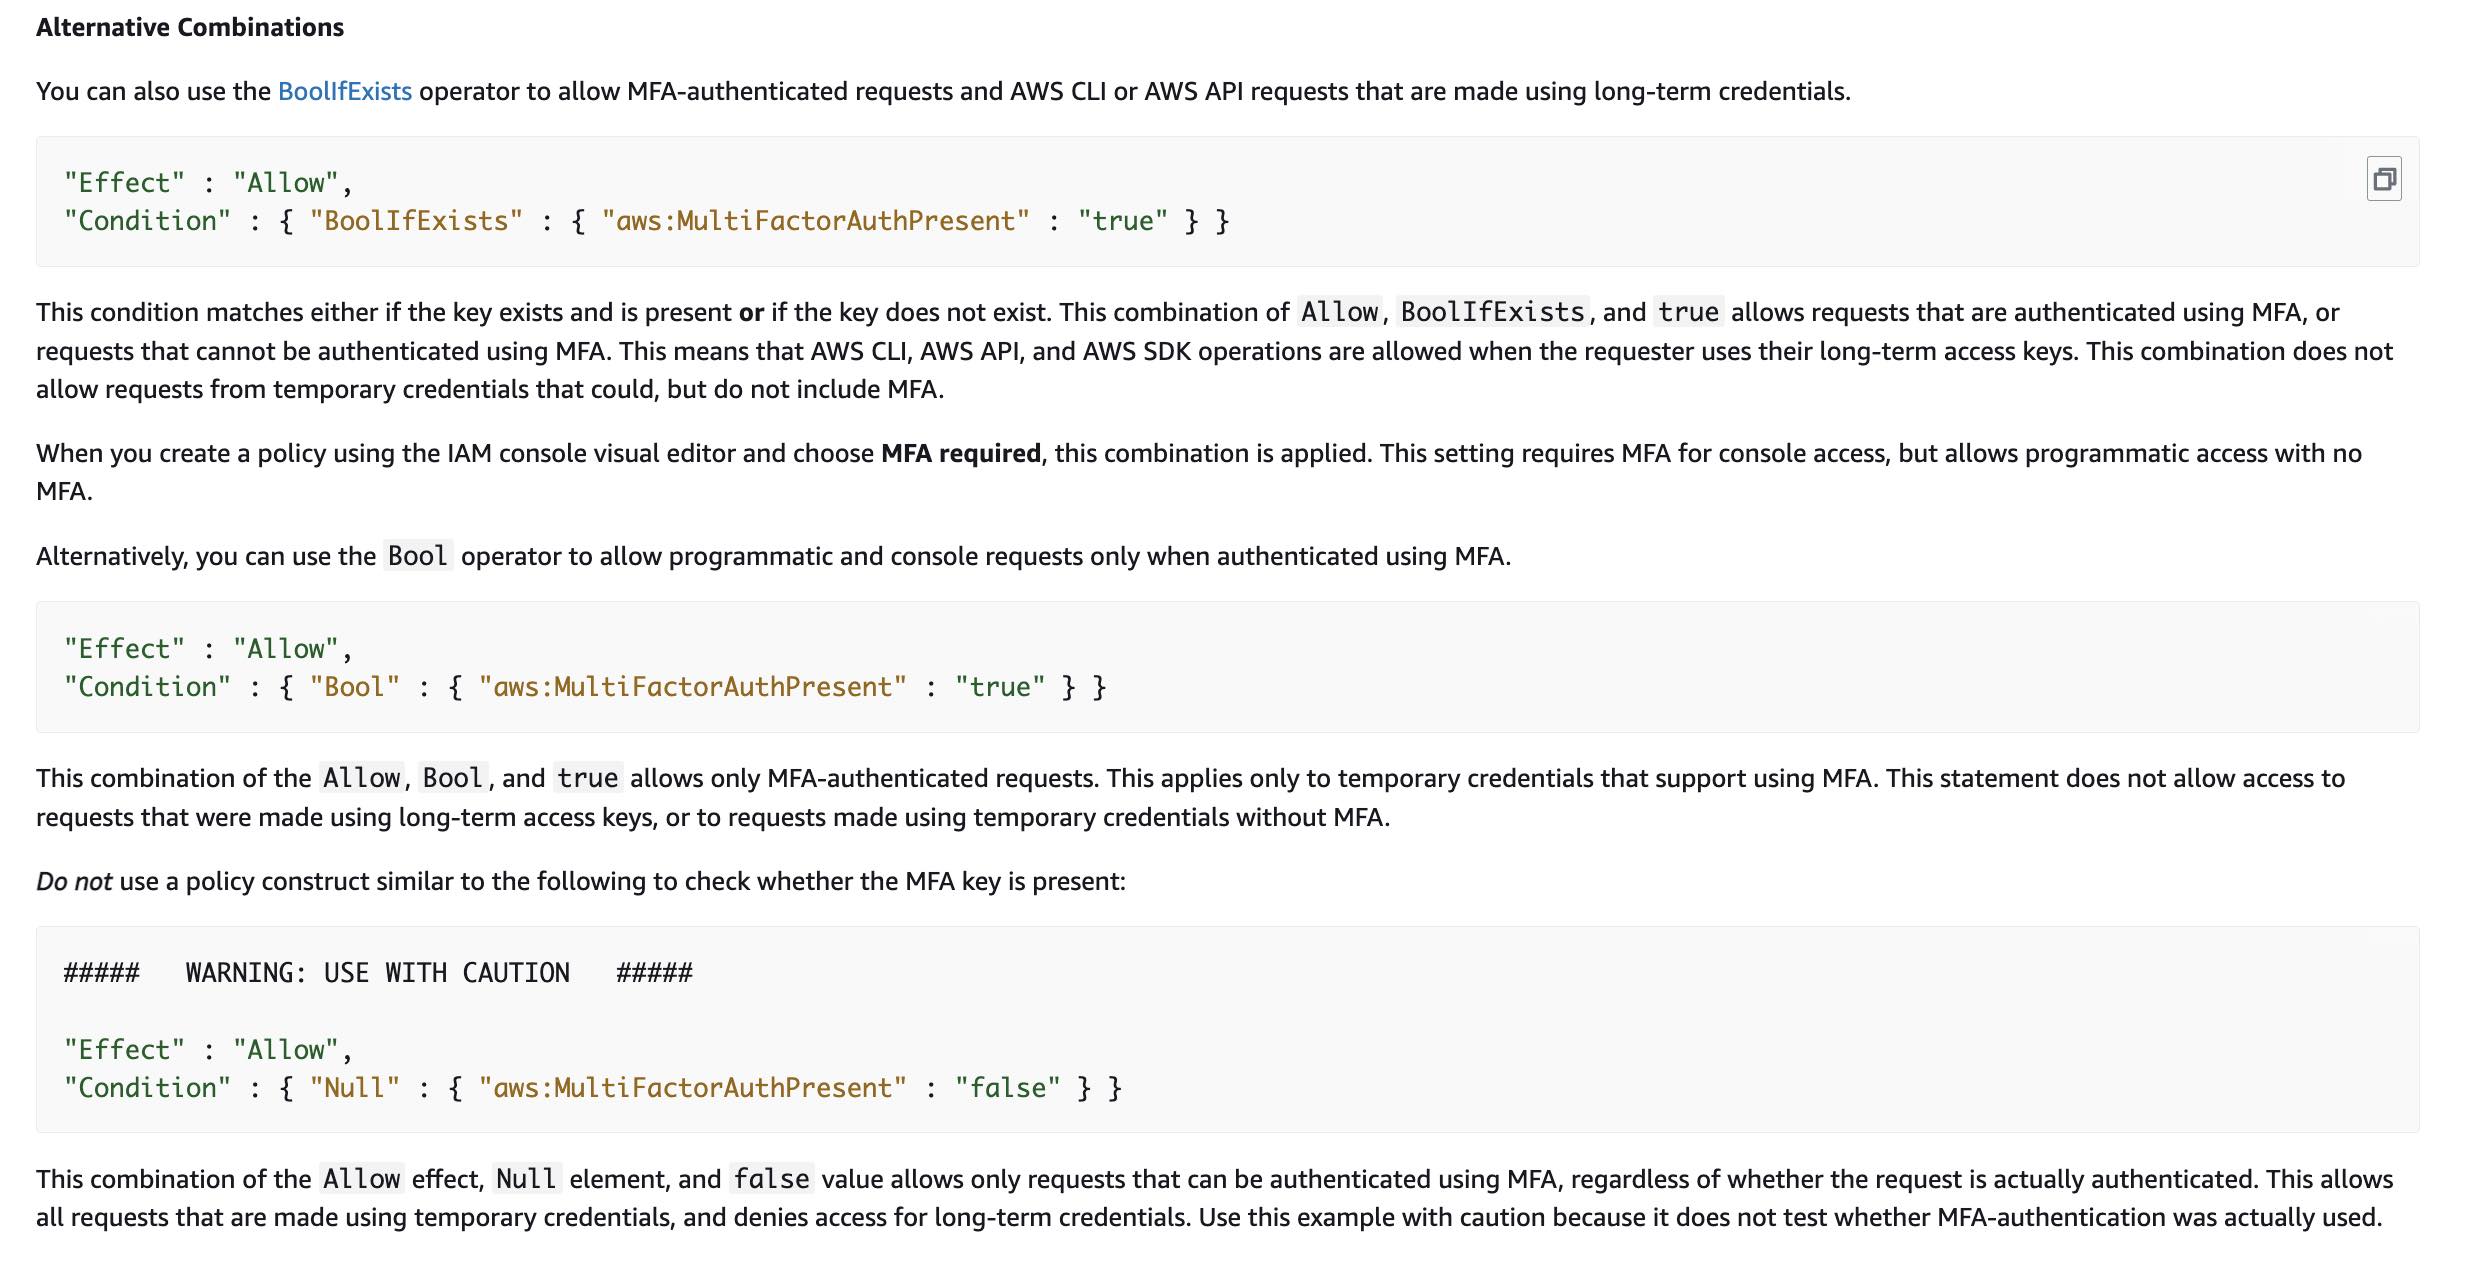
Recommended Combination to mandate MFA through the policy:
Incorrect options:
*Create an IAM group having the development team users. Add a customer-managed policy with Deny Effect to the group for all s3:actions with the condition defined as "Condition" : { "Bool" : { "aws:MultiFactorAuthPresent" : "false" } } - This combination of the Deny effect, Bool element, and false value denies requests that can be authenticated using MFA, but were not. This applies only to temporary credentials that support using MFA. This statement does not deny access to requests that are made using long-term credentials, or to requests that are authenticated using MFA. Use this example with caution because its logic is complicated and it does not test whether MFA-authentication was actually used. Therefore, this option is incorrect for the given use case.
*Create an IAM group having the development team users. Add a customer managed policy with Allow Effect to the group for all s3:actions with the condition defined as "Condition": {"BoolIfExists": {"aws:MultiFactorAuthPresent": "true"}} - This condition matches either if the key exists and is present or if the key does not exist. This combination of Allow, BoolIfExists, and true allows requests that are authenticated using MFA, or requests that cannot be authenticated using MFA. This means that AWS CLI, AWS API, and AWS SDK operations are allowed when the requester uses their long-term access keys. This combination does not allow requests from temporary credentials that could, but do not include MFA. Therefore, this option is incorrect for the given use case.
*Create an IAM group having the development team users. Add a customer-managed policy with Allow Effect to the group for all s3:actions with the condition defined as "Condition" : { "BoolIfExists" : { "aws:MultiFactorAuthPresent" : "false" } } - This allows any request that is not authenticated using MFA. This is the opposite of what the use case demands.
Reference:
Domain
Domain 5: Data Protection
Question 15
A project manager has connected with you for the resolution of an issue. Although an AWS Identity and Access Management (IAM) entity has admin permissions, it has received an access denied error.
As an AWS Certified Security Specialist, how will you troubleshoot and resolve this issue? (Select two)
A resource-based policy defines the maximum permissions that an identity-based policy can grant to an entity. Check for any restrictive resource-based policies
A session policy is in place and is causing an authorization issue
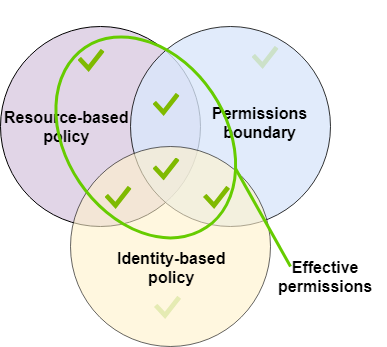
If you use a permissions boundary, then the entity can only perform actions that are allowed in both the identity-based policy and the concerned resource-based policy. Check for any restrictive permissions boundary
An Organization NACL can restrict access to member account IAM entities. Check for restrictions coming from an NACL using the management account of the Organization
If the requests are routed through a VPC endpoint, then check for any restrictions coming from the associated VPC endpoint policy
Admin이라도 IAM role이나 federated user의 role을 사용하는 session으로 접근하면 권한 거부 발생 가능.
마찬가지로 VPC endpoint로 접근해도 그렇다. VPC endpoint policy는 resource-based policy로서 VPC endpoint를 통해 접근할 때 특정 서비스를 사용하지 못하게 막을 수 있음.
그냥 나머지 옵션들 자체가 틀린거구나.. 어려운 문제일 때는 선택지 자체가 말이 되는지 안 되는지 꼼꼼히 확인하자.
‘maximum permissions that an identity-based policy’는 permission boundary 이야기임
permission boundary에 대한 설명을 하는데 resource-based policy가 등장할 이유가 없다.
Resourced-based policy에서 허용한건 identity-based policy와 permission boundary에 명시적인 거부가 없으면 허용된다
Evaluating effective permissions with boundaries:
Overall explanation
Correct options:
If the requests are routed through a VPC endpoint, then check for any restrictions coming from the associated VPC endpoint policy
A VPC endpoint policy is a resource-based policy that you can attach to a VPC endpoint. It can restrict access to IAM entities. If you route your requests through a VPC endpoint, then check for any restrictions coming from the associated VPC endpoint policy.
A session policy is in place and is causing an authorization issue
Session policies can be passed programmatically when you create a temporary session for your IAM role for a federated user. The permissions for a session are at the intersection of the identity-based policies assigned to the IAM entity that the session is created for and the session policy itself. Check if a session policy is passed for your IAM role session using the AWS CloudTrail logs for AssumeRole/AssumeRoleWithSAML/AssumeRoleWithWebIdentity API calls. To check for session policies passed for a federated user session, check CloudTrail logs for GetFederationToken API calls.
Resolving authorization issues for IAM entities with admin permissions
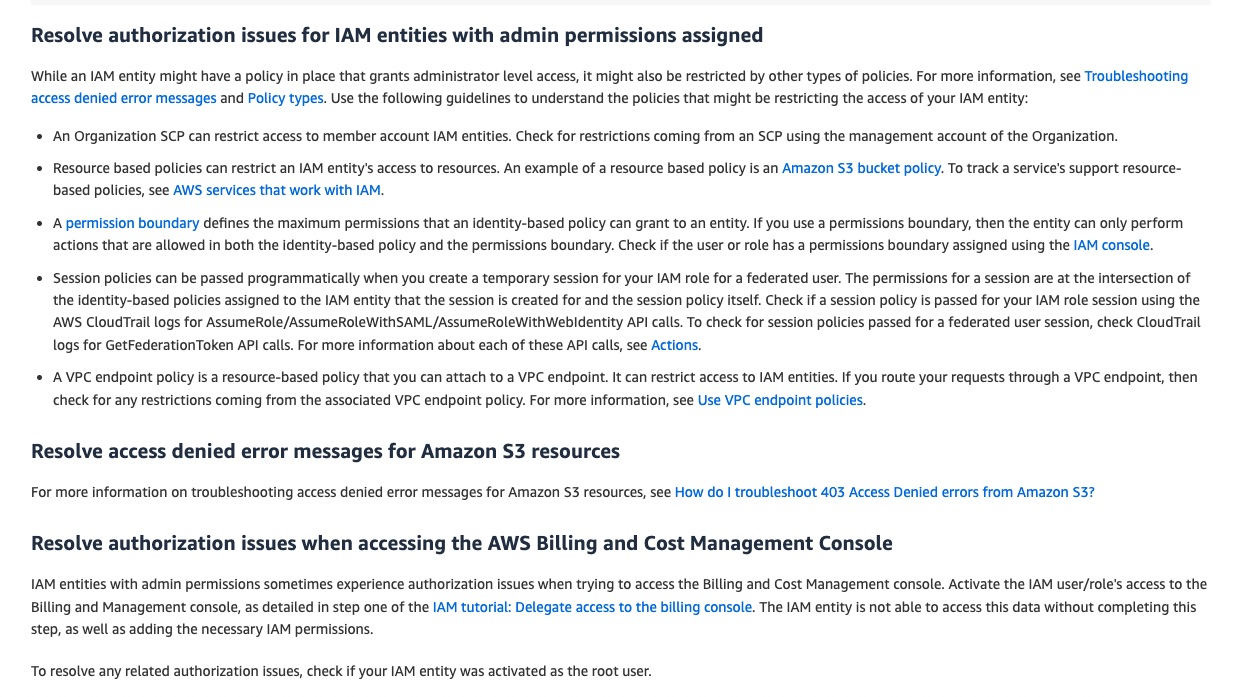
via - https://aws.amazon.com/premiumsupport/knowledge-center/iam-access-denied-root-user/
Incorrect options:
A resource-based policy defines the maximum permissions that an identity-based policy can grant to an entity. Check for any restrictive resource-based policies - A permission boundary defines the maximum permissions that an identity-based policy can grant to an entity, not a resource-based policy. If you use a permissions boundary, then the entity can only perform actions that are allowed in both the identity-based policy and the permissions boundary. So the definition of the resource-based policy is incorrect in this statement.
An Organization NACL can restrict access to member account IAM entities. Check for restrictions coming from an NACL using the management account of the Organization - An Organization has a Service Control Policy (SCP) for restricting access to a service. A Network Access Control List (NACL) is an optional layer of security for a VPC that acts as a firewall for controlling traffic in and out of one or more subnets.
If you use a permissions boundary, then the entity can only perform actions that are allowed in both the identity-based policy and the concerned resource-based policy. Check for any restrictive permissions boundary - A permissions boundary limits the actions your entity can perform. If you use a permissions boundary, then the entity can only perform actions that are allowed in both the identity-based policy and the permissions boundary. So the reference to the resource-based policy is incorrect in this statement.
Evaluating effective permissions with boundaries:
via - https://docs.aws.amazon.com/IAM/latest/UserGuide/access_policies_boundaries.html
References:
https://aws.amazon.com/premiumsupport/knowledge-center/iam-access-denied-root-user/
https://docs.aws.amazon.com/IAM/latest/UserGuide/access_policies_boundaries.html
Domain
Domain 4: Identity and Access Management
Question 17
A company’s cloud operations team is building secure IAM cross-account access between a development account and a production account. The team asks a security engineer to investigate why some developers in the engineering account 210987654321 cannot assume a cross-account IAM role named DataReadRole in the production account 555544443333. The purpose of the role is to read objects from an Amazon S3 bucket named sales-archive-prod in the production account.
The relevant IAM policies are shown below.
Engineering account 210987654321 - Engineering developers group permissions:
{
  "Version": "2012-10-17",
  "Statement": {
    "Effect": "Allow",
    "Action": "sts:AssumeRole",
    "Resource": "arn:aws:iam::555544443333:role/DataReadRole"
  }
}
Production account 555544443333 - DataReadRole permissions policy:
{
  "Version": "2012-10-17",
  "Statement": [
    {
      "Effect": "Allow",
      "Action": "s3:ListAllMyBuckets",
      "Resource": "*"
    },
    {
      "Effect": "Allow",
      "Action": [
        "s3:ListBucket",
        "s3:GetBucketLocation"
      ],
      "Resource": "arn:aws:s3:::sales-archive-prod"
    },
    {
      "Effect": "Allow",
      "Action": "s3:GetObject",
      "Resource": "arn:aws:s3:::sales-archive-prod/*"
    }
  ]
}
Production account 555544443333 - DataReadRole trust relationship:
{
  "Version": "2012-10-17",
  "Statement": [
    {
      "Effect": "Allow",
      "Principal": {
        "AWS": "arn:aws:iam::777766665555:root"
      },
      "Action": "sts:AssumeRole",
      "Condition": {
        "BoolIfExists": {
          "aws:MultiFactorAuthPresent": "true"
        }
      }
    }
  ]
}
Which recommendations should the security engineer make to resolve this issue? (Select two)
-
Ensure that the developers authenticate with multi-factor authentication before they attempt to assume the cross-account role
-
Add an inline policy to the production account role that allows
iam:PassRolefor the engineering developers group -
Ask the developers to reset their passwords and retry the AssumeRole operation from a different browser session
-
Modify the production account role permissions policy to allow the
s3:PutBucketPolicyaction on thesales-archive-prodbucket -
Update the trust relationship on the production account role so it trusts account
210987654321instead of account777766665555
iam:PassRole은 Principal(IAM User, Role)이 자신의 권한을 EC2, Lambda, or ECS 등의 서비스에 전달할 때 필요하다. 문제는 role assumption이나 service role delegation이 아니므로 iam:PassRole과는 상관없다.
Overall explanation
Correct option:
Ensure that the developers authenticate with multi-factor authentication before they attempt to assume the cross-account role
The trust policy on the production account role includes a condition that requires aws:MultiFactorAuthPresent to be true. That means the developers must use MFA when they authenticate before they try to assume the role. If they do not sign in with MFA-backed credentials, the AssumeRole request will fail even if the caller has permission to call sts:AssumeRole.
This is a common cross-account access issue. The caller-side IAM policy and the target role trust policy must both allow the request, and any conditions in the trust policy must also be satisfied. Here, MFA is one of those conditions, so the developers must use MFA to meet the trust policy requirement.
Update the trust relationship on the production account role so it trusts account 210987654321 instead of account 777766665555
The trust relationship on the target role is configured incorrectly. It currently trusts account 777766665555, but the developers are in account 210987654321. Because the trust policy points to the wrong AWS account, principals from the engineering account are not trusted to assume the role.
Cross-account role assumption requires the caller to have sts:AssumeRole permission on the role and the target role to trust the caller’s account or principal. The developers group already has permission to call sts:AssumeRole on arn:aws:iam::555544443333:role/DataReadRole, so the remaining trust-side fix is to update the trust policy to reference the correct source account.
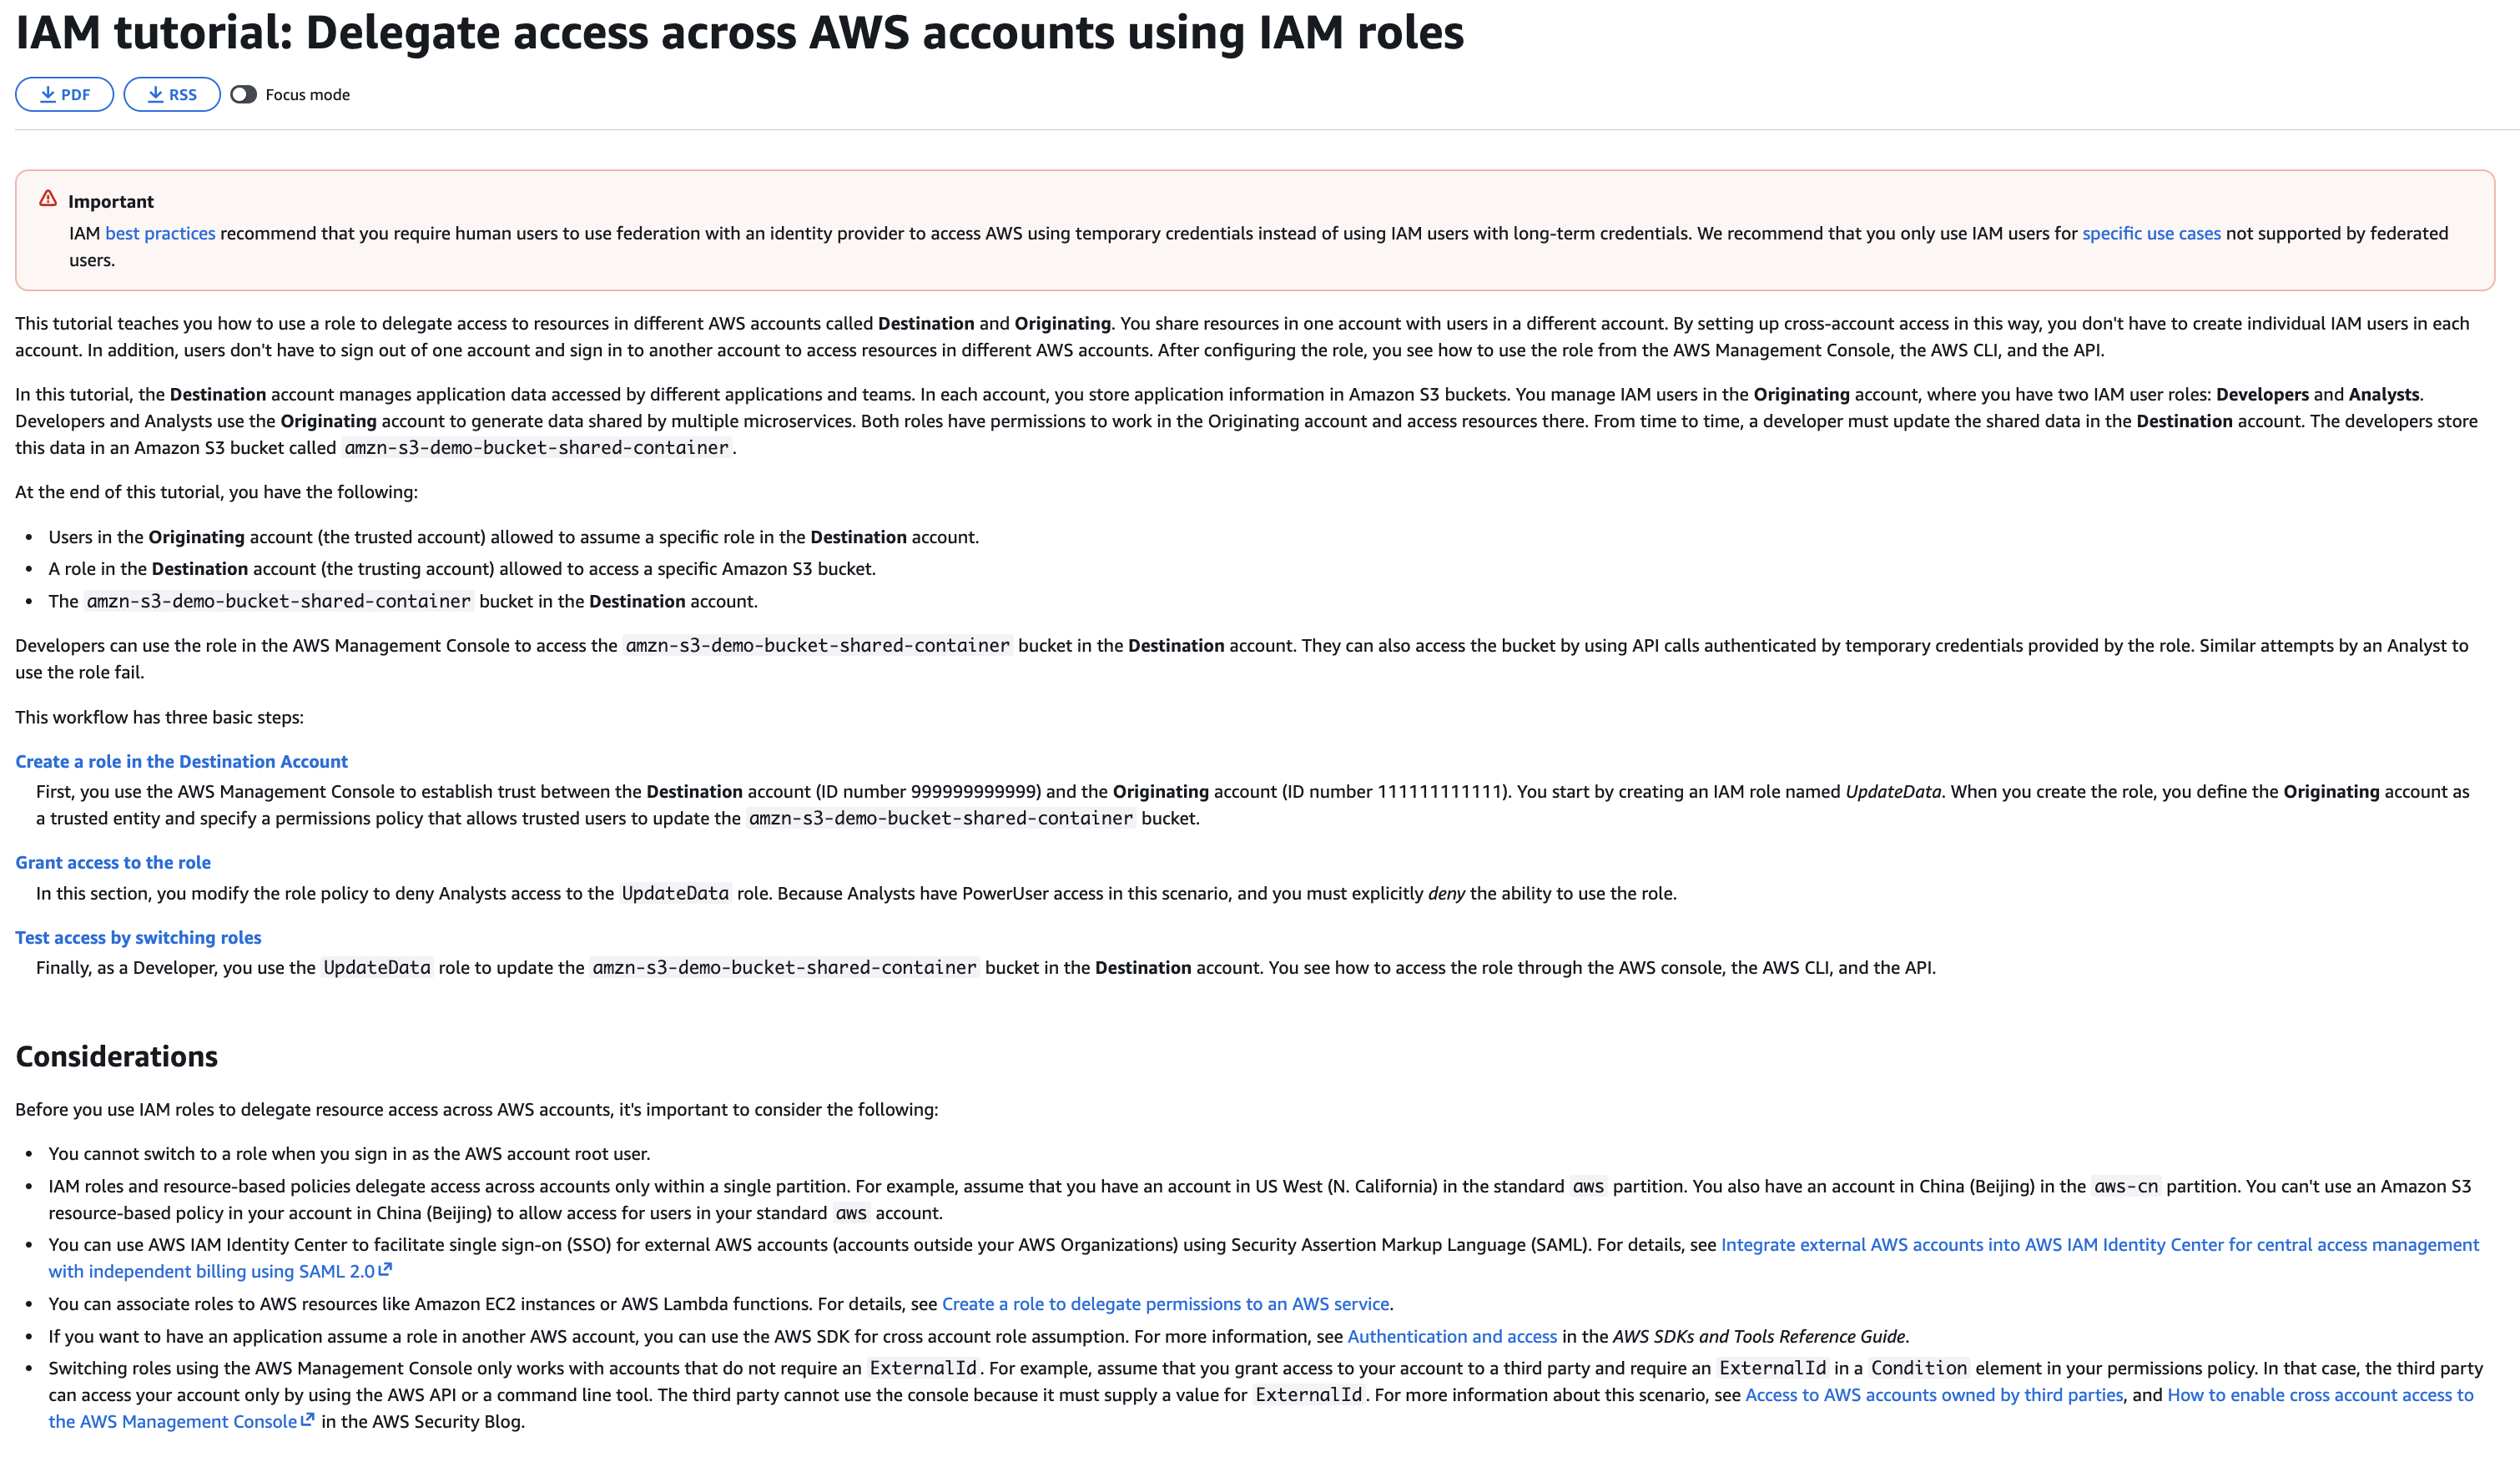
via - https://docs.aws.amazon.com/IAM/latest/UserGuide/tutorial_cross-account-with-roles.html
Incorrect options:
Ask the developers to reset their passwords and retry the AssumeRole operation from a different browser session - Resetting passwords or changing browsers does not address the IAM policy problem shown in the question. The failure is caused by trust-policy and MFA requirements, not by a browser or password issue. This distractor sounds plausible for a generic sign-in problem, but role assumption failures in this scenario are driven by IAM authorization logic. Changing browser state would not correct the wrong trusted account in the trust policy.
Modify the production account role permissions policy to allow the s3:PutBucketPolicy action on the sales-archive-prod bucket - The role already contains the permissions needed for S3 read access, including s3:ListBucket, s3:GetBucketLocation, and s3:GetObject on the target bucket. Adding s3:PutBucketPolicy would not help the developers assume the role. This option also grants an unnecessary administrative permission on the bucket. The stated goal is to read the contents of the bucket, not to manage the bucket policy. Adding that permission would violate least privilege.
Add an inline policy to the production account role that allows iam:PassRole for the engineering developers group - iam:PassRole is used when a principal needs to pass a role to an AWS service such as EC2, Lambda, or ECS. It is not required for a user or role to call sts:AssumeRole on a cross-account IAM role. Because the problem is role assumption and not service role delegation, adding iam:PassRole would not solve the access issue. It would only add unnecessary permissions.
References:
https://docs.aws.amazon.com/IAM/latest/UserGuide/tutorial_cross-account-with-roles.html
https://docs.aws.amazon.com/STS/latest/APIReference/API_AssumeRole.html
https://docs.aws.amazon.com/IAM/latest/UserGuide/id_credentials_mfa_configure-api-require.html
https://docs.aws.amazon.com/IAM/latest/UserGuide/reference_policies_condition-keys.html
https://docs.aws.amazon.com/IAM/latest/UserGuide/id_roles_use_passrole.html
Domain
Domain 4: Identity and Access Management
Question 18
A company is designing a security monitoring strategy for a sensitive workload running on AWS. The security team has identified multiple monitoring requirements that must be addressed by using appropriate AWS-native capabilities.
Select and arrange the necessary steps from the list below:
-
Use VPC Flow Logs with CloudWatch Logs Insights queries to analyze traffic volume and destination patterns
-
Monitor network traffic for unusual outbound data transfers to external destinations outside business hours
-
Identify repeated failed login attempts from specific IP addresses within a defined time window
-
Automatically quarantine EC2 instances when malware findings are validated
-
Aggregate and correlate findings across multiple AWS security services to identify coordinated attack patterns
-
Detect abnormal spikes in resource deletion activity by privileged users
Which sequence of monitoring steps should the security engineer implement to address these requirements effectively?
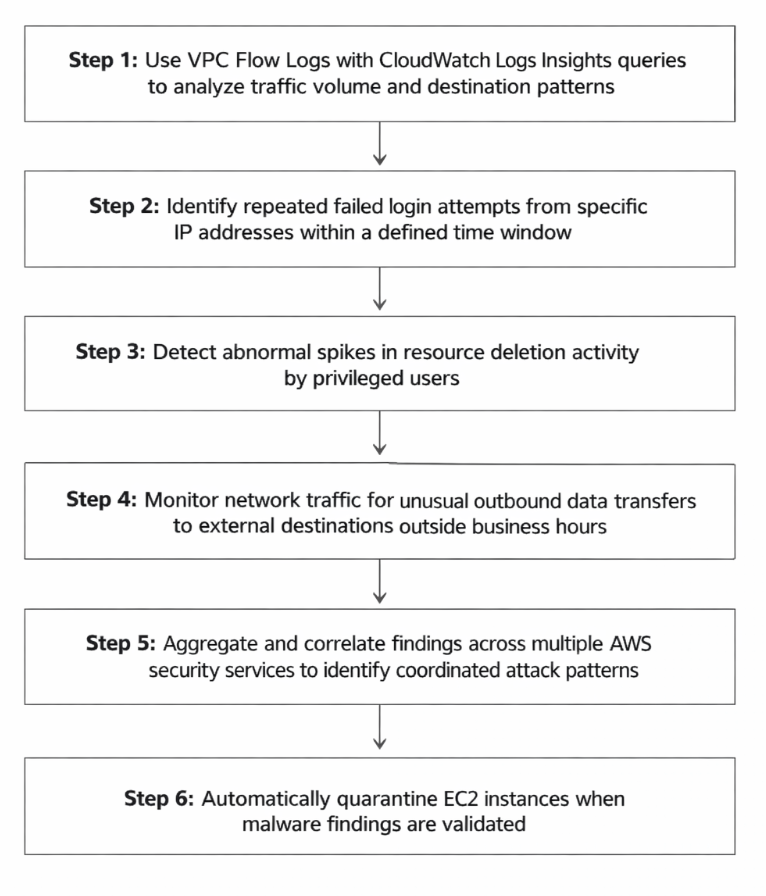
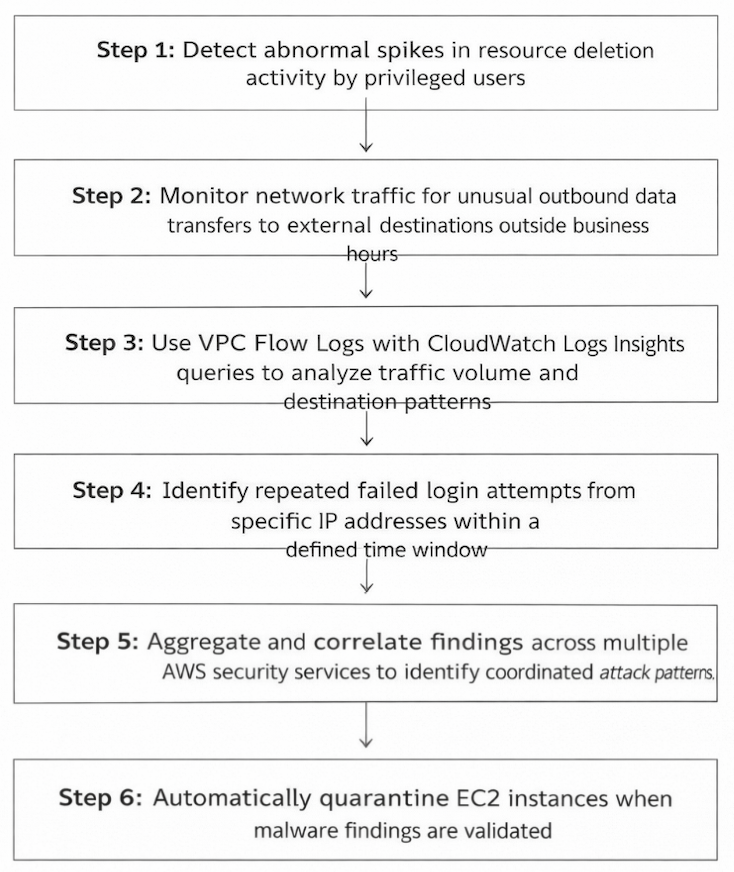
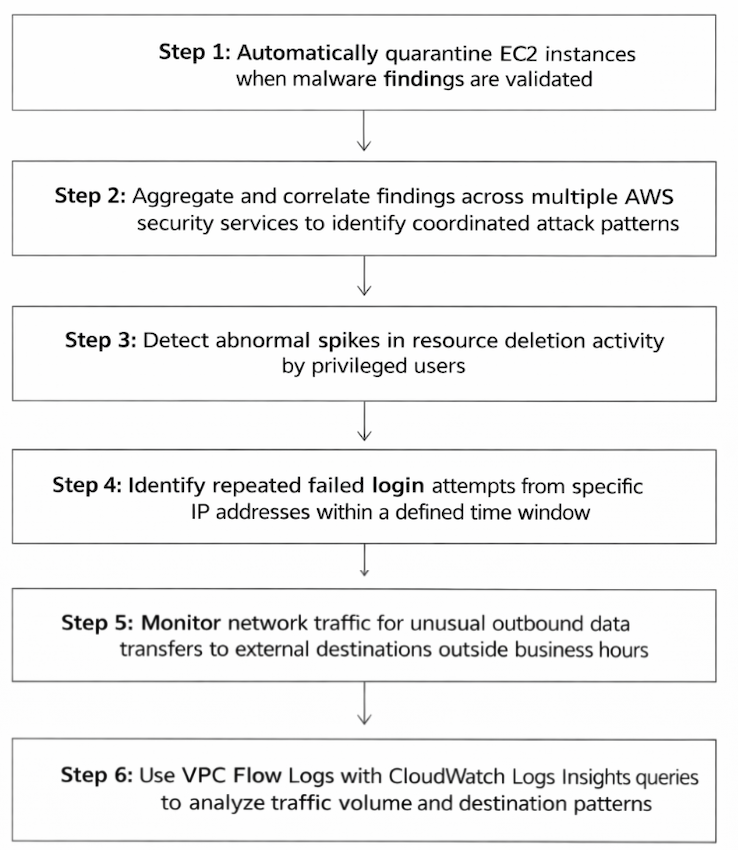
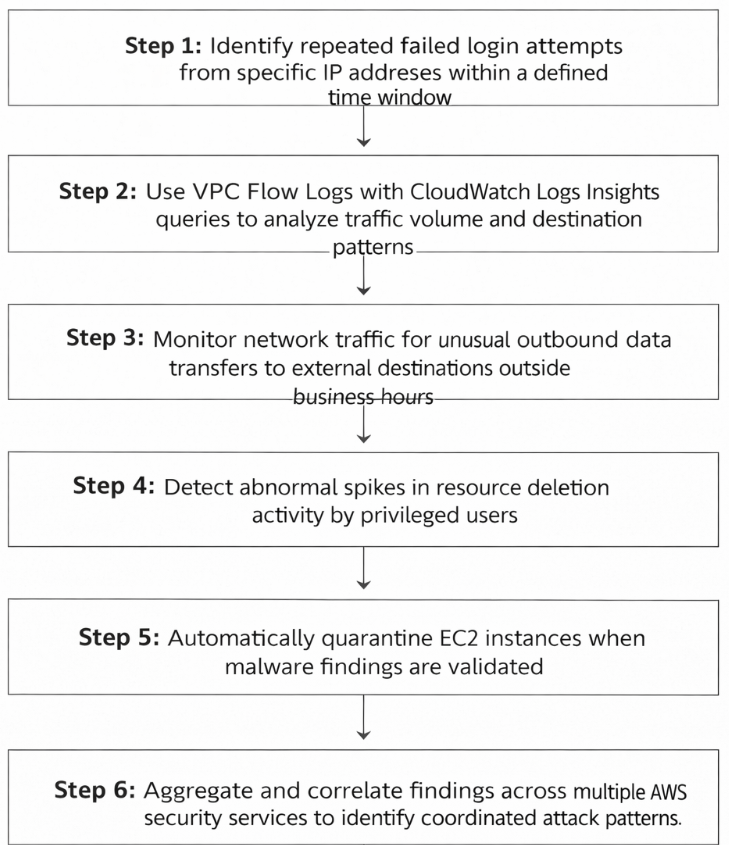
임의의 공격 탐지할 때 설정 순서.. 일단 VPC Flow Logs 켜고 시작하자.
Overall explanation
Correct option:
This sequence follows a structured security lifecycle that begins with establishing visibility, progresses through detection, and ends with response. The first step enables VPC Flow Logs and CloudWatch Logs Insights analysis, which provides baseline network telemetry and helps define normal traffic patterns.
Next, the sequence focuses on detecting early indicators of compromise such as repeated failed authentication attempts and abnormal privileged activity. These signals help identify reconnaissance attempts, brute-force attacks, or misuse of elevated credentials. Monitoring outbound traffic patterns further strengthens detection by identifying potential data exfiltration based on deviations from established baselines.
Finally, correlating findings across AWS services such as GuardDuty and Security Hub enables identification of multi-stage attacks. Once threats are confirmed, automated isolation of EC2 instances ensures rapid containment and minimizes the blast radius. This progression from visibility to detection to response reflects AWS security best practices.
Incorrect options:
- This sequence begins with automated response before establishing visibility or detection capabilities. Isolating resources without prior analysis can lead to false positives and operational disruption.
It also delays foundational steps such as enabling VPC Flow Logs until the end, which prevents effective baseline creation. Without initial telemetry, subsequent detection and correlation steps lack context.
- This option starts with authentication monitoring before establishing baseline network visibility. While detecting failed logins is important, it is not the foundational step in a monitoring strategy.
Additionally, it introduces response actions before correlation. Without correlating findings, automated isolation decisions may not be based on sufficient evidence, reducing the effectiveness of the response.
- This sequence prioritizes privileged activity monitoring and network anomaly detection before enabling baseline visibility through VPC Flow Logs.
It delays foundational telemetry collection, which weakens the accuracy of anomaly detection. Without understanding normal patterns first, identifying deviations becomes unreliable, making the sequence suboptimal.
References:
https://docs.aws.amazon.com/vpc/latest/userguide/flow-logs.html
https://docs.aws.amazon.com/AmazonCloudWatch/latest/logs/CWL_QuerySyntax.html
https://docs.aws.amazon.com/securityhub/latest/userguide/securityhub-findings.html
https://docs.aws.amazon.com/guardduty/latest/ug/guardduty_findings.html
https://docs.aws.amazon.com/awscloudtrail/latest/userguide/cloudtrail-user-guide.html
Domain
Domain 1: Detection
Question 20
A Security Engineer has followed the best practices to set up a trusted IP address list for Amazon GuardDuty. However, GuardDuty is generating alert findings for the configured trusted IP addresses.
Which of the following checks will you perform to ensure GuardDuty works as expected? (Select two)
-
Ensure that IP addresses added in the trusted IP list are publicly routable IPv4 addresses
-
Ensure that multiple trusted IP lists per AWS account per Region have been configured
-
Ensure that the trusted IP lists are uploaded in the same AWS Region as your GuardDuty findings
-
Ensure that the same IP is not enlisted on both a trusted IP list as well as a threat list, as it will be processed by the threat list on priority, thereby resulting in a finding
-
Ensure that in multi-account environments, GuardDuty generates findings for member accounts based on activity that involves IP addresses from the administrator’s trusted IP lists
trusted IP list는 리전당 1개
threat list와 trusted IP list에 동시에 올라가면 trusted로 처리한다.
선택지 잘 읽기.. GuardDuty의 findings는 trusted IP list가 아니라 thread list에서 찾는다. multi-account 환경에서는 administrator의 thread list와 trusted IP list를 참조할 수 있음.
multi-account 환경에서는 GuardDuty administrator(정확히는 delegated administrator) 계정이 관리하는 Threat list와 Trusted IP list/Trusted entity list가 member account들에도 자동으로 적용됩니다. AWS 문서에 따르면 multi-account 환경에서는 오직 GuardDuty administrator account만 list를 관리할 수 있고, 그 설정은 member accounts에 자동 적용됩니다. 그래서 GuardDuty는 administrator 계정의 threat source를 기준으로 member 계정의 활동에 대해 finding을 생성하고, administrator 계정의 trusted source에 대해서는 finding을 생성하지 않습니다.
multi-account 환경에서는 계정별로 리스트를 관리할 수 없음.
- 리전별로 따로 생성/활성화 필요
GuardDuty를 여러 리전에서 쓰면, 각 리전에서 threat list / trusted IP list를 각각 등록하고 활성화해야 합니다. 한 리전 설정이 다른 리전에 자동 전파되지 않습니다. - 멀티 계정이어도 리전 개념은 그대로
GuardDuty의 delegated administrator는 Region별 administrator로 동작하며, 그 리전 안에서 member account들을 관리합니다. 그래서 멀티 계정 환경에서도 결국 리전마다 관리한다고 이해하는 게 맞습니다. - 추가로, AWS는 요즘 entity lists 사용을 권장
GuardDuty는 legacy IP lists(threat/trusted IP lists)도 계속 지원하지만, 현재는 IP뿐 아니라 도메인도 담을 수 있는 entity lists 사용을 권장하고 있습니다. 다만 운영 범위가 Region 단위라는 점은 동일하게 생각하시면 됩니다.
Overall explanation
Correct options:
Ensure that IP addresses added in the trusted IP list are publicly routable IPv4 addresses
Trusted IP lists and threat lists apply only to traffic destined for publicly routable IP addresses. The effects of a list apply to all VPC Flow Log and CloudTrail findings, but do not apply to DNS findings.
Ensure that the trusted IP lists are uploaded in the same AWS Region as your GuardDuty findings
Trusted IP lists and threat lists are account and Region-specific. At any given time, you can have only one uploaded trusted IP list per AWS account per Region. Whereas, you can have up to six uploaded threat lists per AWS account per Region.
AWS suggested best practices to verify the trusted IP list settings:
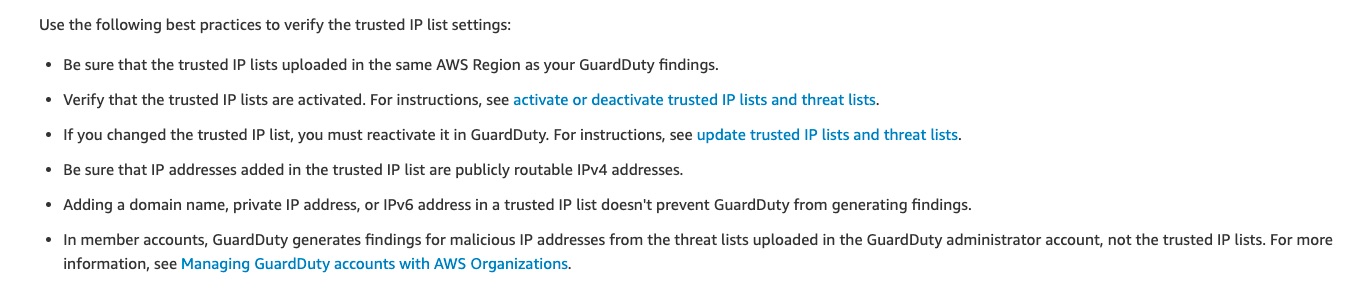
via - https://aws.amazon.com/premiumsupport/knowledge-center/guardduty-trusted-ip-list-alert/
Incorrect options:
Ensure that multiple trusted IP lists per AWS account per Region have been configured - This statement is incorrect. At any given time, you can have only one uploaded trusted IP list per AWS account per Region.
Ensure that in multi-account environments, GuardDuty generates findings for member accounts based on activity that involves IP addresses from the administrator’s trusted IP lists - This statement is incorrect. In multi-account environments, GuardDuty generates findings for member accounts based on activity that involves known malicious IP addresses from the administrator’s threat lists. It does not generate findings based on activity that involves IP addresses from the administrator’s trusted IP lists.
Ensure that the same IP is not enlisted on both a trusted IP list as well as a threat list, as it will be processed by the threat list on priority, thereby resulting in a finding - If you include the same IP on both a trusted IP list and threat list it will be processed by the trusted IP list first, and will not generate a finding.
References:
https://docs.aws.amazon.com/guardduty/latest/ug/guardduty_upload-lists.html
https://aws.amazon.com/premiumsupport/knowledge-center/guardduty-trusted-ip-list-alert/
Domain
Domain 3: Infrastructure Security
Question 22
The security team at a financial services company has received a notification that the resources in the company’s AWS account might be compromised.
What actions would you recommend to handle this issue? (Select three)
-
Use the health check report in AWS Systems Manager (formerly known as SSM) to find out the details about the compromised AWS resources
-
Use Amazon Inspector to detect the compromised resources of your account
-
Use AWS Git projects to scan for evidence of unauthorized use
-
Check your AWS account bill to know the charged resources
-
Rotate and delete all root and AWS Identity and Access Management (IAM) access keys
-
Use AWS Trusted Advisor security check report to find out the details about the compromised AWS resources
SSM은 관리/운영용이지 compromised AWS resources 를 찾는 용도는 아니다.
Amazon Inspector → Inspector는 주로 취약점/노출/소프트웨어 보안 상태 평가 서비스이지, 계정 침해 발생 시 무단 사용 리소스를 식별하는 대표 대응 절차 자체는 아닙니다. 런타임에 발생하는 문제를 찾는 서비스가 아님.
ChatGPT는 4,5,6이 정답이라 그러네.
- 4번 맞음: AWS는 무단 사용 여부 확인을 위해 Billing and Cost Management 콘솔도 보라고 안내합니다.
- 5번 맞음: 침해 의심 시 access key는 회전 또는 삭제가 맞습니다. 다만 실무적으로는 “영향받은 키 우선 폐기”가 더 정확한 표현이지만, 시험 문맥에서는 정답 취지로 보는 게 맞습니다.
- 6번 맞음: Trusted Advisor security check report에 Exposed Access Keys 체크가 있으며, 잠재적 침해 탐지에 직접 연결됩니다.
3번이 오답인 이유
- **문제의 초점은 “이미 계정이 침해되었을 수 있을 때의 대응”**이다. AWS 공식 대응 가이드는 이런 경우 과금/리소스 사용 내역 확인, 의심 자격 증명 회전·삭제, 보안 점검 항목 확인 같은 조치를 우선 권장한다.
- 반면 “AWS Git projects”는 정식 AWS 보안 대응 서비스명이 아니다. AWS의 Git 관련 정식 서비스는 CodeCommit이고, “AWS Git projects”라는 이름의 관리형 서비스가 따로 있는 것은 아니다.
- 이 보기에서 암시하는 건 사실상 AWS Labs의
git-secrets같은 Git 저장소 스캔 도구에 가깝다. 이 도구는 코드 저장소에 비밀정보(AWS access key 등)가 들어갔는지 검사하는 용도지, 현재 계정 안에서 어떤 리소스가 무단 생성·악용되었는지 파악하는 핵심 침해 대응 도구는 아니다.
한 줄 결론
- 3번은 “원인 조사/재발 방지 보조 수단”일 수는 있어도, 문제에서 묻는 계정 침해 대응의 대표 조치가 아니므로 오답.
ECR에서
- Basic scanning: Amazon ECR 자체가 스캔함
- Enhanced scanning: Amazon Inspector가 연동되어 스캔함
“compromised resources의 details를 찾는다”는 표현에 가장 잘 맞는 건 GuardDuty + CloudTrail입니다. GuardDuty는 잠재적 침해 리소스와 자격 증명을 finding으로 식별하고, CloudTrail은 누가 무엇을 했는지 조사하는 로그 소스이기 때문입니다.
하지만 시험문제라면 6번이 의도정답으로 들어갈 수 있다.
왜냐하면 Trusted Advisor가 실제로 Potentially compromised / Exposed / Suspected access key 상태를 보여주고, 무단 사용 여부 및 Billing 확인을 권장하기 때문입니다. 다만 AWS 문서도 이 체크가 “노출 키나 compromised EC2를 보장해서 식별해 주는 것은 아니다” 라고 분명히 한계도 적어둡니다. 그래서 6번 문장은 완전히 정확한 문장이라기보다, 다소 부정확하지만 시험에서는 채택될 수 있는 문장 에 가깝습니다.
Overall explanation
Correct options:
Rotate and delete all root and AWS Identity and Access Management (IAM) access keys
If your application currently uses access keys, you need to replace the existing keys with new ones. To start, create a new access key. Then, modify your application to use the new access key. You can then deactivate the original access keys that your application no longer uses. Verify that there aren’t any issues with your application. If everything works, then you can delete the original access keys.
Check your AWS account bill to know the charged resources
The Bills page of your AWS Management Console lists all charges for all resources on your account. Check your bill for the following:
- AWS services that you don’t normally use
- Resources in AWS Regions that you don’t normally use
- A significant change in the size of your bill
You can use this information to help you to delete or terminate any resources you don’t want to keep.
Use AWS Git projects to scan for evidence of unauthorized use
AWS offers Git projects that you can install to help you protect your account:
-
Git Secrets can scan merges, commits, and commit messages for secret information (that is, access keys). If Git Secrets detects prohibited regular expressions, it can reject those commits from being posted to public repositories.
-
Use AWS Step Functions and AWS Lambda to generate Amazon CloudWatch Events from AWS Health or by AWS Trusted Advisor. If there is evidence that your access keys are exposed, the projects can help you to automatically detect, log, and mitigate the event.
Incorrect options:
Use the health check report in AWS Systems Manager (formerly known as SSM) to find out the details about the compromised AWS resources - AWS Systems Manager (formerly known as SSM) is an AWS service that you can use to view and control your infrastructure on AWS. Systems Manager cannot be used to know if a resource is compromised.
Use AWS Trusted Advisor security check report to find out the details about the compromised AWS resources - AWS Trusted Advisor provides recommendations that help you follow AWS best practices. Trusted Advisor can help improve the security of your AWS environment by suggesting foundational security best practices curated by security experts. Trusted Advisor provides suggestions based on best practices and cannot be used to know if a resource is compromised.
Use Amazon Inspector to detect the compromised resources of your account - Amazon Inspector is an automated vulnerability management service that continually scans Amazon Elastic Compute Cloud (EC2) and container workloads for software vulnerabilities and unintended network exposure. Amazon Inspector removes the operational overhead associated with deploying and configuring a vulnerability management solution by allowing you to deploy Amazon Inspector across all accounts with a single click. Inspector cannot be used to detect the compromised resources of your account.
References:
https://aws.amazon.com/premiumsupport/technology/trusted-advisor/
https://docs.aws.amazon.com/IAM/latest/UserGuide/id_credentials_access-keys.html
https://aws.amazon.com/premiumsupport/knowledge-center/potential-account-compromise/
Domain
Domain 3: Infrastructure Security
Question 24
As a Security Engineer, you received a notification from AWS about suspicious activity in your account. What are the security checks/actions that you will need to perform before responding to the AWS Support Center? (Select three)
-
There is no need to revoke any temporary IAM security credentials
-
Create new access keys and modify the application to use new ones. Deactivate the exposed account access keys immediately. Subsequently, delete the exposed keys only when you have verified the proper functioning of the application
-
If the exposed EC2 instance cannot be shut down, move it to Isolation VPC to contain the expose of other resources while having the ability to keep the instance working
-
To contain access for an IAM principal where an IAM access key has been compromised, the access key can be deactivated or deleted. It is important to note that an IAM principal can have up to five access keys at any given time
-
If you must retain an EC2 instance for regulatory, compliance, or legal reasons, then create an Amazon EBS snapshot before terminating the instance
-
In the IAM console, under the Permissions tab, look for a policy named
AWSCompromisedKeyQuarantineV2. If the user has this policy attached, then update the access keys for the user
AWSCompromisedKeyQuarantineV2라는걸 몰랐다.. 이게뭐지
IAM 사용자(또는 역할)에 대해 “명시적 Deny”가 추가된다고 보면 돼요. 그래서 원래 다른 정책에서 허용돼 있던 권한이 있어도, 이 정책에 적힌 액션은 전부 막힙니다. AWS는 이 정책을 자격 증명이 유출되었거나 침해 의심이 있을 때 피해 확산과 부정 과금을 줄이기 위한 격리용 정책이라고 설명합니다.
핵심은 “완전 차단”이 아니라 “위험한 액션 위주 차단” 이라는 점이에요.
실무적으로는 그 사용자가 갑자기 이런 행동을 못 하게 됩니다:
- 새 EC2 띄우기
- 새 access key 만들기
- Role/User/Policy 만들어서 권한 키우기
- Lambda에 악성 코드 올리기
- S3 버킷/객체를 읽거나 지우기
- ECR 로그인 토큰 받아서 이미지 pull/push 흐름 시작하기
즉, 침해된 키로 추가 피해를 내는 전형적 수법을 차단하는 효과가 있어요.
중요한 함정도 하나 있어요. 이 정책은 iam:UpdateAccessKey와 iam:DeleteAccessKey도 막습니다. 그래서 해당 사용자가 자기 access key를 스스로 비활성화/삭제하는 것도 막힐 수 있어요. 보통은 별도의 관리자 권한 주체가 그 사용자의 키를 비활성화/삭제/회전해야 합니다.
최근엔 V3도 나왔음. 시험에 AWSCompromisedKeyQuarantineV3가 나올 수 있고 V3는 설명 자체를 “기존 리소스에는 영향을 덜 주면서 unauthorized charges를 줄이기 위한 목적” 이라고 더 명확히 적고 있습니다.
IAM principal은 최대 2개의 access key를 동시에 가질 수 있다. 5개가 아님.
Overall explanation
Correct options:
Create new access keys and modify the application to use new ones. Deactivate the exposed account access keys immediately. Subsequently, delete the exposed keys only when you have verified the proper functioning of the application
- Create a new AWS access key.
- Modify your application to use the new access key.
- Deactivate the original access key. Don’t delete the original access key yet. Deactivate the original access key only.
- Verify that there aren’t any issues with your application. If there are issues, reactivate the original access key temporarily to remediate the problem.
- If your application is fully functional after deactivating the original access key, then delete the original access key.
- Delete the AWS account root user access keys that you no longer need or didn’t create.
If you must retain an EC2 instance for regulatory, compliance, or legal reasons, then create an Amazon EBS snapshot before terminating the instance
Delete any unrecognized or unauthorized resources. If you must keep any resources for investigation, consider backing up those resources. For example, if you must retain an EC2 instance for regulatory, compliance, or legal reasons, then create an Amazon EBS snapshot before terminating the instance.
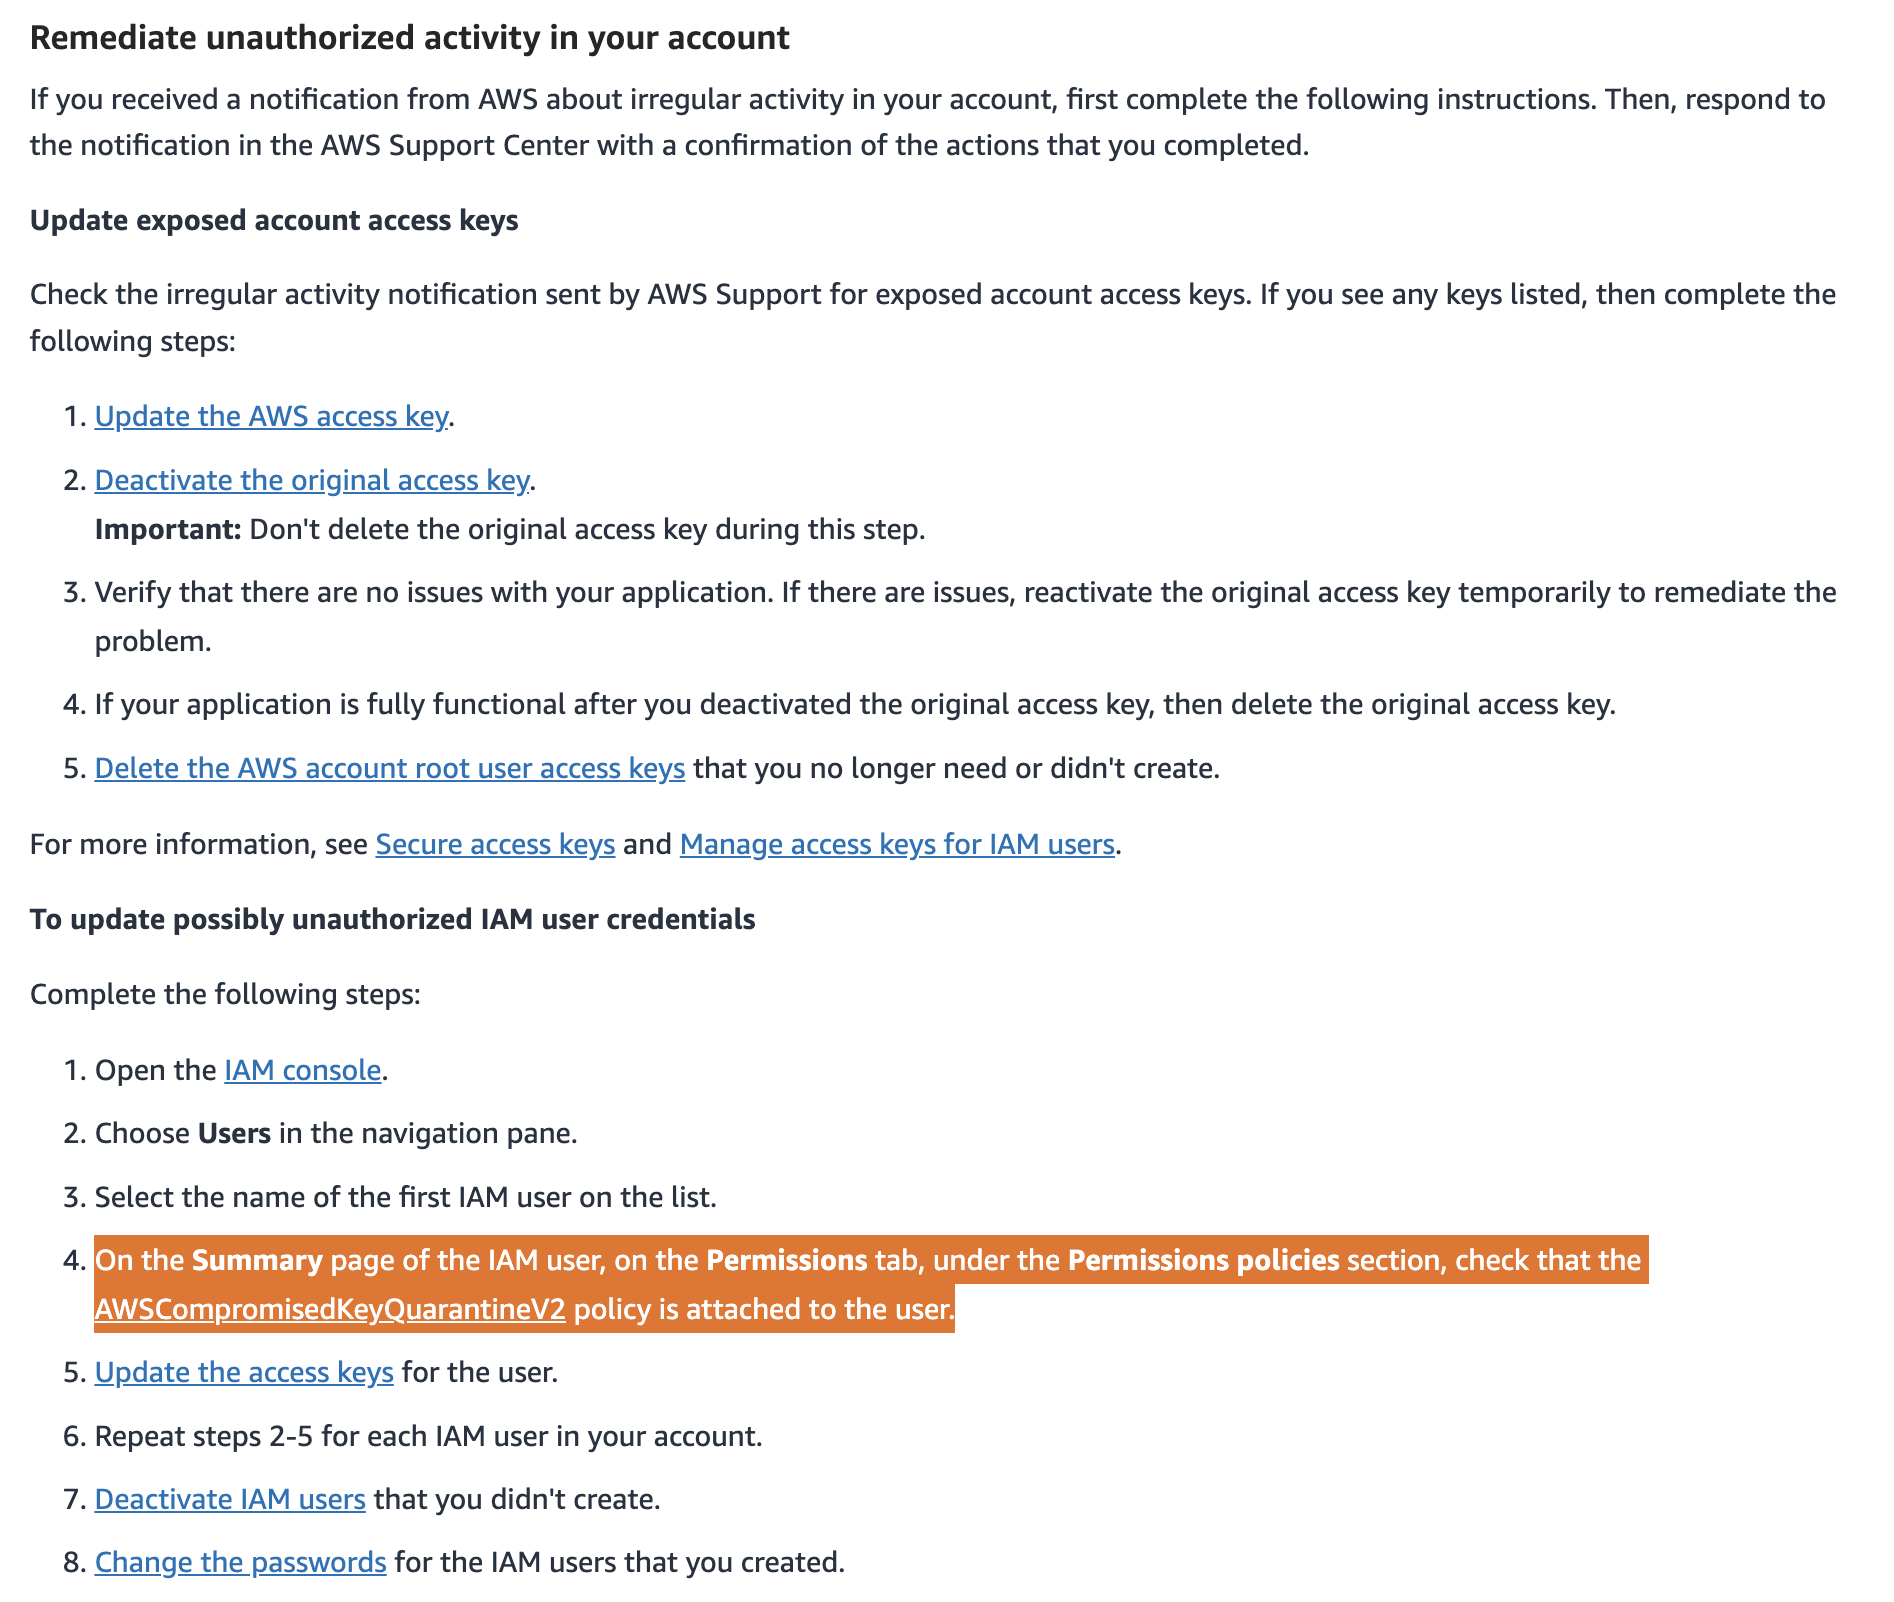
In the IAM console, under the Permissions tab, look for a policy named AWSCompromisedKeyQuarantineV2. If the user has this policy attached, then update the access keys for the user - Update any potentially unauthorized IAM user credentials.
Update any potentially unauthorized IAM user credentials:
via - https://repost.aws/knowledge-center/potential-account-compromise
Incorrect options:
To contain access for an IAM principal where an IAM access key has been compromised, the access key can be deactivated or deleted. It is important to note that an IAM principal can have up to five access keys at any given time - While it is correct that it is necessary to contain access for an IAM principal where an IAM access key has been compromised, an IAM principal can only have up to two access keys at any given time and not five as given in the statement.
If the exposed EC2 instance cannot be shut down, move it to Isolation VPC to contain the exposure of other resources while having the ability to keep the instance working - Isolation VPCs can be used to provide effective containment of resources while providing access to legitimate traffic. Isolation VPCs can be preconfigured in advance of a security event to permit valid IP addresses and ports, and targeted resources can immediately be moved into this isolation VPC during an active security event to contain the resource while allowing legitimate traffic to be sent and received by the targeted resource during subsequent phases of incident response.
An important aspect of using an isolation VPC is that resources, such as EC2 instances, need to be shut down and relaunched in the new isolation VPC before use.
There is no need to revoke any temporary IAM security credentials - Temporary credentials are typically used by IAM roles and do not have to be rotated or explicitly revoked because they have a limited lifetime. In cases where a security event occurs involving a temporary security credential before the temporary security credential expiration, you might need to alter the effective permissions of the existing temporary security credentials. When you permit users to access the AWS Management Console with a long session duration time (such as 12 hours), their temporary credentials do not expire as quickly. If users inadvertently expose their credentials to an unauthorized third-party, that party has access for the duration of the session. However, you can immediately revoke all permissions to the role’s credentials issued before a certain point in time if you need to. All temporary credentials for that role issued before the specified time become invalid. This forces all users to re-authenticate and request new credentials.
References:
https://repost.aws/knowledge-center/potential-account-compromise
Domain
Domain 2: Incident Response
Question 29
A pharmaceutical company is showcasing its new business lines and is promoting them to its partner organizations. These flagship applications are hosted on Amazon EC2 instances. The technology teams at the partner organizations are expected to access these instances for a first-hand understanding of these applications. The EC2 instances will be shared, and non-root SSH access is needed for the teams.
As a Security Engineer, how will you block the EC2 instance metadata service for the given use case to avoid an assault on other AWS account resources?
-
Disable the instance metadata service on all the instances
-
Configure the instance metadata service on each instance so that users must use Instance Metadata Service Version 2 (IMDSv2). The session-oriented methods will not respond to usual request/response queries
-
Install intrusion prevention software (IPS) on each instance to disable access to instance metadata
-
Implement local firewall rules using iptables based restrictions on the instances
2번 오답: IMDSv2는 session-oriented, token-based 방식이라 IMDSv1보다 안전하지만, 인스턴스에 로그인한 사용자가 토큰을 발급받아 IMDSv2를 사용하는 것 자체는 막지 못한다. 즉, “metadata 접근 차단”이 아니라 “metadata 접근 방식 강화”에 가깝다.
로컬 방화벽으로 메타데이터 조회용 ip에 접근하지 못하게 하는 수밖에 없음.
Overall explanation
Correct option:
Implement local firewall rules using iptables based restrictions on the instances
iptables is a command line interface used to set up and maintain tables for the Netfilter firewall for IPv4, included in the Linux kernel. The firewall matches packets with rules defined in these tables and then takes the specified action on a possible match.
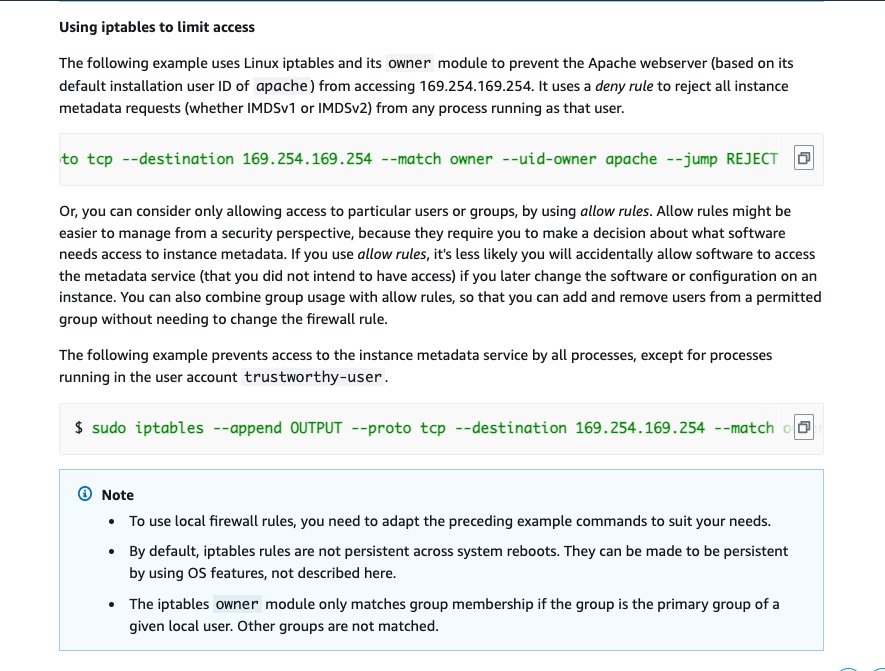
You can consider using local firewall rules to disable access from some or all processes to the instance metadata service. The following example uses Linux iptables and its owner module to prevent the Apache webserver (based on its default installation user ID of apache) from accessing 169.254.169.254. It uses a deny rule to reject all instance metadata requests (whether IMDSv1 or IMDSv2) from any process running as that user.
sudo iptables --append OUTPUT --proto tcp --destination 169.254.169.254 --match owner --uid-owner apache --jump REJECT
The following example prevents access to the instance metadata service by all processes, except for processes running in the user account trustworthy-user.
sudo iptables --append OUTPUT --proto tcp --destination 169.254.169.254 --match owner ! --uid-owner trustworthy-user --jump REJECT
Using iptables to limit access:
via - https://docs.aws.amazon.com/AWSEC2/latest/UserGuide/instancedata-data-retrieval.html
Incorrect options:
Configure the instance metadata service on each instance so that users must use Instance Metadata Service Version 2 (IMDSv2). The session-oriented methods will not respond to usual request/response queries - You can access instance metadata from a running instance using one of the following methods: 1. Instance Metadata Service Version 1 (IMDSv1) – a request/response method 2. Instance Metadata Service Version 2 (IMDSv2) – a session-oriented method
By default, you can use either IMDSv1 or IMDSv2, or both. The instance metadata service distinguishes between IMDSv1 and IMDSv2 requests based on whether, for any given request, either the PUT or GET headers, which are unique to IMDSv2, are present in that request.
This solution will not help block access to instance metadata as needed.
Disable the instance metadata service on all the instances - An application on the instance retrieves the security credentials provided by the role from the instance metadata item iam/security-credentials/role-name. The application is granted the permissions for the actions and resources that you’ve defined for the role through the security credentials associated with the role. Therefore, disabling metadata service can cause applications that use the roles to crash. Hence, this option is incorrect.
Install intrusion prevention software (IPS) on each instance to disable access to instance metadata - EC2 Instance IDS/IPS solutions offer key features to help protect your EC2 instances. This includes alerting administrators of malicious activity and policy violations, as well as identifying and taking action against attacks. This solution is not useful for blocking access to instance metadata.
References:
https://docs.aws.amazon.com/AWSEC2/latest/UserGuide/instancedata-data-retrieval.html
https://docs.aws.amazon.com/AWSEC2/latest/WindowsGuide/configuring-instance-metadata-service.html
https://aws.amazon.com/mp/scenarios/security/ids/
Domain
Domain 3: Infrastructure Security
Question 30
A Security Engineer noticed that an application layer (layer 7) DDoS attack is underway on one of the critical systems.
What should the immediate response of the engineer be to control the damage? (Select two)
-
You can contact the AWS Support Center to get help with mitigations if you’re a Shield Advanced customer
-
Enable Amazon GuardDuty to automatically monitor for malicious activity and block unauthorized access
-
Monitor the CloudWatch metrics: The maximum size of the Auto Scaling group, Amazon EC2 instance’s CPUUtilization and NetworkIn parameters to detect a DDoS attack and send an SNS notification to the security team
-
Define an AWS Systems Manager document (SSM document) to block all vulnerable ports, lock public access to Amazon S3 buckets, and stop internet traffic to affected EC2 instances. Run the SSM using AWS Systems Manager CLI
-
Create your own AWS WAF rules in your web ACL to mitigate the attack
SSM Document에 저런거 없다.
GuardDuty나 ASG는 DDoS공격을 받는중에 대응할만한 조치는 아니다.
Overall explanation
Correct options:
Create your own AWS WAF rules in your web ACL to mitigate the attack
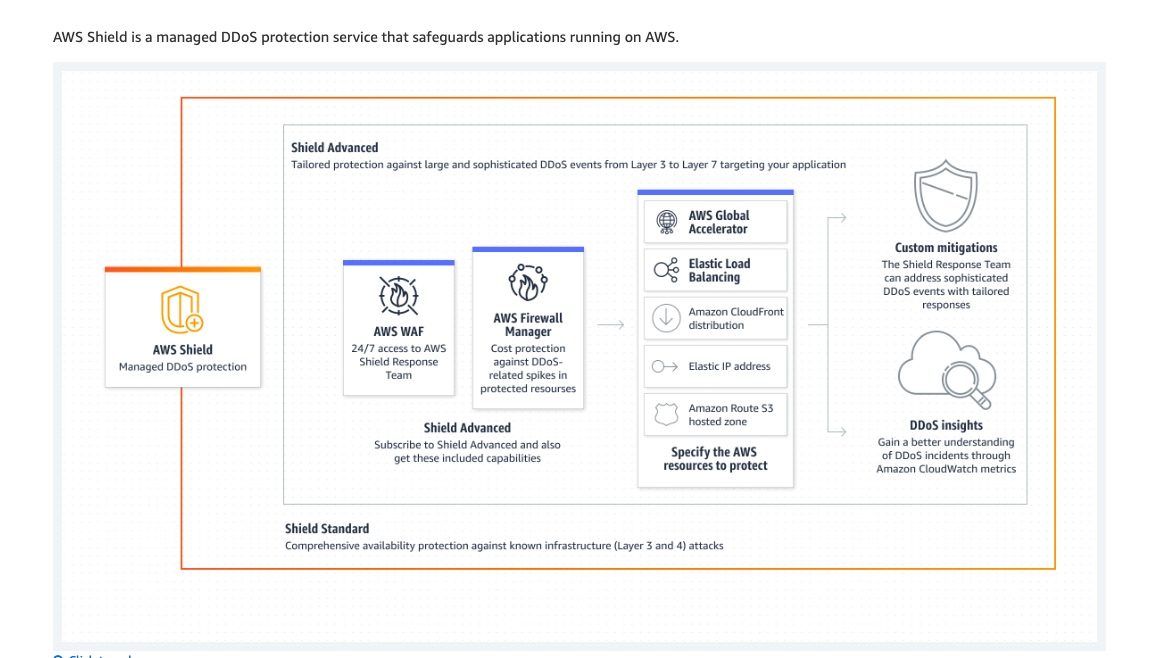
You can contact the AWS Support Center to get help with mitigations if you’re a Shield Advanced customer - AWS automatically mitigates network and transport layer (layer 3 and layer 4) Distributed Denial of Service (DDoS) attacks.
For application layer (layer 7) DDoS attacks, AWS attempts to detect and notify AWS Shield Advanced customers through CloudWatch alarms. By default, it doesn’t automatically apply mitigations, to avoid inadvertently blocking valid user traffic.
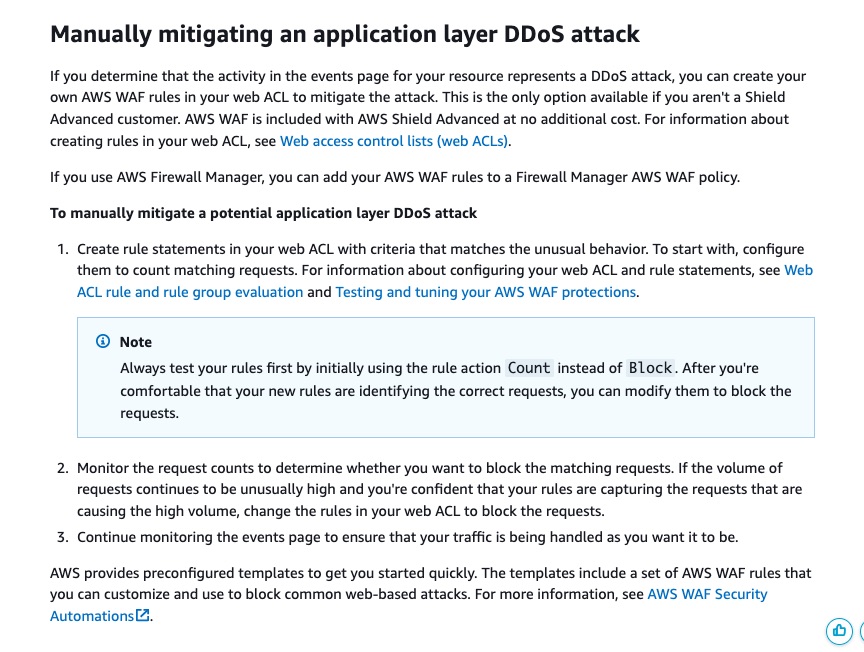
For application layer (layer 7) resources, you have the following options available for responding to an attack. 1. Provide your own mitigations – You can investigate and mitigate the attack on your own. To manually mitigate a potential application layer DDoS attack you can create your own AWS WAF rules in your web ACL to mitigate the attack. This is the only option available if you aren’t a Shield Advanced customer.
- Contact support – If you’re a Shield Advanced customer, you can contact the AWS Support Center to get help with mitigations. Critical and urgent cases are routed directly to DDoS experts.
Manually mitigating an application layer DDoS attack:
via - https://docs.aws.amazon.com/waf/latest/developerguide/ddos-responding.html#ddos-responding-manual
How AWS Shield Advanced works:
via - https://aws.amazon.com/shield/
Incorrect options:
Enable Amazon GuardDuty to automatically monitor for malicious activity and block unauthorized access
Monitor the CloudWatch metrics: The maximum size of the Auto Scaling group, Amazon EC2 instance’s CPUUtilization, and NetworkIn parameters to detect a DDoS attack and send an SNS notification to the security team
These two options can be used to proactively tighten the security of AWS infrastructure. But, these are not meant to be used as immediate responses when a DDos attack is underway.
Define an AWS Systems Manager document (SSM document) to block all vulnerable ports, lock public access to Amazon S3 buckets and stop internet traffic to affected EC2 instances. Run the SSM using AWS Systems Manager CLI - This is a made-up option, given only as a distractor.
References:
https://docs.aws.amazon.com/waf/latest/developerguide/ddos-responding.html
https://docs.aws.amazon.com/waf/latest/developerguide/ddos-responding.html#ddos-responding-manual
Domain
Domain 2: Incident Response
Question 33
The security team at a company has set up an IAM user with full permissions for the EC2 service, yet the user is unable to start an Amazon EC2 instance after it was stopped for maintenance purposes. The instance would change its state to “Pending” but would eventually switch back to “Stopped” with the error “client error on launch”. Upon investigating the issue, it was discovered that the EC2 instance had attached Amazon EBS volumes that were encrypted using a Customer Master Key (CMK). Detaching the encrypted volumes from the EC2 instance resolved the issue and allowed the user to start the instance successfully.
Following is a snippet of the existing IAM user policy:
{
    "Version": "2012-10-17",
    "Statement": [
        {
            "Effect": "Allow",
            "Action": [
                    <action>
            ],
            "Resource": "arn:aws:kms:<region>:<accountId>:key/kms-encryption-key-for-ebs",
            "Condition": <condition>
        }
    ]
}
You have been tasked to build a solution to fix this issue. What do you recommend? (Select two)
-
Add the <action> as
kms:CreateKeyto the IAM user policy -
Add the <action> as
kms:CreateGrantto the IAM user policy -
Add the condition as
{ "Bool": { "kms:ViaService": "ec2.<region>.amazonaws.com"}to the IAM user policy -
Add the condition as
{ "Bool": { "kms:GrantIsForAWSResource": true }to the IAM user policy -
Add the <action> as
kms:DescribeKeyto the IAM user policy
지금 케이스는 “EC2 권한 부족”이 아니라, EBS를 암호화한 KMS 키를 EC2가 대신 쓰도록 허용하는 KMS 권한 부족 문제로 보입니다. 핵심은 kms:CreateGrant 쪽입니다.
정답: 2번, 4번
포인트: encrypted EBS volume을 붙인 EC2를 시작하려면 KMS key에 대해 kms:CreateGrant가 필요하고, least privilege를 위해 kms:GrantIsForAWSResource=true 조건을 건다.
- 1
kms:CreateKey: 새 키를 만드는 권한일 뿐, 기존 EBS 암호화 키를 써서 인스턴스를 시작하는 문제 해결과는 무관합니다. - 3
kms:ViaService를 Bool로 쓰는 조건:kms:ViaService는 AWS KMS 문서상 String 조건 키이며, 예시도StringEquals로 사용합니다. 문제 보기처럼Bool로 넣는 것은 맞지 않습니다. - 5
kms:DescribeKey: 실제 운영 정책에서는 EBS 암호화 사용에 필요한 권한 목록에 포함되지만, 이 문제처럼 “두 개만” 고르는 보기에서는 launch failure를 해결하는 핵심 조합으로 보기는 어렵고, AWS가 EBS 관련 최소 권한 예시로 직접 강조하는 것은CreateGrant + GrantIsForAWSResource입니다. EBS 문서에는DescribeKey도 필요 권한 목록에 들어가 있습니다.
아.. 3번은 그냥 타입 자체가 틀렸네. 긴가민가 할 때는 선택지 자체가 잘못되진 않았는지 확인하자.
Overall explanation
Correct options:
Add the <action> as kms:CreateGrant to the IAM user policy
This issue occurs with EC2 instances with encrypted volumes attached if:
The AWS Key Management Service (AWS KMS) or an AWS Identity and Access Management (IAM) user launching the instances doesn’t have the required permissions. The KMS key usage is restricted by the SourceIp condition key. The IAM user must have permission from AWS KMS to decrypt the AWS KMS key.
You should note that the default KMS key policy gives the AWS account that owns the KMS key permission to use IAM policies to allow access to all AWS KMS operations on the KMS key. To allow access to decrypt a KMS key, you must use the key policy with IAM policies or grants. IAM policies alone aren’t sufficient to allow access to a KMS key, but you can use them in combination with a KMS key’s policy (which is the default key policy in this case).
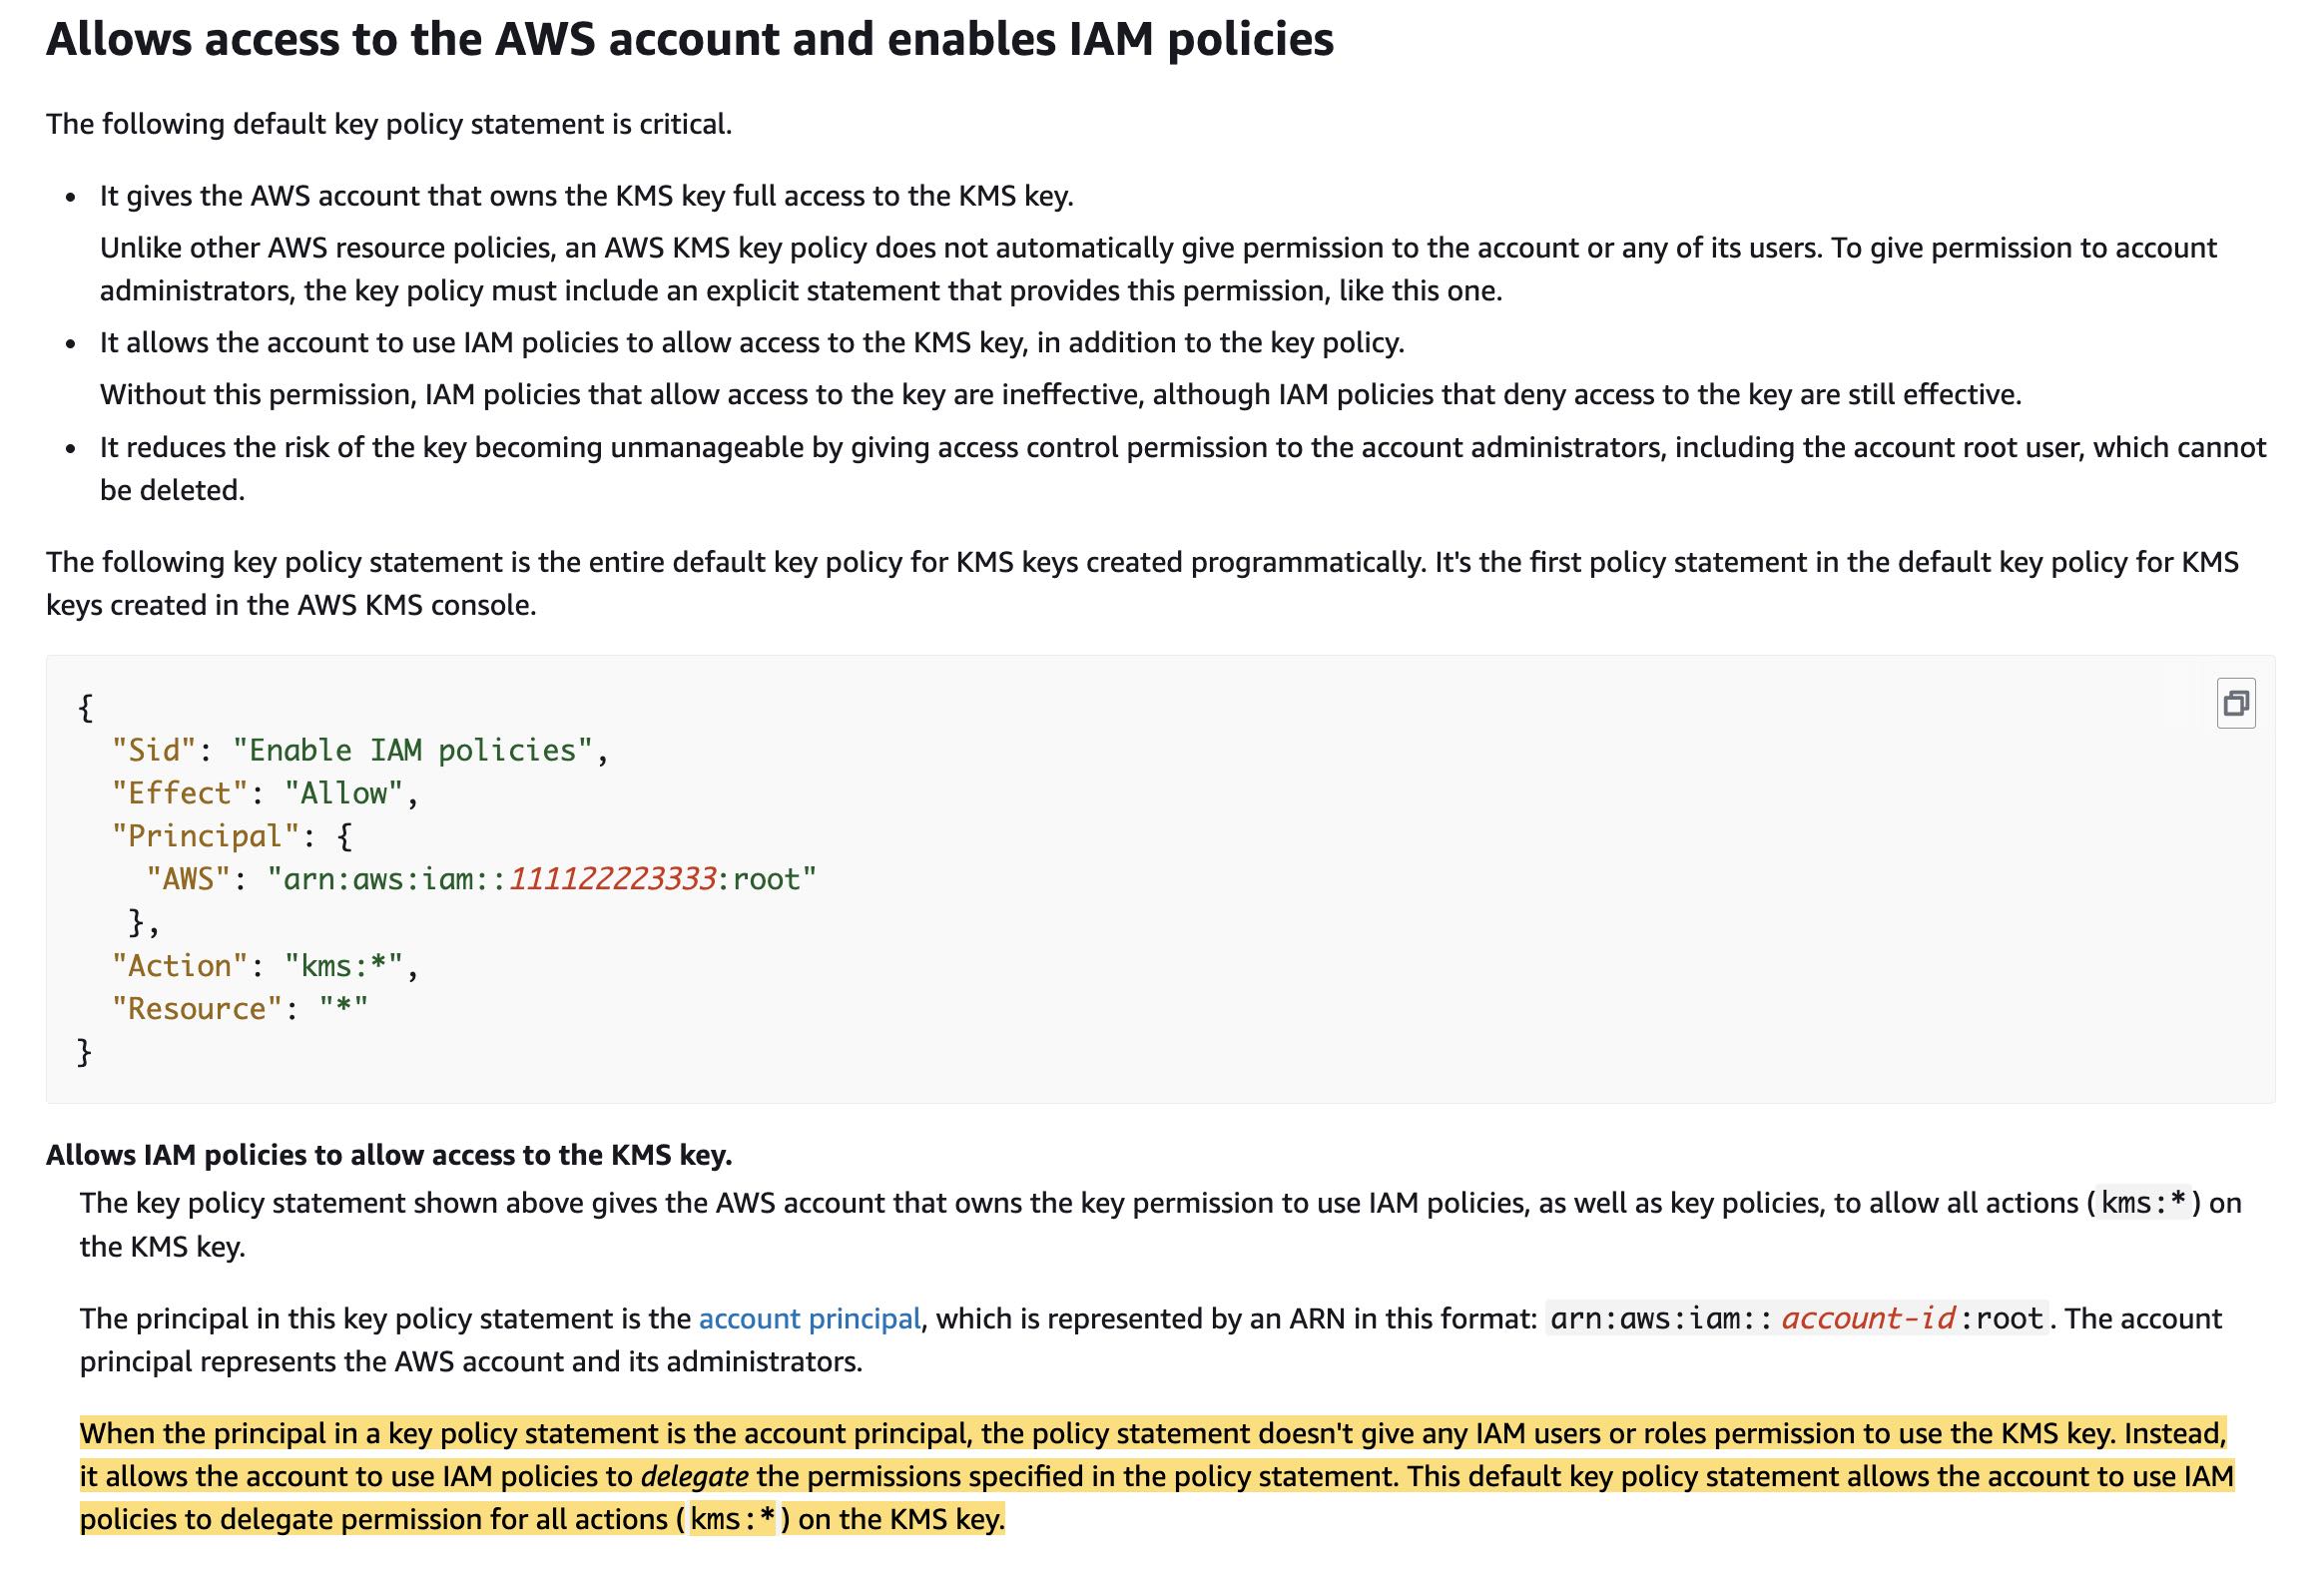
via - https://docs.aws.amazon.com/kms/latest/developerguide/key-policy-default.html
Add the condition as { "Bool": { "kms:GrantIsForAWSResource": true } to the IAM user policy
The condition kms:GrantIsForAWSResource allows or denies permission for the CreateGrant, ListGrants, or RevokeGrant operations only when an AWS service integrated with AWS KMS calls the operation on the user’s behalf. This policy condition doesn’t allow the user to call these grant operations directly. This policy condition can be applied to Key policies as well as IAM policies.
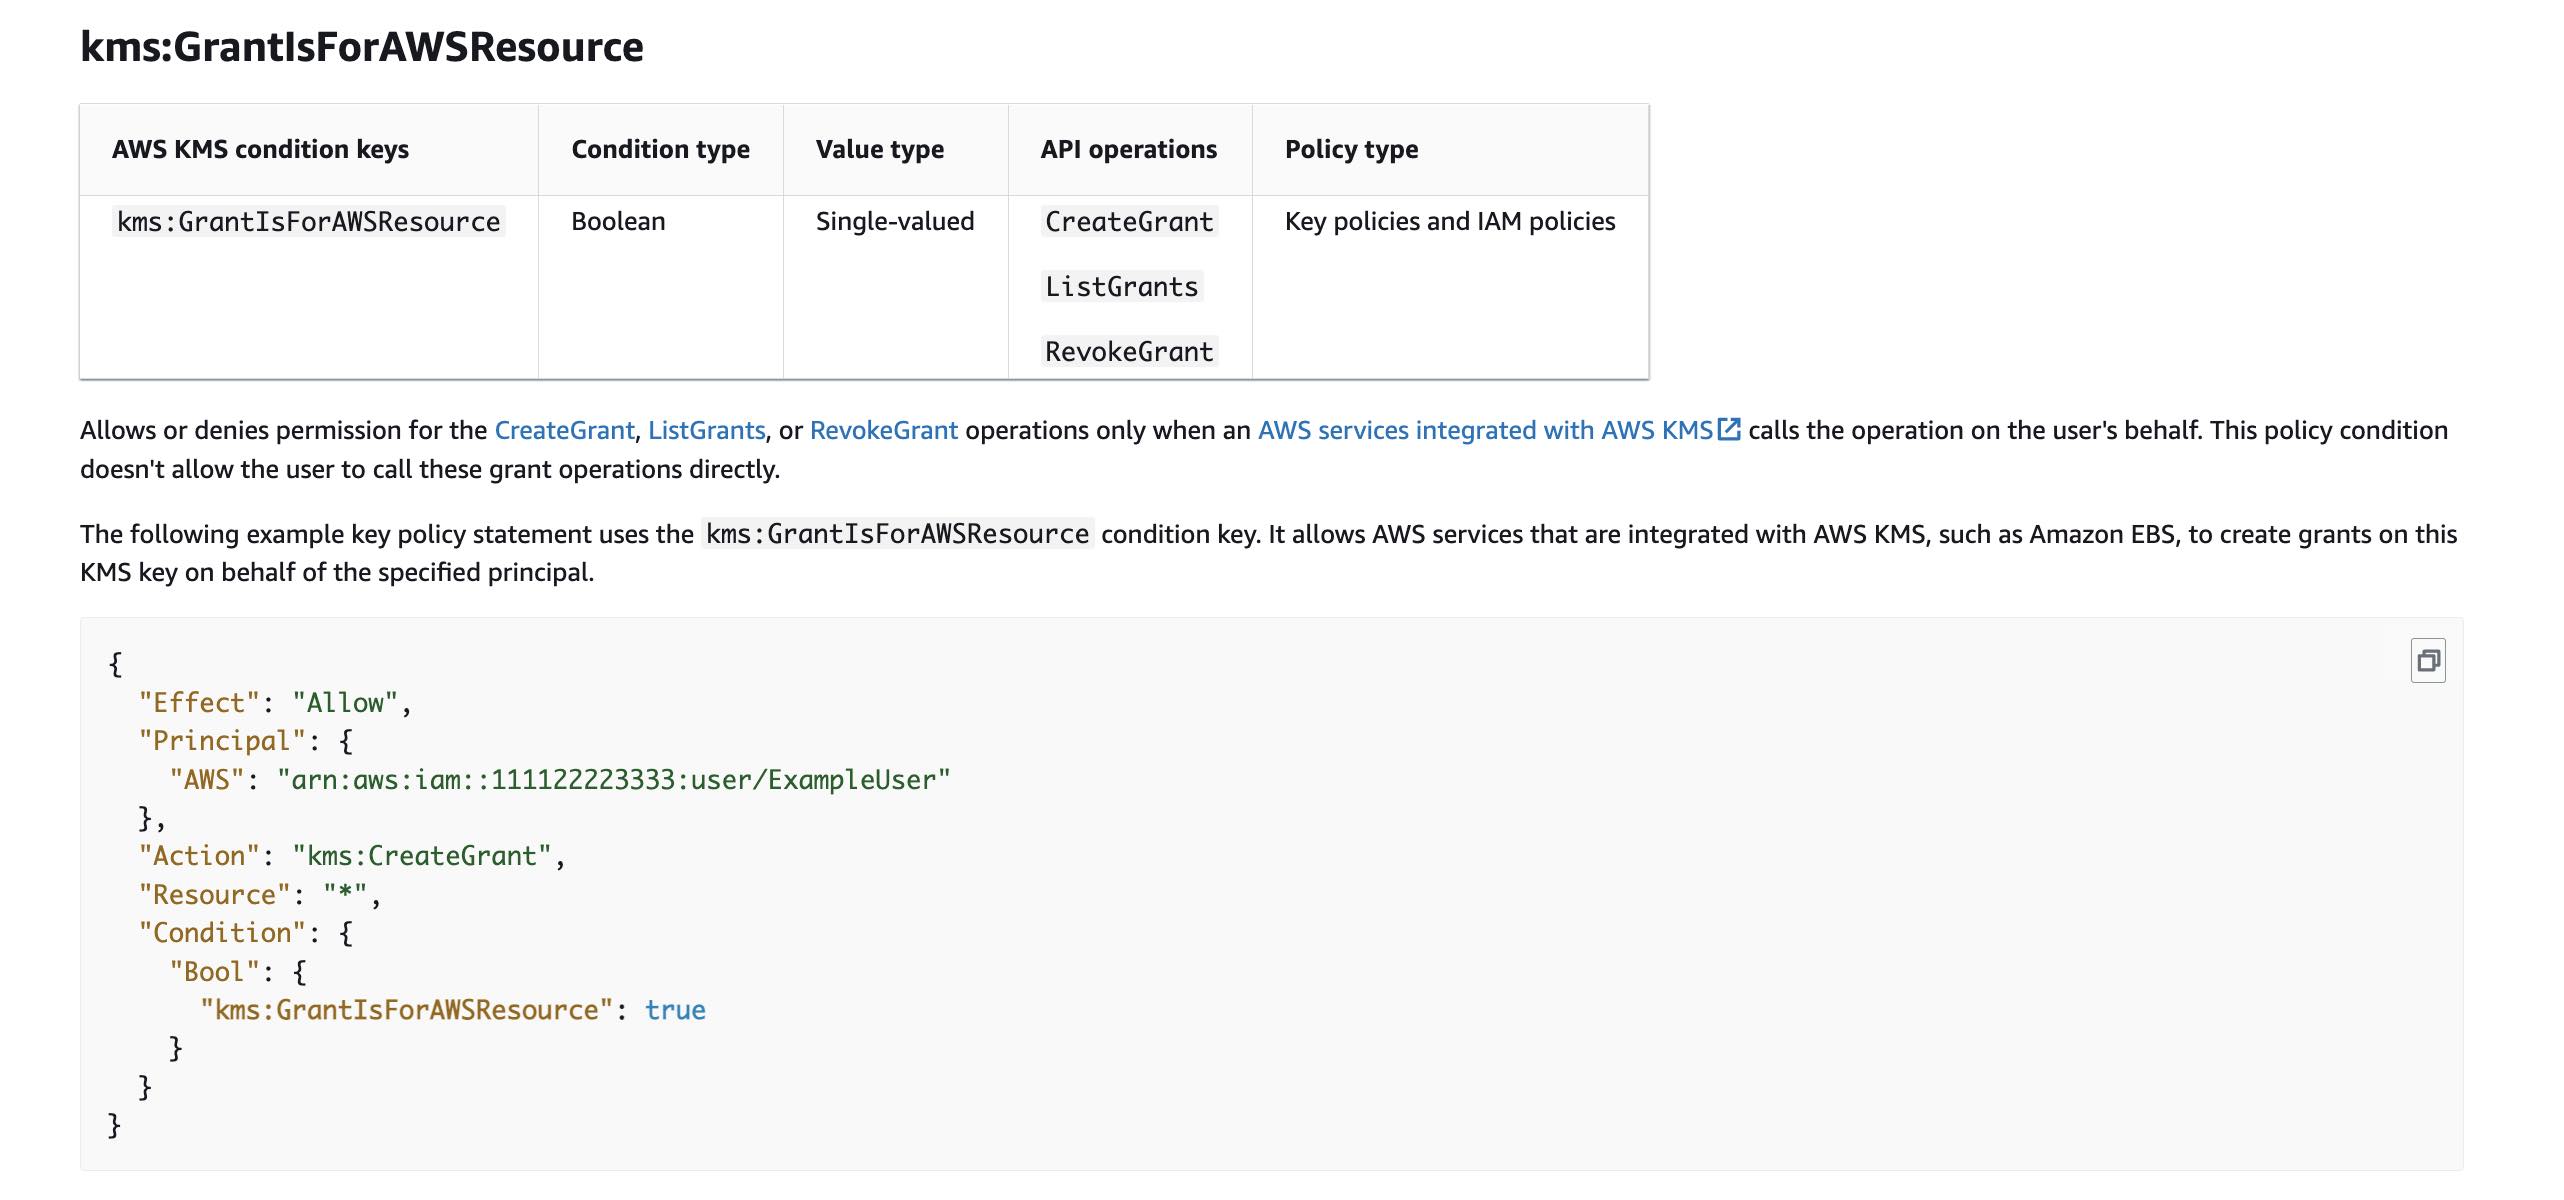
Incorrect options:
Add the <action> as kms:DescribeKey to the IAM user policy - kms:EnableKey controls permission to view detailed information about an AWS KMS key. This option is not relevant to the given use case.
Add the <action> as kms:CreateKey to the IAM user policy - kms:CreateKey controls permission to create an AWS KMS key that can be used to protect data keys and other sensitive information. Since the key is already created, this option is not relevant.
Add the condition as { "Bool": { "kms:ViaService": "ec2.<region>.amazonaws.com"} to the IAM user policy - The kms:ViaService condition key limits the use of a KMS key to requests from specified AWS services. You can specify one or more services in each kms:ViaService condition key. The operation must be a KMS key resource operation, that is, an operation that is authorized for a particular KMS key. This option has been added as a distractor since the issue is with the EBS volumes (and not the EC2 service) that were encrypted using a CMK and the lack of sufficient key-specific grants thereof.
References:
https://aws.amazon.com/premiumsupport/knowledge-center/encrypted-volumes-stops-immediately/
https://docs.aws.amazon.com/kms/latest/developerguide/key-policy-default.html
Domain
Domain 4: Identity and Access Management
Question 37
A Security Engineer received a GuardDuty security alert pertaining to one of the Amazon EC2 instances that is attempting to communicate with the IP address of a remote host known to hold credentials and stolen data captured by malware. The Security Engineer immediately tried to isolate the instance by activating the isolation security group on the instance. However, within a few minutes, the engineer received a similar alert again.
Which of the following represents the underlying reason for this behavior and what is the solution to remediate the issue?
-
When you associate multiple security groups with an instance, rules with deny access need to be mutually exclusive. Delete all the security groups and create only the isolation security group to isolate the compromised instance
-
When the isolation security group is unable to isolate an instance, the immediate fix is to shut down the compromised instance to cut off further damage to your AWS resources
-
When you change a security group rule, its tracked connections are not immediately interrupted. The tracked connections need to be configured to change to untracked connections and then apply the isolation security group to isolate the compromised instance
-
If you send a request from your instance, the response traffic for that request is allowed to flow in regardless of inbound security group rules. Hence, to isolate the instance, cut off Internet Gateway from the instance
Security Group에 따른 tracked connection과 untracked connection을 알아야 한다.
Security Group은 allow만 있다. Security Group에서 deny를 한다는 선택지는 모두 오답.
EC2 보안 그룹은 stateful 이라서, 이미 성립된 tracked connection 은 보안 그룹을 바꿔도 즉시 끊기지 않습니다. AWS 문서에도 “security group rule을 바꿔도 tracked connections are not immediately interrupted” 라고 되어 있고, 기존 연결은 타임아웃될 때까지 계속 패킷이 허용될 수 있다고 나옵니다. 그래서 격리용 security group을 붙였는데도 몇 분 뒤 비슷한 GuardDuty 알림이 다시 올 수 있습니다.
그래서 문제의 underlying reason 은 3번의 앞부분이 맞습니다.
즉, 기존 tracked connection 이 살아 있어서 격리 SG 적용 직후에도 통신이 이어진 것입니다.
다만 remediation 는 AWS 공식 기준으로는 3번의 “tracked connections를 untracked로 바꾼다”가 아니라, Network ACL로 즉시 차단하는 쪽이 맞습니다. AWS는 기존 연결까지 즉시 끊고 싶으면 stateless 한 NACL을 사용하라고 안내합니다. 또한 AWS Incident Response 가이드도 security group 변경만으로는 기존 tracked connection 이 종료되지 않는다고 분명히 말합니다.
- tracked connection 은 “outbound로 시작된 연결만”을 뜻하지 않습니다.
SG가 stateful 이라서, 허용된 inbound의 응답도, 허용된 outbound의 응답도 connection tracking으로 처리될 수 있습니다. AWS 문서도 “instance가 보낸 요청의 응답은 inbound rule과 무관하게 허용”되고, 반대로 “허용된 inbound traffic에 대한 응답도 outbound rule과 무관하게 허용”된다고 설명합니다. - untracked connection 도 “inbound 허용된 IP CIDR이면 다 untracked”가 아닙니다.
AWS 공식 문서상 untracked가 되려면, TCP/UDP flow를 0.0.0.0/0 또는 ::/0로 허용하는 rule 이 한 방향에 있고, 반대 방향에도 모든 응답 트래픽을 any port(0–65535) / 0.0.0.0/0 또는 ::/0 로 허용하는 대응 rule 이 있어야 합니다. 즉, 꽤 넓게 열린 양방향 규칙 조합이어야 untracked가 됩니다.
tracked / untracked의 기준은 “누가 먼저 시작했는가”보다, SG rule 조합이 응답 트래픽을 상태 추적 없이도 허용할 만큼 넓게 열려 있는가”입니다.
SG 변경 후에도 기존 tracked connection은 안 끊길 수 있다 → 즉시 격리는 NACL 문제에서 “underlying reason”을 묻고 있으므로 그나마 원인을 정확히 설명한 3번이 답이다.
마지막까지 찜찜하면 가장 덜 틀린 선택지를 고릅니다. 즉, 일부 표현이 거칠어도 핵심 메커니즘이 맞으면, 완전히 방향이 다른 선택지보다 우선입니다.
Overall explanation
Correct option:
When you change a security group rule, its tracked connections are not immediately interrupted. The tracked connections need to be configured to change to untracked connections and then apply the isolation security group to isolate the compromised instance
When you change a security group rule, its tracked connections are not immediately interrupted. The security group continues to allow packets until existing connections time out. To ensure that traffic is immediately interrupted, the tracked connections need to be configured to change to untracked connections and then apply the isolation security group to isolate the instance completely.
An untracked flow of traffic is immediately interrupted if the rule that enables the flow is removed or modified. For example, if you have an open (0.0.0.0/0) outbound rule, and you remove a rule that allows all (0.0.0.0/0) inbound SSH (TCP port 22) traffic to the instance (or modify it such that the connection would no longer be permitted), your existing SSH connections to the instance are immediately dropped. The connection was not previously being tracked, so the change will break the connection. On the other hand, if you have a narrower inbound rule that initially allows an SSH connection (meaning that the connection was tracked), but change that rule to no longer allow new connections from the address of the current SSH client, the existing SSH connection is not interrupted because it is tracked.
There are multiple ways to change tracked connections to being untracked. You can implement the isolation with an existing security group using the following steps:
- Identify the security group of the instance
- Delete all existing rules
- Create a single rule of 0.0.0.0/0 (0-65535) for all traffic in both inbound and outbound rules. This converts all existing and new traffic to being untracked.
- Remove the 0.0.0.0/0 (0-65535) inbound and outbound rules to terminate all connections and isolate the instance.
Security Group level containment:
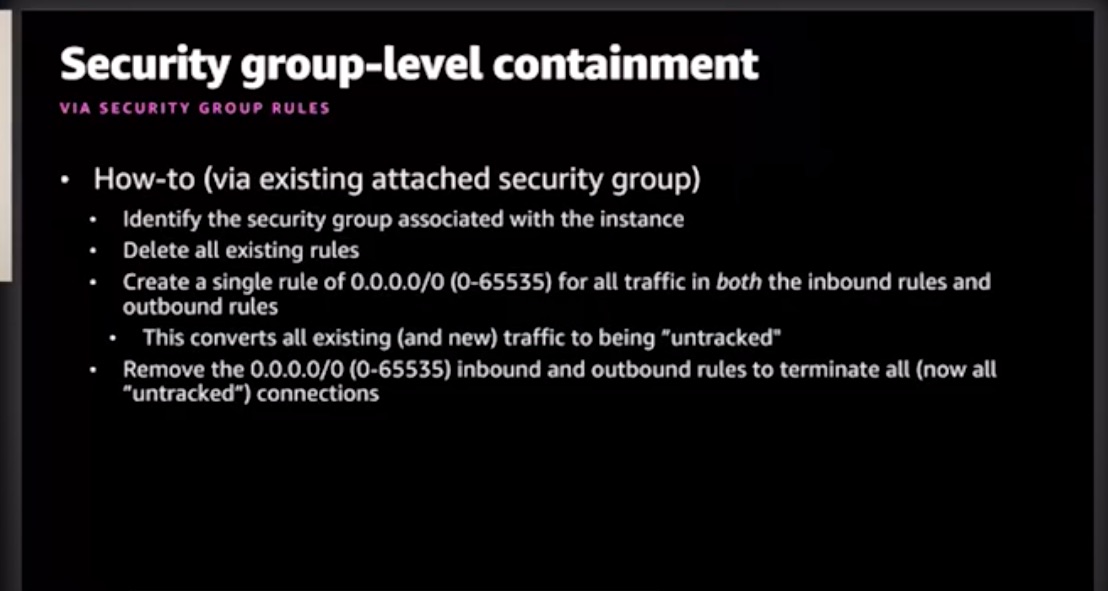
via - https://www.youtube.com/watch?v=pPCuCYrhIyI
Incorrect options:
When you associate multiple security groups with an instance, rules with deny access need to be mutually exclusive. Delete all the security groups and create only the isolation security group to isolate the compromised instance - Security group rules can only allow traffic; you can’t create rules that deny access. Hence, this option is incorrect.
When the isolation security group is unable to isolate an instance, the immediate fix is to shut down the compromised instance to cut off further damage to your AWS resources - Shutting down an instance is the last resort when trying to isolate the compromised instance. The reason is when an instance is shut down all the cache data is lost which is crucial in understanding the security breach that has taken place on the instance and the extent to which AWS resources have been compromised.
If you send a request from your instance, the response traffic for that request is allowed to flow in regardless of inbound security group rules. Hence, to isolate the instance, cut off Internet Gateway from the instance - An internet gateway is a horizontally scaled, redundant, and highly available VPC component that allows communication between your VPC and the internet. An internet gateway enables resources (like EC2 instances) in your public subnets to connect to the internet if the resource has a public IPv4 address or an IPv6 address. Internet Gateway operates at the VPC level and not at the instance level. This option has been added as a distractor.
References:
https://docs.aws.amazon.com/AWSEC2/latest/UserGuide/security-group-connection-tracking.html
https://aws.amazon.com/blogs/security/automate-amazon-ec2-instance-isolation-by-using-tags/
Domain
Domain 2: Incident Response
Question 38
A media company stores all of its business data on Amazon S3 buckets. Since a massive growth in the number of customers has resulted in complicated bucket policies, the company has now hired you as an AWS Certified Security Specialist for simplifying the company’s S3 buckets configuration to facilitate access for the company’s customers as well as other connected applications.
What are the important configuration characteristics to consider while defining access points for the S3 buckets? (Select three)
-
Aliases for S3 Access Points are interchangeable with S3 bucket names. Aliases can be used as a logging destination for AWS CloudTrail logs and S3 server access logs. However, an alias cannot be used in AWS Identity and Access Management (IAM) policies
-
Access points support access over HTTP and HTTPS alone. It does not offer support over TCP and UDP protocols
-
You can’t configure Cross-Region Replication to operate through an access point
-
After you create an access point, you can’t change its virtual private cloud (VPC) configuration from the console anymore. An AWS CLI has to be used for modifying the configuration
-
You can only use access points to perform operations on objects. You can’t use access points to perform Amazon S3 operations, such as modifying or deleting buckets
-
The cross-account access points don’t grant access to data until you are granted permissions from the bucket owner
access point로 Cross-Region Replication을 사용하는건 아님.
Access points는 HTTP 안 됨. HTTPS만 지원.
Access point 생성 완료하면 CLI로도 관련 VPC 설정 안 된다.
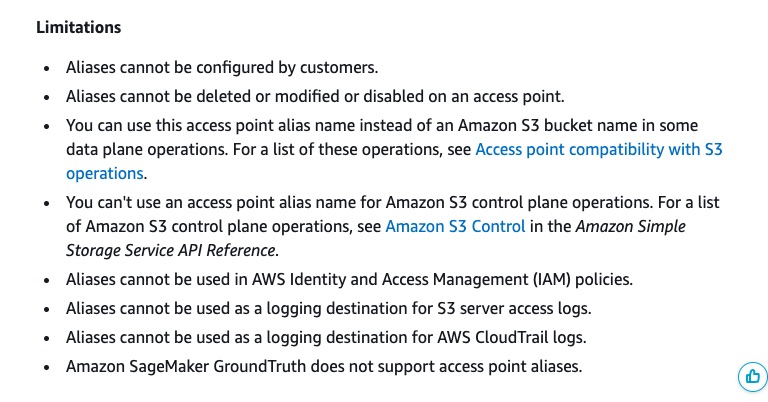
Access Point의 alias로는 로그 관련 안 됨. IAM 관련도 안 됨. data access에만 쓸 수 있음 access point를 생성할 때마다 alias도 자동으로 생성된다.
Access point alias limitations:
Overall explanation
Correct options:
You can only use access points to perform operations on objects. You can’t use access points to perform Amazon S3 operations, such as modifying or deleting buckets - Access points support access only over HTTPS.
The cross-account access points don’t grant access to data until you are granted permissions from the bucket owner - The cross-account access points don’t grant access to data until you are granted permissions from the bucket owner. The bucket owner always retains ultimate control of the data and must update the bucket policy to authorize requests from the cross-account access point.
You can’t configure Cross-Region Replication to operate through an access point - You can’t use an access point as a destination for S3 Replication.
Access points restrictions and limitations:
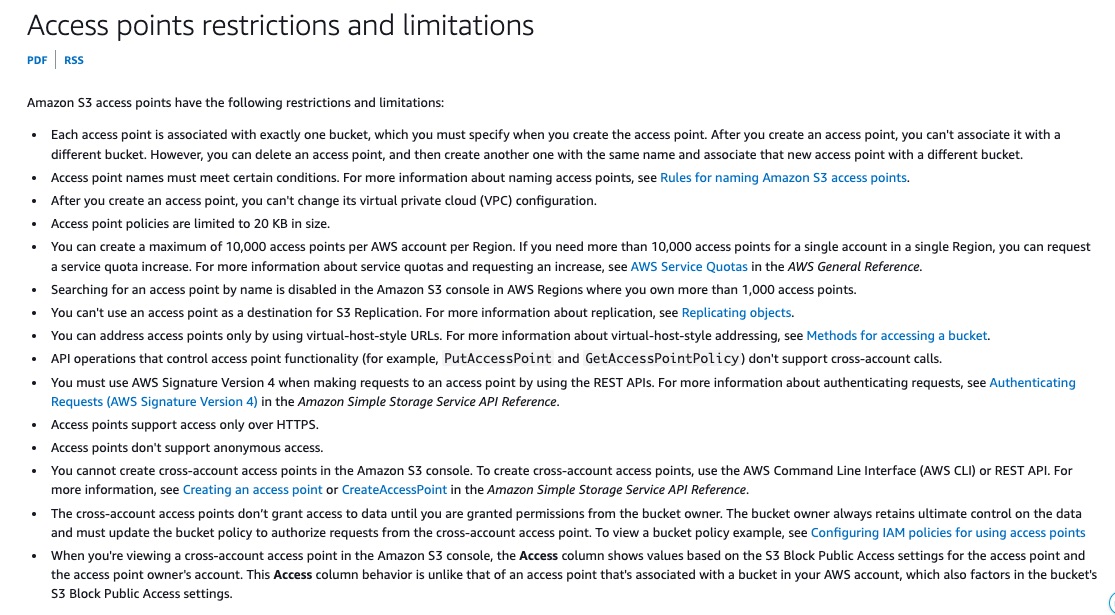
via - https://docs.aws.amazon.com/AmazonS3/latest/userguide/access-points-restrictions-limitations.html
Access point alias limitations:
via - https://docs.aws.amazon.com/AmazonS3/latest/userguide/access-points-alias.html
Incorrect options:
Access points support access over HTTP and HTTPS alone. It does not offer support over TCP and UDP protocols - This statement is incorrect. Access points support access only over HTTPS.
Aliases for S3 Access Points are interchangeable with S3 bucket names. Aliases can be used as a logging destination for AWS CloudTrail logs and S3 server access logs. However, an alias cannot be used in AWS Identity and Access Management (IAM) policies - Aliases for S3 Access Points are automatically generated and are interchangeable with S3 bucket names anywhere you use a bucket name for data access. Every time you create an access point for a bucket, S3 automatically generates a new Access Point Alias.
Aliases cannot be used as a logging destination for S3 server access logs. Aliases cannot be used as a logging destination for AWS CloudTrail logs.
After you create an access point, you can’t change its virtual private cloud (VPC) configuration from the console anymore. An AWS CLI has to be used for modifying the configuration - After you create an access point, you can’t change its virtual private cloud (VPC) configuration.
References:
https://aws.amazon.com/s3/features/access-points/
https://docs.aws.amazon.com/AmazonS3/latest/userguide/access-points-alias.html
Domain
Domain 5: Data Protection
Question 43
After a recent DDoS assault, the IT security team of a media company has asked the Security Engineer to revamp the security of the application to prevent future attacks. The website is hosted on an Amazon EC2 instance and data is maintained on Amazon RDS. A large part of the application data is static and this data is in the form of images.
Which of the following steps can be combined to constitute the revamped security model? (Select two)
-
Use Amazon Route 53 to distribute traffic
-
Move the static content to Amazon S3, and front this with an Amazon CloudFront distribution. Configure another layer of protection by adding AWS Web Application Firewall (AWS WAF) to the CloudFront distribution
-
Configure the Amazon EC2 instance with an Auto Scaling Group (ASG) to scale in case of a DDoS assault. Front the ASG with AWS Web Application Firewall (AWS WAF) for another layer of security
-
Use Global Accelerator to distribute traffic
-
Configure Amazon Inspector with AWS Security Hub to mitigate DDoS attacks by continual scanning that delivers near real-time vulnerability findings
WAF는 Amazon CloudFront, the Application Load Balancer (ALB), Amazon API Gateway, and AWS AppSync에 붙는다. ASG에 붙는게 아니다.
1번 Route 53도 단순 DNS 서비스가 아니라, AWS 문서상 사용자를 리소스로 라우팅하고, 건강 상태 확인과 DNS 계층 가용성 보호에 중요한 역할을 합니다. Route 53은 anycast routing, shuffle sharding, anycast striping 같은 메커니즘으로 DNS query flood 대응력을 높인다고 AWS가 설명합니다. 그래서 “DDoS 이후 보안 모델 개편”이라는 문맥에서 Route 53을 포함하는 설명은 충분히 설득력 있습니다.
Global Accelerator는 틀렸다고 단정할 정도는 아니지만, AWS 문서상 보통 정적 IP가 필요하거나 CloudFront가 적합하지 않은 경우, 또는 TCP/UDP 성격의 애플리케이션에서 더 전형적으로 등장합니다. AWS도 Global Accelerator를 Route 53과 함께 쓰는 예를 보여주지만, 그건 별도 TCP/UDP 앱 예시 쪽에 가깝고, 웹 애플리케이션 예시는 Route 53 + CloudFront + WAF 쪽이 정석입니다.
Overall explanation
Correct options:
Use Amazon Route 53 to distribute traffic
Move the static content to Amazon S3, and front this with an Amazon CloudFront distribution. Configure another layer of protection by adding AWS Web Application Firewall (AWS WAF) to the CloudFront distribution
AWS WAF is a web application firewall that helps protect web applications from attacks by allowing you to configure rules that allow, block, or monitor (count) web requests based on conditions that you define. These conditions include IP addresses, HTTP headers, HTTP body, URI strings, SQL injection, and cross-site scripting.
AWS WAF is tightly integrated with Amazon CloudFront, the Application Load Balancer (ALB), Amazon API Gateway, and AWS AppSync – services that AWS customers commonly use to deliver content for their websites and applications. When you use AWS WAF on Amazon CloudFront, your rules run in all AWS Edge Locations, located around the world close to your end users. Blocked requests are stopped before they reach your web servers.
Route 53 DNS requests and subsequent application traffic routed through CloudFront are inspected inline. Always-on monitoring, anomaly detection, and mitigation against common infrastructure DDoS attacks such as SYN/ACK floods, UDP floods, and reflection attacks are built into both Route 53 and CloudFront.
Route 53 is also designed to withstand DNS query floods, which are real DNS requests that can continue for hours and attempt to exhaust DNS server resources. Route 53 uses shuffle sharding and anycast striping to spread DNS traffic across edge locations and help protect the availability of the service.
When used with Amazon CloudFront distribution, AWS Shield adds security against DDoS attacks.
AWS Shield is a managed Distributed Denial of Service (DDoS) protection service that safeguards applications running on AWS. AWS Shield provides always-on detection and automatic inline mitigations that minimize application downtime and latency, so there is no need to engage AWS Support to benefit from DDoS protection.
All AWS customers benefit from the automatic protections of AWS Shield Standard, at no additional charge. AWS Shield Standard defends against the most common, frequently occurring network and transport layer DDoS attacks that target your website or applications. When you use AWS Shield Standard with Amazon CloudFront and Amazon Route 53, you receive comprehensive availability protection against all known infrastructure (Layer 3 and 4) attacks.
Incorrect options:
Configure the Amazon EC2 instance with an Auto Scaling Group (ASG) to scale in case of a DDoS assault. Front the ASG with AWS Web Application Firewall (AWS WAF) for another layer of security - AWS WAF is tightly integrated with Amazon CloudFront, the Application Load Balancer (ALB), Amazon API Gateway, and AWS AppSync – services that AWS customers commonly use to deliver content for their websites and applications. WAF cannot be directly configured in front of an ASG, so this option is incorrect.
Use Global Accelerator to distribute traffic - Global Accelerator is effective in traffic distribution across AWS Regions. However, the given use case needs services that can help mitigate DDoS attacks.
Configure Amazon Inspector with AWS Security Hub to mitigate DDoS attacks by continual scanning that delivers near real-time vulnerability findings - Amazon Inspector is an automated vulnerability management service that continually scans Amazon Elastic Compute Cloud (EC2) and container workloads for software vulnerabilities and unintended network exposure. It cannot be used to mitigate DDoS attacks.
References:
https://aws.amazon.com/shield/
https://aws.amazon.com/waf/faqs/
Domain
Domain 3: Infrastructure Security
Question 44
The security team at an e-commerce company has noticed that several Amazon Elastic Block Store (Amazon EBS) volumes are not encrypted. These unencrypted EBS volumes are attached to Amazon EC2 instances that are provisioned with an Auto Scaling group and a launch template. You have been hired as an AWS Certified Security Specialist to implement a solution that ensures all EBS volumes are encrypted both now and in the future.
What would you recommend?
-
Configure a new launch template from the existing launch template, such that the encrypted flag for all EBS volumes is set to true in the new launch template. Update the Auto Scaling group to use the new launch template. In due course of time, let the Auto Scaling group replace all the old instances that have unencrypted EBS volumes
-
Leverage the Amazon EC2 console to enable encryption of new EBS volumes by default. Propagate this setting to the Auto Scaling group so it will automatically replace existing instances with new instances
-
Modify the launch template by setting the encrypted flag for all EBS volumes to true. Leverage the Auto Scaling group’s instance refresh feature to replace existing instances with new instances
-
Leverage the Amazon EC2 console to enable encryption of new EBS volumes by default. Leverage the Auto Scaling group’s instance refresh feature to replace existing instances with new instances
‘Auto Scaling group’s instance refresh feature’ 라는게 있구나.
문제에서 ‘encrypted both now and in the future’라고 되어있으므로 현재 암호화되지 않은 EBS도 암호화 해야 함.
launch template은 불변이다. 새로 만들어야 함.
4번: 앞으로 생성되는 볼륨은 기본 암호화로 보호하고, 기존 인스턴스는 instance refresh로 새로 교체하므로 문제 요구사항에 가장 정확히 맞습니다.
EC2 Console에서 새 EBS volume에 암호화를 기본으로 설정할 수도 있고, launch template에도 EBS 암호화 옵션이 있음.
Overall explanation
Correct option:
Leverage the Amazon EC2 console to enable encryption of new EBS volumes by default. Leverage the Auto Scaling group’s instance refresh feature to replace existing instances with new instances
You can configure your AWS account to enforce the encryption of the new EBS volumes and snapshot copies that you create. For example, Amazon EBS encrypts the EBS volumes created when you launch an instance and the snapshots that you copy from an unencrypted snapshot. You should note that encryption by default does not affect existing EBS volumes or snapshots.
via - https://aws.amazon.com/premiumsupport/knowledge-center/lambda-cloudwatch-log-streams-error/
For the given use case, you can use the instance refresh feature of an Auto Scaling group to update the instances in your Auto Scaling group instead of manually replacing instances a few at a time. This can be useful when a configuration change requires you to replace instances, and you have a large number of instances in your Auto Scaling group. Amazon EC2 Auto Scaling starts performing a rolling replacement of the instances. It takes a set of instances out of service, terminates them, and launches a set of instances with the new desired configuration. Then, it waits until the instances pass your health checks and complete warmup before it moves on to replacing other instances.
Incorrect options:
Configure a new launch template from the existing launch template, such that the encrypted flag for all EBS volumes is set to true in the new launch template. Update the Auto Scaling group to use the new launch template. In due course of time, let the Auto Scaling group replace all the existing instances that have unencrypted EBS volumes - Since the given use case requires all EBS volumes to be encrypted both now and in the future, so you cannot let the Auto Scaling group to replace all the existing instances (with unencrypted EBS volumes) in due course of time. Hence this option is incorrect.
Modify the launch template by setting the encrypted flag for all EBS volumes to true. Leverage the Auto Scaling group’s instance refresh feature to replace existing instances with new instances - You cannot modify a launch template, rather you need to create a new version of the launch template and then leverage the Auto Scaling group’s instance refresh feature to replace existing instances with new instances. This option has been added as a distractor.
Leverage the Amazon EC2 console to enable encryption of new EBS volumes by default. Propagate this setting to the Auto Scaling group so it will automatically replace existing instances with new instances - This option acts as a distractor, as there is no such setting in the Auto Scaling group that propagates the automatic encryption of new EBS volumes by default.
References:
https://aws.amazon.com/premiumsupport/knowledge-center/ebs-automatic-encryption/
https://docs.aws.amazon.com/autoscaling/ec2/userguide/asg-instance-refresh.html
https://docs.aws.amazon.com/AWSEC2/latest/UserGuide/manage-launch-template-versions.html
Domain
Domain 5: Data Protection
Question 46
A security engineer has configured trusted IP lists and threat lists on Amazon GuardDuty to monitor the security of the AWS environment. Consider the following scenarios:
a) While configuring the lists the engineer mistakenly added the same IP to both lists. What is the outcome of this configuration?
b) To grant the identities full access (such as renaming, deactivating, uploading, activating, deleting) for working with trusted IP lists and threat lists, which managed policy needs to be added? (Select two)
-
Attach
AWSServiceRoleForAmazonGuardDutypolicy to your IAM entities to provide full access privileges to an identity to work with trusted IP lists and threat lists -
The IP will be processed by the trusted IP list first, and will not generate a finding
-
Attach
AmazonGuardDutyFullAccessmanaged policy to provide full access privileges to an identity to work with trusted IP lists and threat lists -
Attach
AmazonGuardDutyFullAccessmanaged policy to provide full access privileges to an identity to work with trusted IP lists and threat lists. You also need to add the following privileges{ "Effect": "Allow", "Action": [ "iam:PutRolePolicy", "iam:DeleteRolePolicy" ], "Resource": "arn:aws:iam::123456789123:role/aws-service-role/guardduty.amazonaws.com/AWSServiceRoleForAmazonGuardDuty" } -
The IP will be processed by the threat IP list first, and will generate findings
trusted IP list가 threat list보다 먼저다.
AWSServiceRoleForAmazonGuardDuty는 GuardDuty의 service-linked role이고, 그 권한 정책은 다른 IAM 사용자/역할에 붙이는 용도가 아닙니다. 이름 잘 봐 가운데에 ServiceRole 들어간다.
AWS 공식 문서상, 리스트 작업에 대해 “완전한” 권한을 주려면 AmazonGuardDutyFullAccess만으로는 부족하고, 추가로 iam:PutRolePolicy, iam:DeleteRolePolicy 권한이 AWSServiceRoleForAmazonGuardDuty 서비스 연결 역할에 대해 필요합니다. 또한 AWS는 이 권한들이 AmazonGuardDutyFullAccess managed policy에는 포함되지 않는다고 명시합니다. 그래서 보기 중에서는 4번이 맞습니다.
AmazonGuardDutyFullAccess가 붙은 IAM identity는 uploaded trusted IP list / threat list를 rename, deactivate만 할 수 있습니다.- 반면 add, activate, delete, location/name update까지 포함한 완전한 관리 권한을 주려면 추가로
iam:PutRolePolicy,iam:DeleteRolePolicy권한이 필요합니다.
Overall explanation
Correct options:
The IP will be processed by the trusted IP list first, and will not generate a finding
Trusted IP lists consist of IP addresses that you have trusted for secure communication with your AWS infrastructure and applications. GuardDuty does not generate VPC flow logs or CloudTrail findings for IP addresses on trusted IP lists.
Threat lists consist of known malicious IP addresses. This list can be supplied by third-party threat intelligence or created specifically for your organization. In addition to generating findings because of potentially suspicious activity, GuardDuty also generates findings based on these threat lists.
If you include the same IP on both a trusted IP list and a threat list it will be processed by the trusted IP list first, and will not generate a finding.
Attach AmazonGuardDutyFullAccess managed policy to provide full access privileges to an identity to work with trusted IP lists and threat lists. You also need to add the following privileges
{
    "Effect": "Allow",
    "Action": [
        "iam:PutRolePolicy",
        "iam:DeleteRolePolicy"
    ],
    "Resource": "arn:aws:iam::123456789123:role/aws-service-role/guardduty.amazonaws.com/AWSServiceRoleForAmazonGuardDuty"
}
Various IAM identities require special permissions to work with trusted IP lists and threat lists in GuardDuty. Identity with the attached AmazonGuardDutyFullAccess managed policy can only rename and deactivate uploaded trusted IP lists and threat lists.
Permissions required to upload trusted IP lists and threat lists:
via - https://docs.aws.amazon.com/guardduty/latest/ug/guardduty_upload-lists.html
Incorrect options:
The IP will be processed by the threat IP list first, and will generate findings - As explained above, this statement is incorrect.
Attach AmazonGuardDutyFullAccess managed policy to provide full access privileges to an identity to work with trusted IP lists and threat lists - An identity with the attached AmazonGuardDutyFullAccess managed policy can only rename and deactivate uploaded trusted IP lists and threat lists.
Attach AWSServiceRoleForAmazonGuardDuty policy to your IAM entities to provide full access privileges to an identify to work with trusted IP lists and threat lists - This statement is incorrect. You can’t attach AWSServiceRoleForAmazonGuardDuty to your IAM entities. This AWS-managed policy is attached to a service-linked role that allows GuardDuty to perform actions on your behalf.
References:
https://docs.aws.amazon.com/guardduty/latest/ug/guardduty_upload-lists.html
Domain
Domain 3: Infrastructure Security
Question 47
For auditing purposes, a company needs to showcase a report of changes made to the security group(s) for an Amazon Virtual Private Cloud (Amazon VPC).
What are the different ways to review security group changes in an AWS account? (Select three)
-
Configure CloudTrail with CloudWatch Logs to monitor your trail logs and be notified when security group changes occur. CloudTrail supports sending only data events to CloudWatch Logs. Configure Amazon EventBridge to monitor management events
-
Use AWS Config to view configuration history for security groups. You must have the AWS Config configuration recorder turned on
-
Create an AWS CloudTrail trail configured to log to an Amazon Simple Storage Service (Amazon S3) bucket. Use Athena to query CloudTrail Logs over the last 30-45 days
-
Use AWS AppConfig capability of AWS Systems Manager, to create, manage, and quickly deploy application configurations and track changes in them
-
Use CloudTrail Lake to create trails that aggregate information from multiple AWS accounts across regions
-
Use AWS CloudTrail Event history to review security group changes in your AWS account
CloudTrail은 data, Insights, and management events를 CloudWatch Logs에 보낼 수 있다. only data events가 아니다.
“최근 90일은 CloudTrail Event history, 장기 이력은 CloudTrail trail+S3+Athena, 구성 변경 추적은 AWS Config.”
1) AWS Config configuration recorder와 CloudTrail의 차이
- CloudTrail은 “누가, 언제, 어떤 API 호출을 했는지”를 보는 서비스입니다. 예를 들어 보안 그룹에 대해
AuthorizeSecurityGroupIngress,RevokeSecurityGroupEgress같은 API 활동 기록을 남깁니다. 계정에는 기본적으로 Event history(최근 90일의 management events) 가 제공되고, 더 오래 보관하려면 trail을 만들어야 합니다. - AWS Config는 “리소스가 어떤 상태였고, 어떻게 바뀌었는지”를 보는 서비스입니다. 즉 보안 그룹 규칙이 변경 전/후에 어떤 구성(configuration) 이었는지, 다른 리소스와의 관계(relationship) 가 어땠는지 추적합니다. 이때 실제로 변경 이력을 수집하는 구성 요소가 configuration recorder이고, 이 recorder를 켜야 기록이 쌓입니다.
보안 그룹 예시로 보면 더 명확합니다.
- CloudTrail 질문: “누가 10:32에 0.0.0.0/0 SSH 규칙을 추가했나?” → CloudTrail 쪽입니다.
- AWS Config 질문: “그 보안 그룹이 어제 오전에는 어떤 규칙이었고, 지금은 어떻게 달라졌나?” → AWS Config 쪽입니다.
추가로, AWS Config는 지원 대상 리소스에 대해 configuration item(CI) 형태로 변경을 저장하고, 어떤 리소스 타입을 기록할지도 정할 수 있습니다. 기록 시점은 보통 변경 감지 직후이지만 best effort라 약간 지연될 수 있습니다.
2) CloudTrail은 CloudWatch Logs 말고 S3에도 보낼 수 있나?
네. 보낼 수 있는 정도가 아니라, trail의 기본 장기 보관 대상은 S3입니다. CloudTrail에서 trail을 만들면 로그 파일을 S3 버킷으로 전달하고, CloudWatch Logs 전송은 선택 사항으로 추가 설정하는 형태입니다.
정리하면:
- Event history: 기본 제공, 최근 90일 management events 조회용
- Trail + S3: 장기 보관/감사용 기본 패턴
- Trail + CloudWatch Logs: 실시간 모니터링/알람용으로 추가 가능
한 줄로 외우면:
- CloudTrail = 누가/언제/무슨 API를 했나
- AWS Config = 리소스 상태가 전후로 어떻게 바뀌었나
- Trail 로그 저장 = S3가 기본, CloudWatch Logs는 모니터링용 추가 옵션
CloudTrail Lake는 한마디로, CloudTrail 이벤트를 SQL로 검색·분석할 수 있게 해주는 관리형 데이터 레이크입니다. AWS 공식 표현도 “audit and security purposes를 위한 managed data lake”에 가깝습니다.
fyi) AWS Config의 자동 동작에 대해서.
AWS Config는 일단 설정 기록(recording) 과 규칙 평가(evaluation) 는 자동으로 할 수 있습니다.
즉, configuration recorder를 켜 두면 지원 리소스의 생성·변경·삭제를 계속 기록하고, Config Rule이 있으면 리소스 변경 시점이나 주기적으로 자동 평가를 수행합니다. 초기 설정 직후에는 기존 리소스들에 대해 한 번 대량 평가가 돌 수 있습니다.
하지만 수정(remediation) 은 AWS Config가 기본으로 자동 수행하는 게 아닙니다.
비정상(noncompliant) 판정이 나와도, 그냥 두면 “어긋났다”까지만 알려주는 역할이고, 실제 수정은 해당 Rule에 remediation action을 연결하고 auto remediation을 명시적으로 켜야 자동 실행됩니다.
그리고 그 자동 수정도 AWS Config가 혼자 직접 고치는 구조라기보다, 보통 AWS Systems Manager Automation runbook(SSM 문서) 를 호출해서 처리합니다.
한 줄로 정리하면:
- 기록: recorder 켜면 자동
- 검사: rule 있으면 자동 평가 가능
- 수정: 기본 자동 아님, remediation + auto remediation 설정해야 함
Overall explanation
Correct options:
Use AWS CloudTrail Event history to review security group changes in your AWS account
You can troubleshoot operational and security incidents in the CloudTrail console by viewing Event history. The Event history provides a read-only view of the last 90 days of recorded API activity (management events) in an AWS Region.
You can look up events related to the creation, modification, or deletion of resources (such as IAM users or Amazon EC2 instances) in your AWS account on a per-region basis. Events can be viewed and downloaded by using the AWS CloudTrail console. You can customize the view of event history in the console by selecting which columns are displayed and which are hidden. You can programmatically look up events by using the AWS SDKs or AWS Command Line Interface. You can also compare the details of events in Event history side-by-side.
Create an AWS CloudTrail trail configured to log to an Amazon Simple Storage Service (Amazon S3) bucket. Use Athena to query CloudTrail Logs over the last 30-45 days
To use Athena to query CloudTrail Logs, you must have a trail configured to log to an Amazon Simple Storage Service (Amazon S3) bucket. You can use Athena to query CloudTrail Logs over the last 90 days.
You can create a non-partitioned Athena table for querying CloudTrail logs directly from the CloudTrail console. Creating an Athena table from the CloudTrail console requires that you be logged in with a role that has sufficient permissions to create tables in Athena.
Use AWS Config to view configuration history for security groups. You must have the AWS Config configuration recorder turned on
AWS Config records details of changes to your AWS resources to provide you with a configuration history. You can use the AWS Management Console, API, or CLI to obtain details of what a resource’s configuration looked like at any point in the past. AWS Config will also automatically deliver a configuration history file to the Amazon Simple Storage Service (S3) bucket you specify.
AWS Config discovers, maps, and tracks AWS resource relationships in your account. For example, if a new EC2 security group is associated with an EC2 instance, AWS Config records the updated configurations of both the EC2 security group and the EC2 instance.
Incorrect options:
Use the AWS AppConfig capability of AWS Systems Manager, to create, manage, and quickly deploy application configurations and track changes in them - AWS AppConfig is a capability of AWS Systems Manager, to create, manage, and quickly deploy application configurations. A configuration is a collection of settings that influence the behavior of your application. You can use AWS AppConfig with applications hosted on Amazon Elastic Compute Cloud (Amazon EC2) instances, AWS Lambda, containers, mobile applications, or IoT devices. You cannot monitor and track changes to security groups using AppConfig.
Use CloudTrail Lake to create trails that aggregate information from multiple AWS accounts across regions - If you want to perform SQL queries on CloudTrail event information across accounts, regions, and dates, consider using CloudTrail Lake. CloudTrail Lake is an AWS alternative to creating trails that aggregate information from an enterprise into a single, searchable event data store. Instead of using Amazon S3 bucket storage, it stores events in a data lake, which allows richer, faster queries. This option has been added as a distractor.
Configure CloudTrail with CloudWatch Logs to monitor your trail logs and be notified when security group changes occur. CloudTrail supports sending only data events to CloudWatch Logs. Configure Amazon EventBridge to monitor management events - This statement is incorrect. CloudTrail supports sending data, Insights, and management events to CloudWatch Logs.
References:
https://docs.aws.amazon.com/awscloudtrail/latest/userguide/view-cloudtrail-events.html
https://docs.aws.amazon.com/athena/latest/ug/cloudtrail-logs.html
Domain
Domain 1: Detection
Question 51
An organization has added virtual machine images, software, and a few databases to its AWS Service Catalog. These will be used by multiple development teams to build their business workloads. The organization does not want the end users to launch and manage products using their own IAM credentials.
How will you address this requirement and implement it in the least possible time?
-
Create a new portfolio and add the new products to it. Attach a launch constraint to this portfolio
-
Add the newly added products under a single tag. Add tag constraints to control the end user behavior and permissions on the products
-
Use the service actions feature of the service catalog to define rules and constraints for the products in the portfolio. A CloudFormation template can also be used for easier implementation
-
Add launch constraint(s) to each product in the service catalog portfolio
service catalog portfolio를 아무 credential이나 사용할 수 없게 launch contraint를 추가해서 제한할 수 있다.
Without a launch constraint, end users must launch and manage products using their own IAM credentials. To do so, they must have permissions for AWS CloudFormation, AWS services that the products use, and Service Catalog. By using a launch role, you can instead limit the end users’ permissions to the minimum they require for that product.
launch constraint는 product에 붙이는거다, portfolio에 붙이는게 아님.
- Product: 실제 제공물입니다. 예를 들면 EC2 표준 서버, RDS 템플릿, VPC 세트, SaaS 앱 같은 개별 서비스/템플릿입니다. 보통 버전(provisioning artifact)을 가질 수 있습니다.
- Portfolio: 그런 product들을 모아두는 논리적 묶음입니다. 여기에 누가 볼 수 있는지, 어떤 태그를 써야 하는지, 어떤 제약을 적용할지 등을 관리합니다.
Service actions는 유저의 권한을 제한하는게 아니라 유저가 직접 운영 task를 수행할 수 있게 허용해주는 기능이다 (perform operational tasks, troubleshoot issues, run approved commands, or request permissions in Service Catalog).
Overall explanation
Correct option:
Add launch constraint(s) to each product in the service catalog portfolio
A launch constraint specifies the AWS Identity and Access Management (IAM) role that Service Catalog assumes when an end user launches, updates, or terminates a product. An IAM role is a collection of permissions that an IAM user or AWS service can assume temporarily to use AWS services.
Launch constraints apply to products in the portfolio (product portfolio association). Launch constraints do not apply at the portfolio level or to a product across all portfolios. To associate a launch constraint with all products in a portfolio, you must apply the launch constraint to each product individually.
Without a launch constraint, end users must launch and manage products using their own IAM credentials. To do so, they must have permissions for AWS CloudFormation, AWS services that the products use, and Service Catalog. By using a launch role, you can instead limit the end users’ permissions to the minimum they require for that product.
Incorrect options:
Create a new portfolio and add the new products to it. Attach a launch constraint to this portfolio - Launch constraints are at the product level and not at the portfolio level. Hence, this option is incorrect.
Use the service actions feature of the service catalog to define rules and constraints for the products in the portfolio. A CloudFormation template can also be used for easier implementation - Service Catalog enables you to reduce administrative maintenance and end-user training while adhering to compliance and security measures. With service actions, as the administrator, you can enable end users to perform operational tasks, troubleshoot issues, run approved commands, or request permissions in Service Catalog. Service actions cannot be used for limiting user permissions on the service catalog products.
Add the newly added products under a single tag. Add tag constraints to control the end user behavior and permissions on the products - This is a made-up option. There are no tag constraints, only tag update constraints. With tag update constraints, Service Catalog administrators can allow or disallow end users to update tags on resources associated with a Service Catalog provisioned product.
References:
https://docs.aws.amazon.com/servicecatalog/latest/adminguide/constraints-launch.html
https://docs.aws.amazon.com/servicecatalog/latest/adminguide/using-service-actions.html
https://docs.aws.amazon.com/servicecatalog/latest/adminguide/constraints-resourceupdate.html
Domain
Domain 6: Security Foundations and Governance
Question 53
As a Security Specialist, you have been asked to create an AWS Identity and Access Management (IAM) policy that explicitly grants permissions to an IAM role for creating and managing Amazon Elastic Compute Cloud (Amazon EC2) instances in a specified VPC. The policy must limit permissions so that the IAM role can only create EC2 instances with specific tags and then manage those EC2 instances in a VPC by using those tags.
Which of the following solutions will meet this requirement?
-
Apply a custom IAM policy to restrict the permissions of the IAM role for creating EC2 instances in a specified VPC with tags. Replace the TAG-KEY or TAG-VALUE parameters with the IAM policy variable ${aws:username}
-
Apply a custom IAM policy to restrict the permissions of the IAM role for creating EC2 instances in a specified VPC with tags using the policy condition
ec2:ResourceTagsto limit control to instances -
Apply a custom IAM policy to restrict the permissions of the IAM role for creating EC2 instances in a specified VPC with tags using the policy condition
aws:sourceVPCso that it also limits the instances within the specified VPC -
Apply a custom IAM policy to restrict the permissions of the IAM role for creating EC2 instances in a specified VPC with tags. Use policy condition
ec2:CreateTagsto limit control to instances
policy condition과 policy action은 다르다.
Overall explanation
Correct option:
Apply a custom IAM policy to restrict the permissions of the IAM role for creating EC2 instances in a specified VPC with tags. Use policy condition ec2:ResourceTags to limit control to instances
Amazon EC2 provides limited supported resource-level permissions, but there are several actions, resources, and conditions to consider. Certain Amazon EC2 API actions, such as launching an EC2 instance, can be controlled through the VPC ARN using tags to control the instances.
For the given use case, you can apply a custom IAM policy to restrict the permissions of an IAM user, group, or role for creating EC2 instances in a specified VPC with tags. Use policy condition “ec2:ResourceTags” to limit control to instances. This policy grants permission to launch EC2 instances in a designated VPC with a unique tag. You can then manage those EC2 instances using restrictive tags.
Check out the relevant snippet of the policy definition here:
via - https://aws.amazon.com/premiumsupport/knowledge-center/iam-policy-permission-ec2-tags-vpc/
Incorrect options:
**Apply a custom IAM policy to restrict the permissions of the IAM role for creating EC2 instances in a specified VPC with tags. Replace the TAG-KEY or TAG-VALUE parameters with the IAM policy variable {aws:username}. Since the IAM role is being used in this example, this configuration is incorrect.
Apply a custom IAM policy to restrict the permissions of the IAM role for creating EC2 instances in a specified VPC with tags using the policy condition aws:sourceVPC so that it also limits the instances within the specified VPC - This option has been added as a distractor. You can create an S3 bucket policy that restricts access for the VPC endpoint to a specific VPC by using the aws:SourceVpc condition. This is useful if you have multiple VPC endpoints configured in the same VPC, and you want to manage access to your Amazon S3 buckets for all of your endpoints.
Apply a custom IAM policy to restrict the permissions of the IAM role for creating EC2 instances in a specified VPC with tags. Use the policy condition ec2:CreateTags to limit control to instances - This option has been added as a distractor. You should note that ec2:CreateTags is an action and not a policy condition. In addition, the ec2:CreateTags action is used for creating tags for ec2 instances.
References:
https://aws.amazon.com/premiumsupport/knowledge-center/iam-policy-permission-ec2-tags-vpc/
https://docs.aws.amazon.com/AWSEC2/latest/UserGuide/Using_Tags.html
https://docs.aws.amazon.com/AmazonS3/latest/userguide/example-bucket-policies-vpc-endpoint.html
Domain
Domain 4: Identity and Access Management
Question 54
A financial services company wants to develop a solution called Financial Information System (FIS) on AWS Cloud that would allow the financial institutions and government agencies to collaborate, anticipate and navigate the changing finance landscape. While pursuing this endeavor, the company would like to decrease its IT operational overhead. The solution should help the company eliminate the bottleneck created by manual provisioning of development pipelines while adhering to crucial governance and control requirements. As a means to this end, the company has set up “AWS Organizations” to manage several of these scenarios and would like to use Service Control Policies (SCP) for central control over the maximum available permissions for the various accounts in their organization. This allows the organization to ensure that all accounts stay within the organization’s access control guidelines.
Which of the following scenarios would you identify as correct regarding the given use-case? (Select three)
-
If a user or role has an IAM permission policy that grants access to an action that is either not allowed or explicitly denied by the applicable SCPs, the user or role can still perform that action
-
If a user or role has an IAM permission policy that grants access to an action that is either not allowed or explicitly denied by the applicable SCPs, the user or role can’t perform that action
-
SCPs affect all users and roles in attached accounts, excluding the root user
-
SCPs do not affect service-linked role
-
SCPs affect all users and roles in attached accounts, including the root user
-
SCPs affect service-linked roles
SCP는 service-linked role에는 영향 안 미친다. service가 할건 해야지. IAM Users와 Roles만 SCP가 영향을 줌.
SCP는 root user에게도 영향을 미친다.
Overall explanation
Correct options:
If a user or role has an IAM permission policy that grants access to an action that is either not allowed or explicitly denied by the applicable SCPs, the user or role can’t perform that action
SCPs affect all users and roles in attached accounts, including the root user
SCPs do not affect service-linked role
Service control policies (SCPs) are one type of policy that can be used to manage your organization. SCPs offer central control over the maximum available permissions for all accounts in your organization, allowing you to ensure your accounts stay within your organization’s access control guidelines.
In SCPs, you can restrict which AWS services, resources, and individual API actions the users and roles in each member account can access. You can also define conditions for when to restrict access to AWS services, resources, and API actions. These restrictions even override the administrators of member accounts in the organization.
Please note the following effects on permissions vis-a-vis the SCPs:
If a user or role has an IAM permission policy that grants access to an action that is either not allowed or explicitly denied by the applicable SCPs, the user or role can’t perform that action.
SCPs affect all users and roles in the attached accounts, including the root user.
SCPs do not affect any service-linked role.
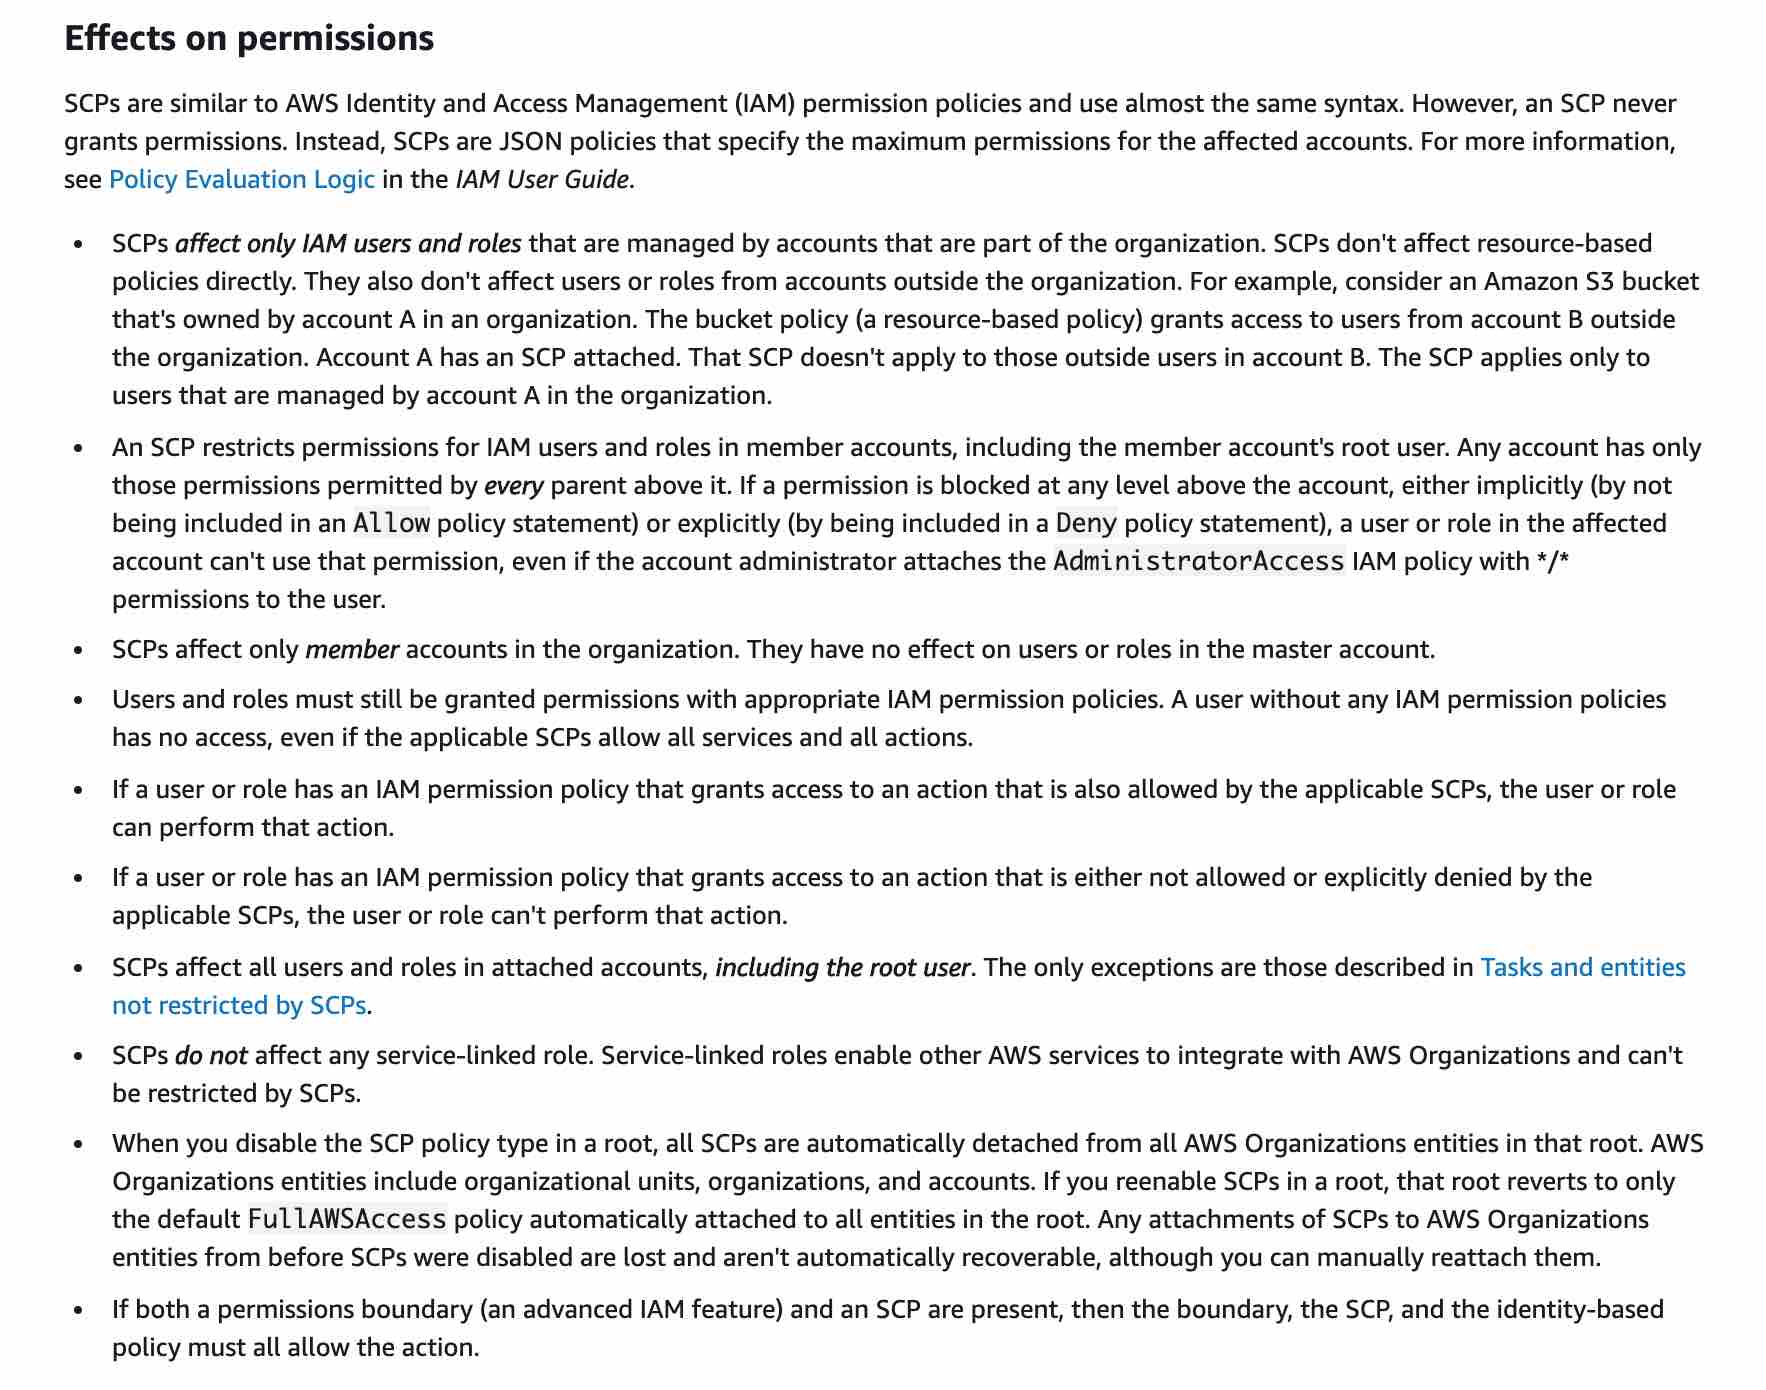
via - https://docs.aws.amazon.com/organizations/latest/userguide/orgs_manage_policies_scp.html
Incorrect options:
If a user or role has an IAM permission policy that grants access to an action that is either not allowed or explicitly denied by the applicable SCPs, the user or role can still perform that action
SCPs affect all users and roles in attached accounts, excluding the root user
SCPs affect service-linked roles
These three options contradict the explanation provided above, so these options are incorrect.
Reference:
https://docs.aws.amazon.com/organizations/latest/userguide/orgs_manage_policies_scp.html
Domain
Domain 4: Identity and Access Management
Question 57
A financial services company is revamping its technology solutions on AWS to meet the company’s new security guidelines that mandate the use of the company’s own imported key material to create Customer Master keys (CMKs) to be used with AWS services. All encryption keys must also be rotated annually.
How will you implement this requirement?
-
Associate the existing CMK with the new key material and run the List operation to update the association
-
Enable automatic key rotation for the KMS key with imported key material. Use this method to rotate the keys annually
-
Create a new CMK and import the new key material into it. Point the key alias of the older CMK to the new CMK created
-
Delete the old KMS key first and create a new key with the same name immediately. Import new key material into this newly created KMS key
automatic key rotation은 imported key material은 못 한다. asymmetric KMS keys, HMAC KMS keys, KMS keys with imported key material, or KMS keys in custom key stores는 automatic key rotation 안 됨.
- 고객 관리형(customer managed) KMS 키 기준으로는 automatic key rotation은 AWS KMS가 직접 생성한 대칭 암호화 키(
SYMMETRIC_DEFAULT, origin=AWS_KMS)에서만 지원됩니다. 비대칭 키, HMAC 키, imported key material(EXTERNAL) 키, custom key store의 키에는 automatic key rotation을 켤 수 없습니다.
Overall explanation
Correct option:
Create a new CMK and import the new key material into it. Point the key alias of the older CMK to the new CMK created
When you import key material into a KMS key, the KMS key is permanently associated with that key material. You can reimport the same key material, but you cannot import a different key material into that KMS key. Also, you cannot enable automatic key rotation for a KMS key with imported key material. However, you can manually rotate a KMS key with imported key material.
How to enable and disable automatic key rotation:
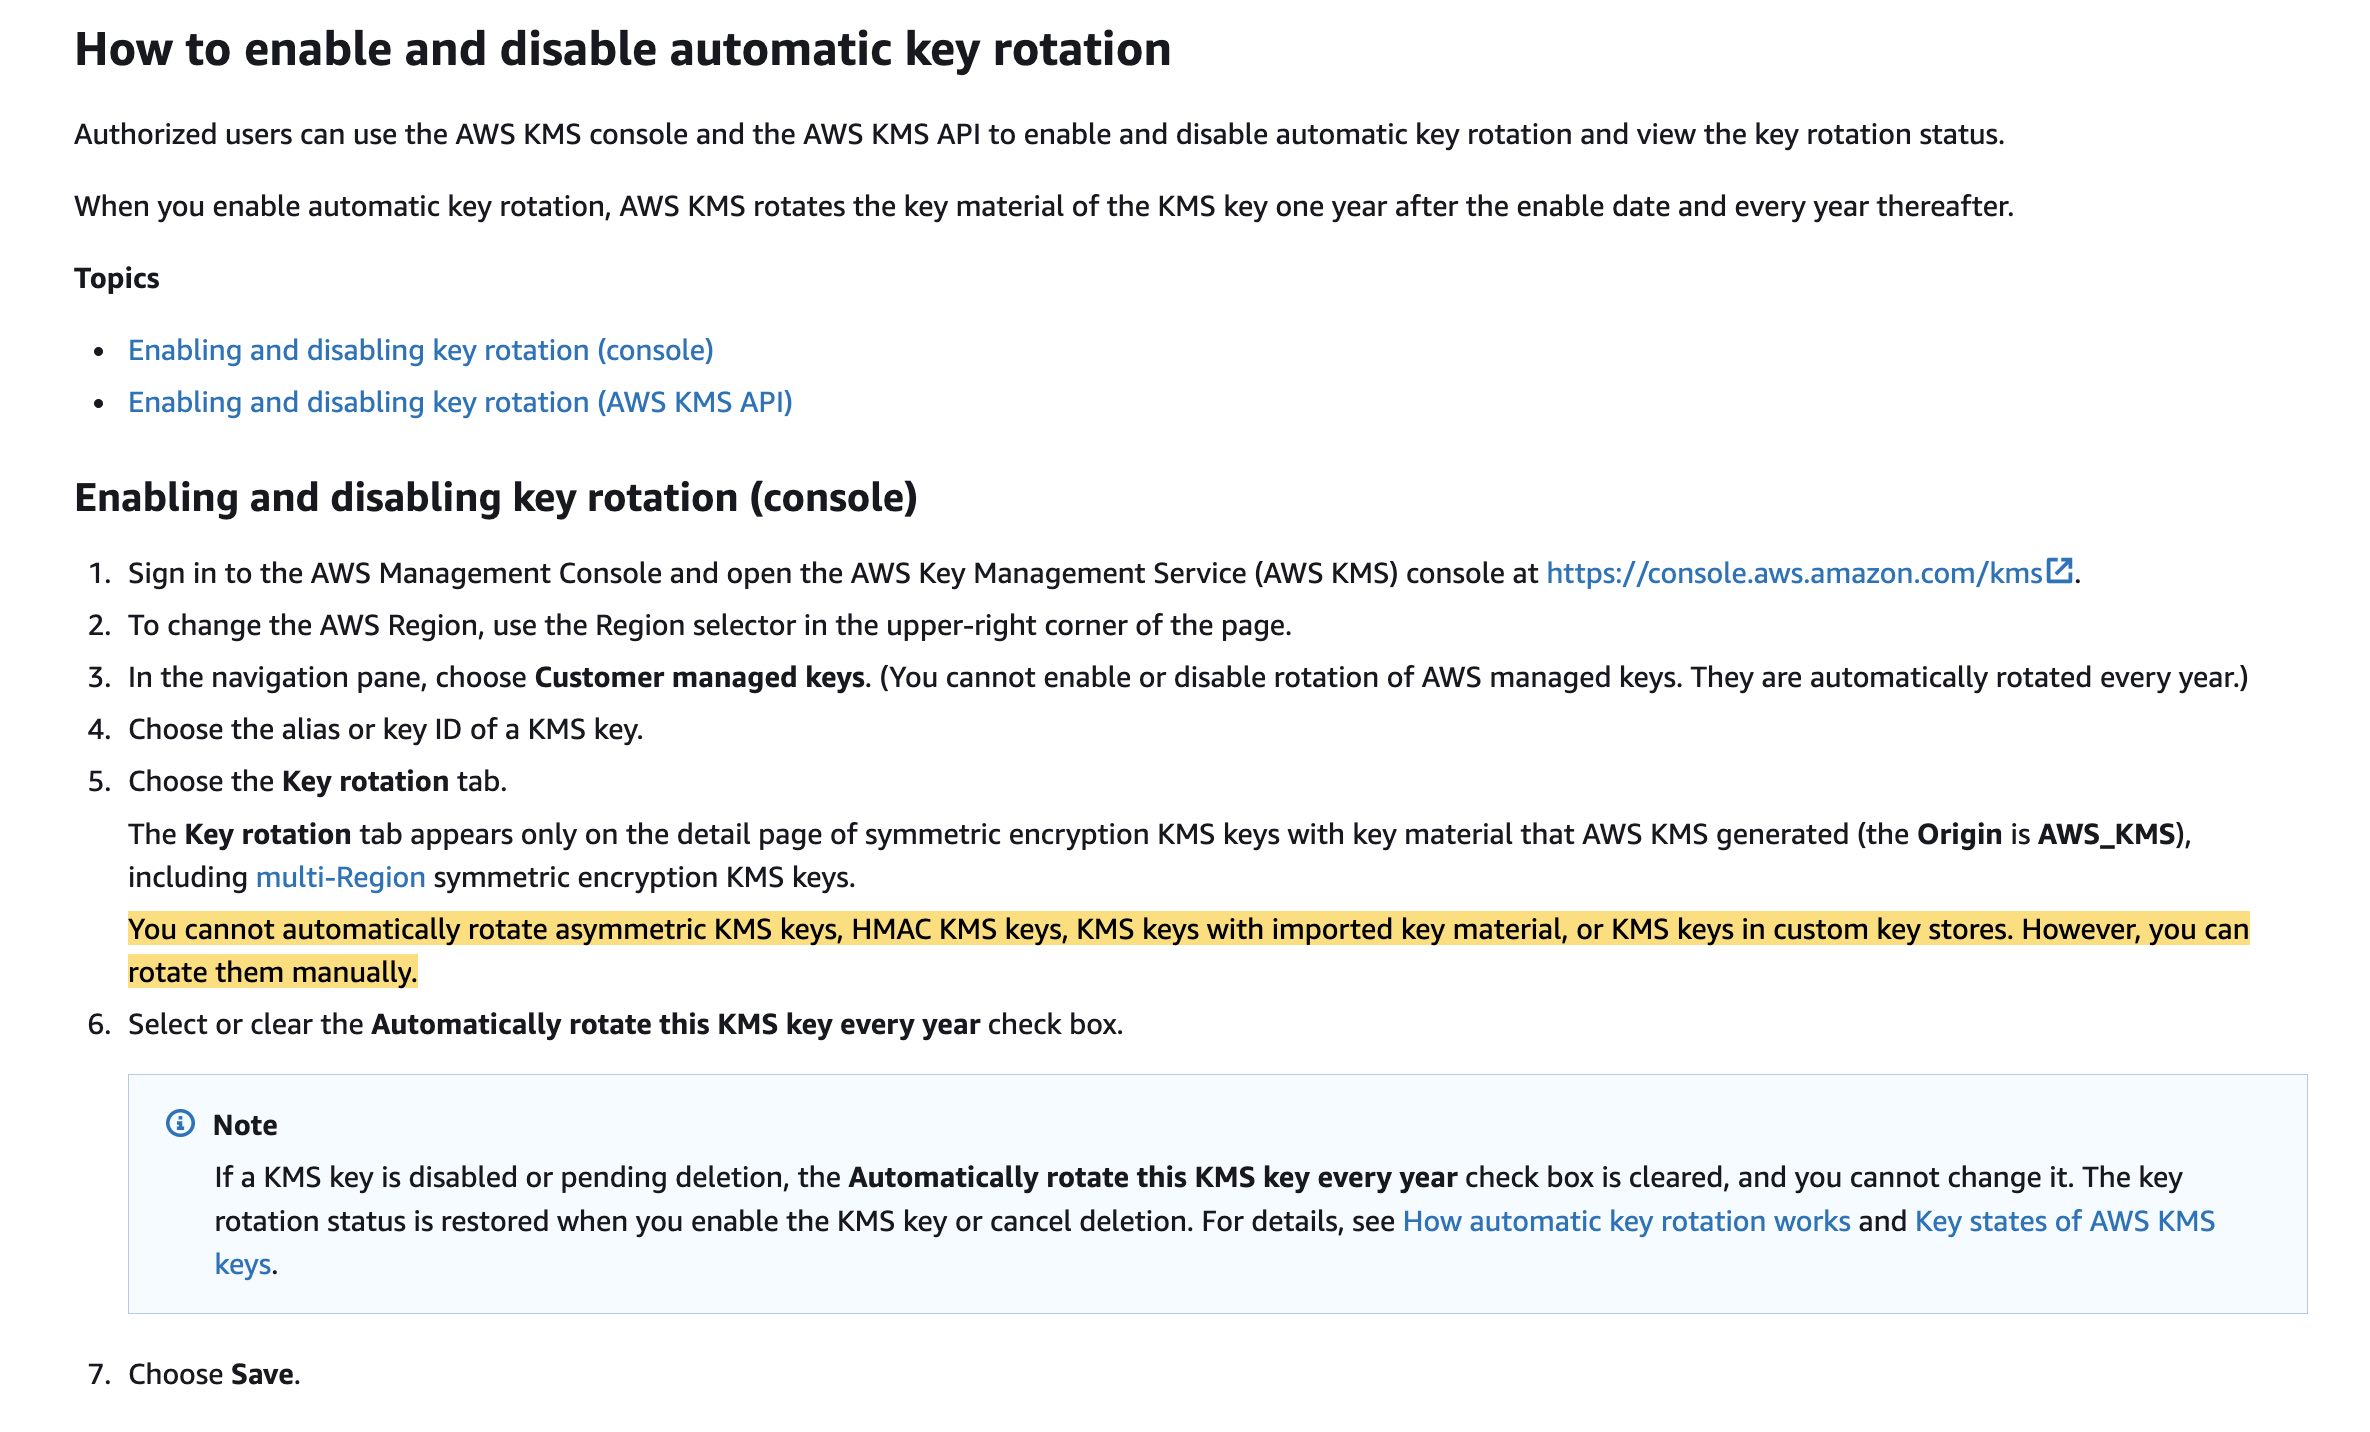
via - https://docs.aws.amazon.com/kms/latest/developerguide/rotate-keys.html#rotate-keys-manually
Because the new KMS key is a different resource from the current KMS key, it has a different key ID and ARN. When you change KMS keys, you need to update references to the KMS key ID or ARN in your applications. Aliases, which associate a friendly name with a KMS key, make this process easier. Use an alias to refer to a KMS key in your applications. Then, when you want to change the KMS key that the application uses, change the target KMS key of the alias.
Rotating keys manually:
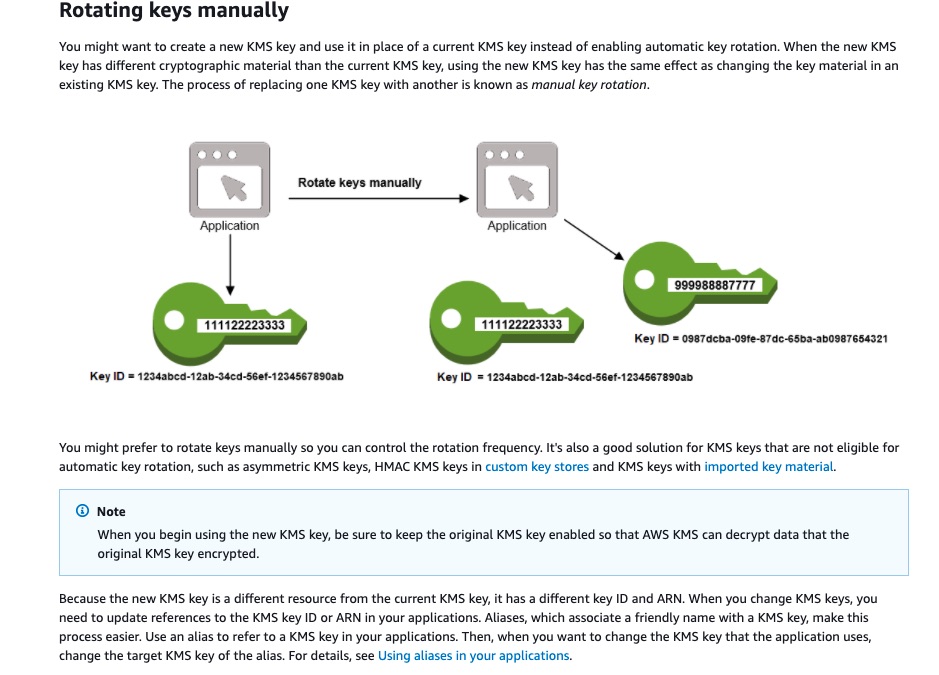
via - https://docs.aws.amazon.com/kms/latest/developerguide/rotate-keys.html#rotate-keys-manually
A key alias allows you to abstract key users away from the underlying Region-specific key ID and key ARN. Authorized individuals can create a key alias that allows their applications to use a specific CMK independent of the Region or rotation schedule. Thus, multi-Region applications can use the same key alias to refer to KMS keys in multiple Regions without worrying about the key ID or the key ARN. You can also trigger the manual rotation of a CMK by pointing a given key alias to a different CMK. Similar to how Domain Name Services (DNS) allows the abstraction of IP addresses, a key alias does the same for the key ID. When you are creating a key alias, we recommend that you determine a naming scheme that can be applied across your accounts such as alias/<Environment>-<Function>-<Service Team>.
Incorrect options:
Enable automatic key rotation for the KMS key with imported key material. Use this method to rotate the keys annually - You cannot automatically rotate asymmetric KMS keys, HMAC KMS keys, KMS keys with imported key material, or KMS keys in custom key stores. However, you can rotate them manually. So, this option is incorrect.
Associate the existing CMK with the new key material and run the List operation to update the association - When you import key material into a KMS key, the KMS key is permanently associated with that key material. You can reimport the same key material, but you cannot import a different key material into an existing KMS key.
Delete the old KMS key first and create a new key with the same name immediately. Import new key material into this newly created KMS key - Because it is destructive and potentially dangerous to delete a KMS key, AWS KMS requires you to set a waiting period of 7 – 30 days. The default waiting period is 30 days. Hence, it is not possible to delete a KMS key and immediately create a new one with the same name.
References:
https://docs.aws.amazon.com/kms/latest/developerguide/importing-keys.html
https://docs.aws.amazon.com/whitepapers/latest/kms-best-practices/key-aliases.html
https://docs.aws.amazon.com/kms/latest/developerguide/deleting-keys.html
https://docs.aws.amazon.com/kms/latest/developerguide/rotate-keys.html#rotate-keys-manually
Domain
Domain 5: Data Protection
Question 61
A Security Engineer is planning for a DDoS-resilient architecture for a three-tier web application. What are the best practices to consider for DDoS mitigation? (Select three)
-
When using Amazon CloudFront and AWS WAF with Amazon API Gateway, configure the cache behavior for your distributions to forward all headers to the API Gateway regional endpoint
-
The security groups assigned to Application Load Balancers should be configured to not use connection tracking
-
Configure Amazon API Gateway with edge-optimized API endpoints whenever possible and associate it with your Amazon CloudFront distribution
-
If you are subscribed to AWS Shield Advanced, you can register Elastic IP addresses as Protected Resources
-
Use AWS WAF to configure web access control lists (Web ACLs) on your Amazon S3 buckets with critical data to filter and block requests based on request signatures
-
Use Network Load Balancer to route traffic to targets based on content and accept only well-formed web requests. Network Load Balancer blocks many common DDoS attacks, such as SYN floods or UDP reflection attacks
security group에서 connection tracking 안 쓰는 것도 DDoS-resilient구나 (stateful이라 최대 커넥션 개수 정해져 있어서 그렇다)
NLB는 content나 well-formed web requests를 구별할 수 없다. ALB만 가능.
3번 틀림
edge-optimized API endpoint 자체는 API Gateway가 CloudFront distribution을 자동으로 만들어 연결하는 방식입니다. 그래서 “edge-optimized endpoint를 구성하고, 또 당신의 CloudFront distribution에 associate한다”는 문장은 부정확합니다.
regional API endpoint를 사용하면 API Gateway를 내가 소유한 CloudFront distribution에 associate할 수 있다. 따라서 CloudFront에 WAF설정을 내 맘대로 붙여서 DDoS 영향 최소화 가능하긴 함.
Overall explanation
Correct options:
When using Amazon CloudFront and AWS WAF with Amazon API Gateway, configure the cache behavior for your distributions to forward all headers to the API Gateway regional endpoint
Configure the cache behavior for your distributions to forward all headers to the API Gateway regional endpoint. By doing this, CloudFront will treat the content as dynamic and skip caching the content.
If you are subscribed to AWS Shield Advanced, you can register Elastic IP addresses as Protected Resources
If you are subscribed to AWS Shield Advanced, you can register Elastic IP addresses as Protected Resources. DDoS attacks against Elastic IP addresses that have been registered as Protected Resources are detected more quickly, which can result in a faster time to mitigate. When an attack is detected, the DDoS mitigation systems read the network ACL that corresponds to the targeted Elastic IP and enforce it at the AWS network border. This significantly reduces your risk of impact from infrastructure layer DDoS attacks.
The security groups assigned to Application Load Balancers should be configured to not use connection tracking
Security groups are stateful, depending on the configuration. To allow the response traffic, the security group uses connection tracking to track information about traffic on the resource where the security group is applied. There is a maximum number of connections that can be tracked per resource. After the maximum is reached, both new inbound and outbound connections cannot be established. This condition exhausts the number of connections tracked by the security group that can be met during a DDoS attack.
To improve the DDoS resilience of resources in your VPC, AWS recommends ensuring that the security groups assigned to managed resources such as Classic and Application Load Balancers are configured to not use connection tracking (untracked connections).
DDoS-resilient reference architecture:
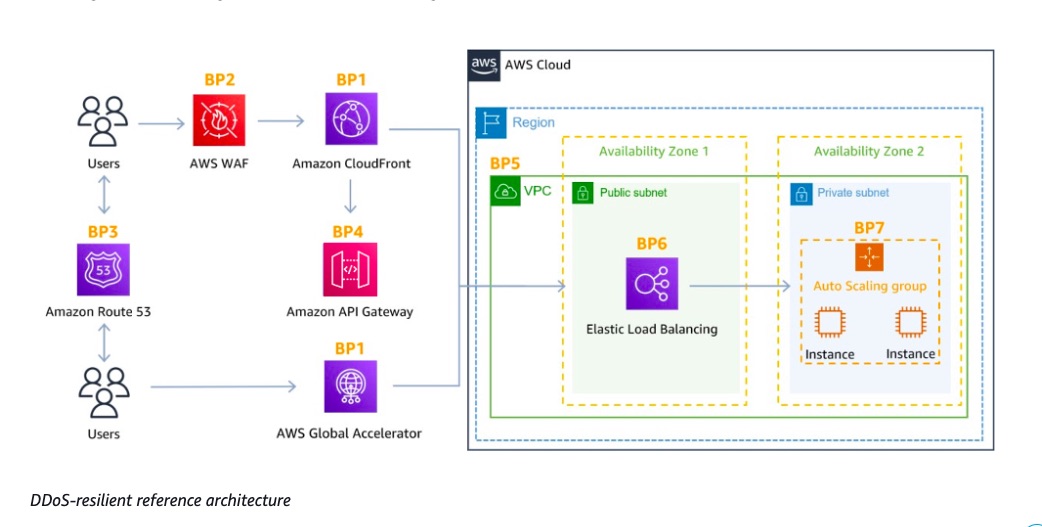
Incorrect options:
Use Network Load Balancer to route traffic to targets based on content and accept only well-formed web requests. Network Load Balancer blocks many common DDoS attacks, such as SYN floods or UDP reflection attacks - This statement is incorrect. Network Load Balancers cannot route traffic based on content since they are not at layer 7, unlike Application Load Balancers.
Use AWS WAF to configure web access control lists (Web ACLs) on your Amazon S3 buckets with critical data to filter and block requests based on request signatures - AWS WAF can be deployed on Amazon CloudFront, the Application Load Balancer (ALB), Amazon API Gateway, and AWS AppSync. Amazon S3 bucket is not a supported target.
Configure Amazon API Gateway with edge-optimized API endpoints whenever possible and associate it with your Amazon CloudFront distribution - When you use Amazon API Gateway, you can choose from two types of API endpoints. The first is the default option: edge-optimized API endpoints that are accessed through an Amazon CloudFront distribution. The distribution is created and managed by API Gateway, however, so you don’t have control over it. The second option is to use a regional API endpoint that is accessed from the same AWS region in which your REST API is deployed. AWS recommends that you use the second type of endpoint and associate it with your own Amazon CloudFront distribution. This gives you control over the Amazon CloudFront distribution and the ability to use AWS WAF for application layer protection. This mode provides you with access to scaled DDoS mitigation capacity across the AWS global edge network.
References:
Domain
Domain 3: Infrastructure Security
Question 63
A security specialist with administrator permissions is using the AWS management console to access the CloudWatch logs for a Lambda function named “myFunc”. However, upon choosing the option to view the logs in the AWS Lambda console, the specialist encountered an error message reading “error loading Log Streams”. The specialist was unable to retrieve the logs as desired and must now find a solution to this issue.
Following is an example IAM policy for the Lambda function’s execution role:
{
    "Version": "2012-10-17",
    "Statement": [
        {
            "Effect": "Allow",
            "Action": "logs:CreateLogGroup",
            "Resource": "arn:aws:logs:<region>:<accountId>:*"
        },
        {
            "Effect": "Allow",
            "Action": [
                "logs:PutLogEvents"
            ],
            "Resource": [
                "arn:aws:logs:<region>:<accountId>:log-group:/aws/lambda/myFunc:*"
            ]
        }
    ]
}
Which of the following solutions would you suggest to the specialist for addressing the issue?
-
Move the logs:CreateLogGroup action to the second Allow statement
-
Add the logs:GetLogEvents action to the second Allow statement
-
Add the logs:DescribeLogStreams action to the second Allow statement
-
Add the logs:CreateLogStream action to the second Allow statement
CloudWatch는 Log Group과 Log Stream으로 구성되어 있음. Log Group에 Log Stream도 생성할 수 있어야 한다. 람다가 직접 로그를 읽어야 하는 상황이 아니기에 2,3번은 답이 아님.
Overall explanation
Correct option:
Add the logs:CreateLogStream action to the second Allow statement
A log stream is a sequence of log events that share the same source. Each separate source of logs in CloudWatch Logs makes up a separate log stream.
A log group is a group of log streams that share the same retention, monitoring, and access control settings. You can define log groups and specify which streams to put into each group. There is no limit on the number of log streams that can belong to one log group.
CreateLogStream creates a log stream for the specified log group.
For the given use case, you must ensure that the write actions CreateLogGroup and CreateLogStream are allowed.
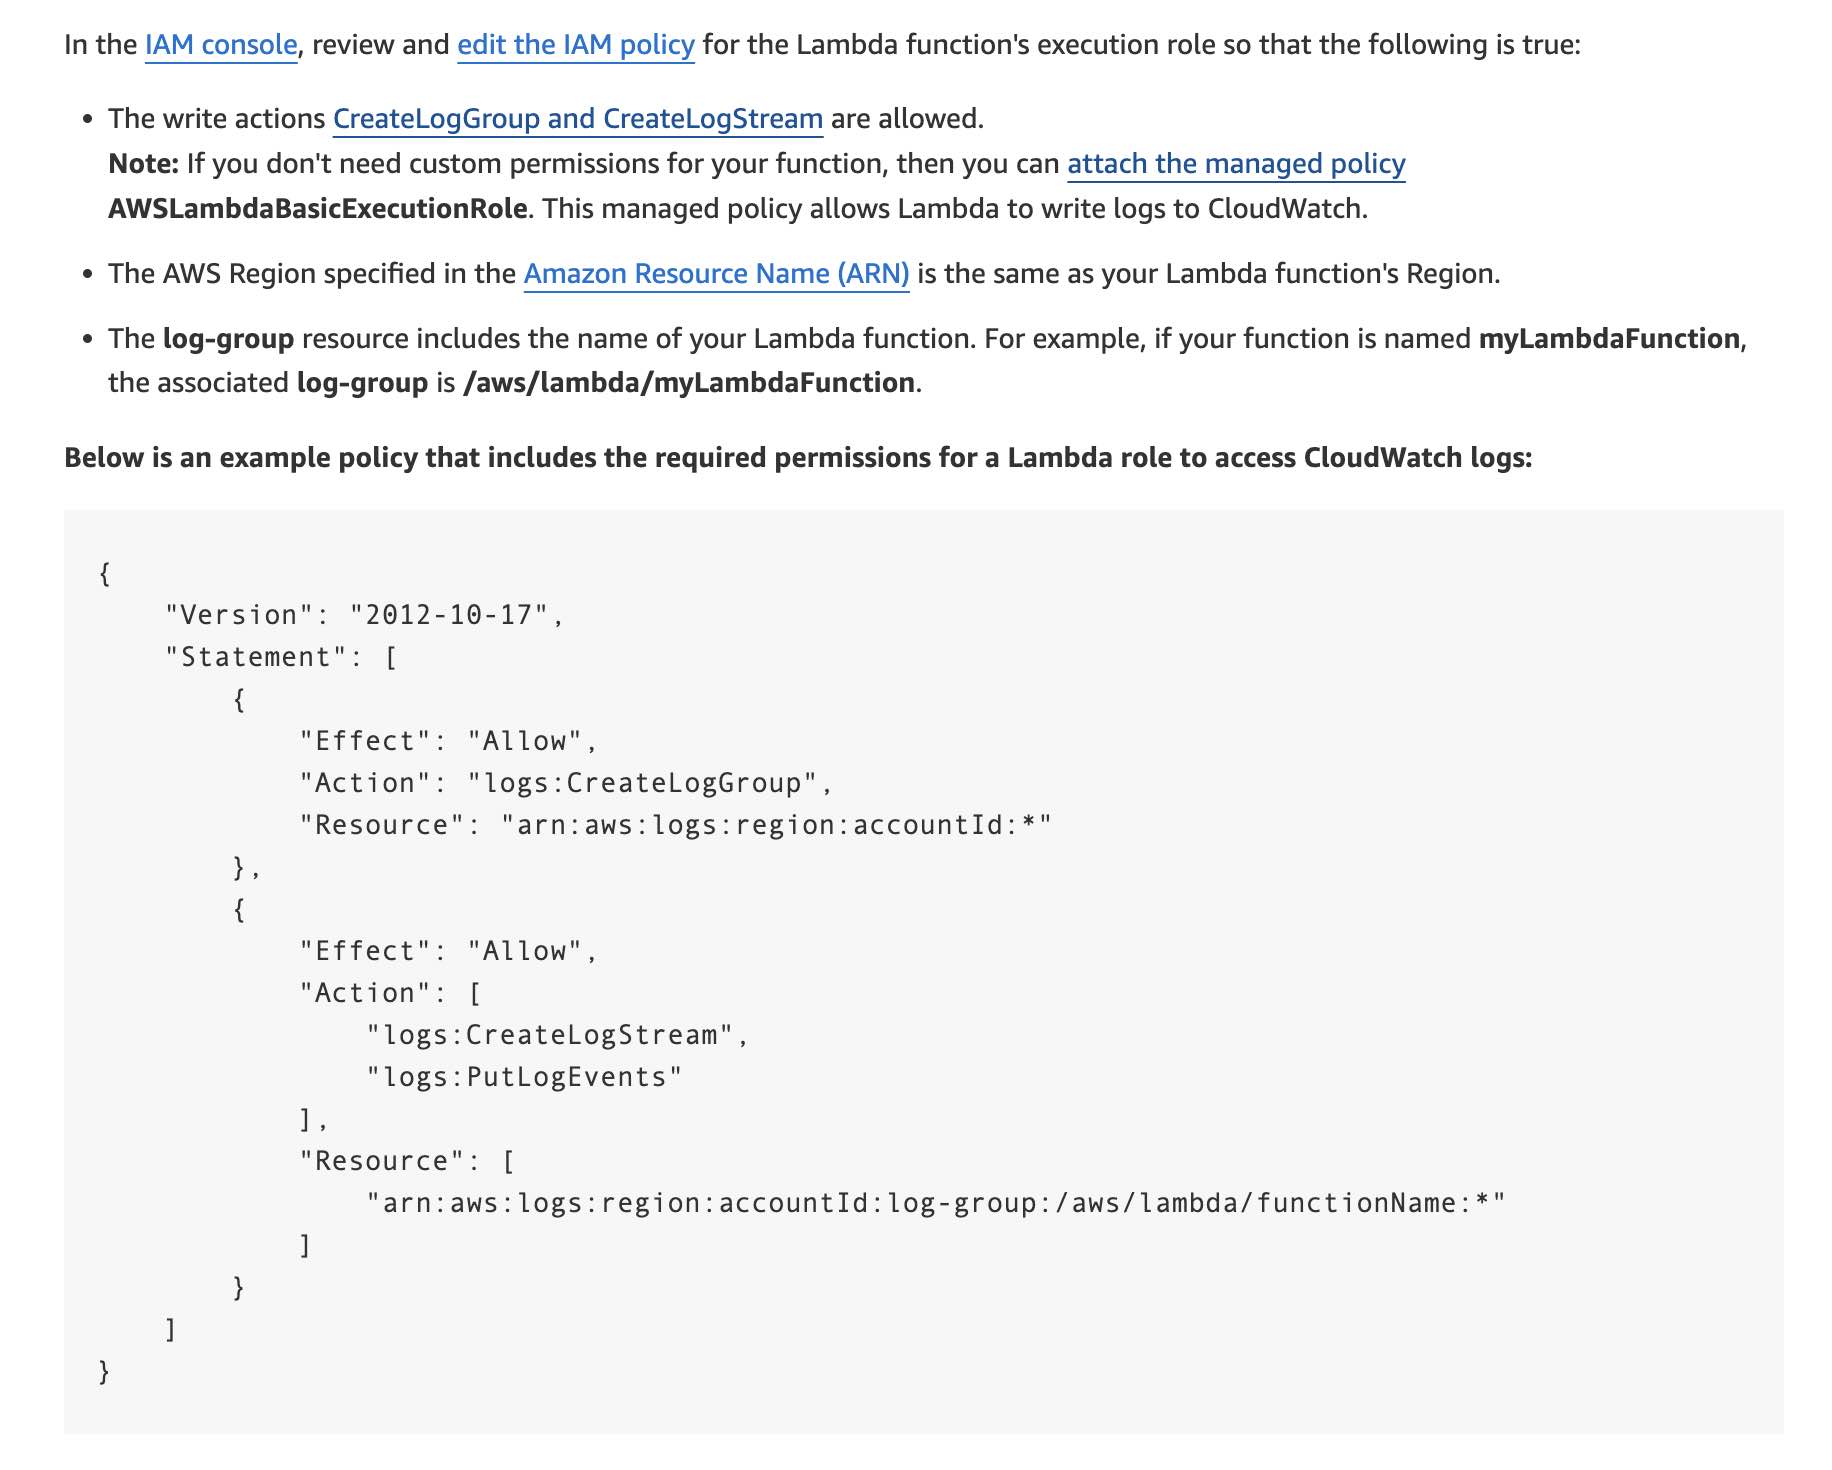
via - https://aws.amazon.com/premiumsupport/knowledge-center/lambda-cloudwatch-log-streams-error/
Incorrect options:
Since the security specialist already has administrator privileges as an IAM user, so there is no lack of permissions that’s causing the error while the specialist is trying to “view” the logs.
The root cause of the issue is that the Lambda function itself needs the CreateLogStream permission to be able to create the log stream and thereby successfully write the logs into CloudWatch Logs.
Add the logs:GetLogEvents action to the second Allow statement
Add the logs:DescribeLogStreams action to the second Allow statement
The GetLogEvents and DescribeLogStreams are both “read” type of permissions which are not needed for the Lambda to successfully write the logs. Hence, both these options are incorrect.
Move the logs:CreateLogGroup action to the second Allow statement - This option is a distractor. The CreateLogGroup action needs to be in the first Allow statement only.
References:
https://docs.aws.amazon.com/AmazonCloudWatch/latest/logs/Working-with-log-groups-and-streams.html
https://docs.aws.amazon.com/AmazonCloudWatch/latest/logs/permissions-reference-cwl.html
https://aws.amazon.com/premiumsupport/knowledge-center/lambda-cloudwatch-log-streams-error/
Domain
Domain 1: Detection
Question 9
The security team at a company has recently decided that CloudTrail logs of each department will be prefixed with the department code. Currently, CloudTrail logs are created with similar names across the company with no immediate way of identifying the departments sending those logs. When the security team tried to add the prefix to the log files in the CloudTrail console, the following error popped up: ‘There is a problem with the bucket policy’.
How will you fix this issue?
-
Use the Amazon S3 console to update the prefix in the current bucket policy, and then use the CloudTrail console to specify the same prefix for the bucket in the trail
-
Manually edit your Amazon S3 bucket policy to add an aws:SourceArn condition key to the policy statement attached for CloudTrail
-
Update the service-specific context keys used in the Condition element of the Amazon S3 bucket policy statements
-
Update the permissions of all users in the security team to AWSCloudTrail_FullAccess policy to impart all the necessary permissions to the users on CloudTrail logs
기존 trail이 로그를 쓰고 있는 S3 버킷에서 log file prefix를 추가/변경/삭제하려고 할 때 "There is a problem with the bucket policy" 오류가 나면, 먼저 S3 bucket policy 안의 prefix를 수정한 뒤, CloudTrail 콘솔에서도 같은 prefix를 지정해야 합니다. 특히 s3:PutObject의 Resource 경로가 새 prefix를 반영해야 합니다.
왜냐하면 CloudTrail의 버킷 정책은 보통 arn:aws:s3:::bucket-name/[optionalPrefix]/AWSLogs/account-id/* 형태로 되어 있는데, prefix를 바꾸면 이 경로도 같이 바뀌어야 CloudTrail이 계속 로그를 쓸 수 있기 때문입니다. AWS 문서는 “incorrect prefix can prevent your trail from delivering logs”라고 설명하고, 해결 절차로 S3 콘솔에서 bucket policy의 prefix를 수정하고, 이후 CloudTrail 콘솔에서 동일한 prefix를 설정하라고 안내합니다.
service-specific context keys는 IAM 정책의 Condition에서 쓰는 서비스 전용 조건 키입니다.
즉, 모든 서비스에 공통으로 쓰는 aws: 계열 global condition keys와 달리, 특정 서비스에서만 의미가 있는 키예요. AWS 문서도 aws:는 global, ec2:, s3: 같은 서비스 prefix가 붙는 것은 service-specific이라고 설명합니다.
예를 들면 이런 것들입니다.
ec2:InstanceType→ EC2 전용s3:VersionId→ S3 전용kms:ViaService→ KMS 전용
이런 키들은 해당 서비스 요청에 대해서만 동작합니다.
CloudTrail는 service-specific context key가 없다.
Overall explanation Correct option:
Use the Amazon S3 console to update the prefix in the current bucket policy, and then use the CloudTrail console to specify the same prefix for the bucket in the trail
If you try to add, modify, or remove a log file prefix for an S3 bucket that receives logs from a trail, you might see the error: “There is a problem with the bucket policy.” A bucket policy with an incorrect prefix can prevent your trail from delivering logs to the bucket. To resolve this issue, use the Amazon S3 console to update the prefix in the bucket policy, and then use the CloudTrail console to specify the same prefix for the bucket in the trail.
Changing a prefix for an existing bucket: via - https://docs.aws.amazon.com/awscloudtrail/latest/userguide/create-s3-bucket-policy-for-cloudtrail.html
Incorrect options:
Update the service-specific context keys used in the Condition element of the Amazon S3 bucket policy statements - CloudTrail does not have service-specific context keys that can be used in the Condition element of policy statements.
Policy best practices for CloudTrail: via - https://docs.aws.amazon.com/awscloudtrail/latest/userguide/security_iam_id-based-policy-examples.html
Update the permissions of all users in the security team to AWSCloudTrail_FullAccess policy to impart all the necessary permissions to the users on CloudTrail logs - The AWSCloudTrail_FullAccess policy is not intended to be shared broadly across your AWS account. Users with this role can disable or reconfigure the most sensitive and important auditing functions in their AWS accounts. For this reason, this policy should be applied only to account administrators, and the use of this policy should be closely controlled and monitored.
Manually edit your Amazon S3 bucket policy to add an aws:SourceArn condition key to the policy statement attached for CloudTrail - This change does not affect the given error.
References:
Domain Domain 4: Identity and Access Management
Question 11
A Security Engineer has configured an AWS Web Application Firewall (WAF) for all the Application Load Balancers (ALBs) after getting a possible threat alert from the company’s IT security department.
How can the Engineer validate if the AWS WAF rules are working?
-
Request penetration testing for login request flooding or API request flooding, whichever is applicable for your configuration
-
Use iPerf Testing tool to emulate DDoS attack on the resources and check for WAF responses through Amazon CloudWatch logs
-
Enable WAF comprehensive logs that are delivered through Amazon Kinesis Firehose to a destination of your choice
-
AWS WAF reports metrics once a minute to CloudTrail. You can use statistics in Amazon CloudTrail to gather insights about the WAF responses
WAF가 CloudWatch에 1분마다 리포트를 보내긴 한다. CloudTrail이 아니다.
iPerf는 DDoS 공격 에뮬레이트 할 수 있는 도구. 문제와 무관.
WAF는 사전 허가 없이 penetration test를 수행해도 되지만 테스트는 AWS에 요청하는게 아니라 직접 수행해야 한다.
Overall explanation Correct option:
Enable WAF comprehensive logs that are delivered through Amazon Kinesis Firehose to a destination of your choice
AWS WAF supports full logging of all web requests inspected by the service. Customers can store these logs in Amazon S3 for compliance and auditing needs as well as use them for debugging and additional forensics. The logs will help customers understand why certain rules are triggered and why certain web requests are blocked. Customers can also integrate the logs with their SIEM and log analysis tools.
For each web request, AWS WAF logs now provide raw HTTP/S headers along with information on which AWS WAF rules are triggered. This is useful for troubleshooting custom WAF rules and Managed Rules for AWS WAF. These logs will be made available via Amazon Kinesis Data Firehose in JSON format.
Enabling AWS WAF full logs is done in two steps. First, on the Amazon Kinesis console, create an instance of the Amazon Kinesis Data Firehose in the relevant account(s). As part of this configuration, customers can choose a destination for the data from Amazon S3, Amazon ElasticSearch, or Amazon RedShift. Customers can also leverage third-party tool(s) from Splunk or Sumo Logic to enable advanced SIEM solutions, giving them a platform for advanced monitoring. Second, on the AWS WAF console, enable the logs and select the Firehose instance. When configuring, customers also have the option of redacting fields from web requests that they do not want to be logged.
Incorrect options:
AWS WAF reports metrics once a minute to CloudTrail. You can use statistics in Amazon CloudTrail to gather insights about the WAF responses - This statement is incorrect. If CloudTrail is substituted with CloudWatch then this statement stands correct i.e. AWS WAF reports metrics once a minute to CloudWatch. You can use statistics in Amazon CloudWatch to gather insights about the WAF responses.
Use iPerf Testing tool to emulate DDoS attack on the resources and check for WAF responses through Amazon CloudWatch logs - iPerf is a tool for network performance measurement and tuning. It is a cross-platform tool that can produce standardized performance measurements for any network. This is not relevant to the given use case.
Request penetration testing for login request flooding or API request flooding, whichever is applicable for your configuration - This statement is incorrect. Firstly, WAF service falls under “Permitted Services” which can be used to carry out penetration testing without prior approval from AWS. Secondly, Request flooding (login request flooding, API request flooding) fall under prohibited activities and hence should not be carried out on AWS resources.
References:
https://aws.amazon.com/security/penetration-testing/
https://aws.amazon.com/shield/faqs/
Domain Domain 3: Infrastructure Security
Question 23
A company maintains separate AWS accounts for its various lines of business. All the accounts are configured with Amazon GuardDuty to detect threats and malicious activities. A partner security firm generates a common threat list quarterly and shares it with all the business lines.
As a Security Engineer, how will you configure the threat list across all AWS accounts with minimum effort? (Select two)
-
Upload the threat list to an Amazon S3 bucket and trigger an Amazon EventBridge event every time a new threat list is added to the bucket. Define Amazon GuardDuty as a target to EventBridge to automatically configure the threat list to the administrator account in GuardDuty
-
Upload the threat list to an Amazon S3 bucket and share the access with the organization’s delegated administrator for GuardDuty
-
Configure all AWS accounts to be part of AWS Organizations and add the threat list to all members of the organization using AWS Resource Access Manager (RAM)
-
Specify an administrator account in GuardDuty and then use the administrator account to invite other AWS accounts to become member accounts. Add the threat list to the administrator account by referencing the S3 object that contains the threat list
-
Upload the threat list to an Amazon S3 bucket and share the access with the administrator account
GuardDuty는 EventBridge의 타겟이 될 수 없다. 타겟이 되는 서비스가 아님.
AWS Organization 사용하지 않고도 GuardDuty를 여러 계정에 연결해서 사용할 수 있다. 문제에서 Organization 나오지 않았음.
threat list가 S3 버킷에 업로드 되면 administrator account가 access하게 되고, administrator account가 access하면 threat list가 나머지 account의 GuardDuty에 propagated 된다. 개별 계정에 S3 Bucket이 있는게 아님. RAM도 쓰지 않는다.
(fyi. RAM은 AWS Organization를 사용하지 않아도 쓸 수 있다. RAM을 통해서 resource를 공유할 수 있고 초대하면 됨. 그러나 VPC Subnet 같은 몇몇 리소스는 AWS Organization을 사용해야 공유 가능함)
Overall explanation Correct options:
Upload the threat list to an Amazon S3 bucket and share the access with the administrator account
Specify an administrator account in GuardDuty and then use the administrator account to invite other AWS accounts to become member accounts. Add the threat list to the administrator account by referencing the S3 object that contains the threat list
If the accounts you want to associate with are not part of your AWS Organizations organization, you can specify an administrator account in GuardDuty and then use the administrator account to invite other AWS accounts to become member accounts. When the invited account accepts the invitation, that account becomes a GuardDuty member account associated with the administrator account.
When you use GuardDuty in a multiple-account environment, the administrator account can manage certain aspects of GuardDuty on behalf of the member accounts. The primary functions the administrator account can perform are the following:
Add and remove associated member accounts. The process by which this is done differs based on whether the accounts are associated through organizations or by invitation.
Manage the status of GuardDuty within associated member accounts, including enabling and suspending GuardDuty.
Customize findings within the GuardDuty network through the creation and management of suppression rules, trusted IP lists, and threat lists. Member accounts lose access to these features in a multiple-account environment.
Relationship between GuardDuty administrator and member accounts: via - https://docs.aws.amazon.com/guardduty/latest/ug/guardduty_accounts.html
For the given use case, you can upload the threat list to an Amazon S3 bucket and share the access with the administrator account for referencing the S3 object that contains the threat list, which is finally propagated through the GuardDuty network across all accounts.
Incorrect options:
Upload the threat list to an Amazon S3 bucket and share the access with the organization’s delegated administrator for GuardDuty - This statement is correct only if AWS Organizations is used by the company. Since it is not specified for the given use case, so this option is not the right fit.
Configure all AWS accounts to be part of AWS Organizations and add the threat list to all members of the organization using AWS Resource Access Manager (RAM) - AWS Organizations is not mentioned in the given use case, so this option is not the right fit. Also, the organization’s delegated administrator for GuardDuty will upload a threat list to all member accounts, it is not done through AWS Resource Access Manager.
Upload the threat list to an Amazon S3 bucket and trigger an Amazon EventBridge event every time a new threat list is added to the bucket. Define Amazon GuardDuty as a target to EventBridge to automatically configure the threat list to the administrator account in GuardDuty - Amazon GuardDuty is not a supported target for Amazon EventBridge and hence this option is invalid.
References:
https://docs.aws.amazon.com/guardduty/latest/ug/guardduty_accounts.html
https://docs.aws.amazon.com/eventbridge/latest/userguide/eb-targets.html
Domain Domain 3: Infrastructure Security
Question 26
A healthcare company only operates in the us-east-1 region and stores encrypted data in S3 using SSE-KMS. Since the company wants to improve the backup and recovery architecture, it wants the encrypted data in S3 to be replicated into the us-west-1 AWS region. The security policies mandate that the data must be encrypted and decrypted using the same key in both AWS regions.
Which of the following represents the best solution to address these requirements?
-
Set up a new S3 bucket in the us-east-1 region with replication enabled from this new bucket into another bucket in us-west-1 region. Enable SSE-KMS encryption on the new bucket in us-east-1 region by using an AWS KMS multi-region key. Copy the existing data from the current S3 bucket in us-east-1 region into this new S3 bucket in us-east-1 region
-
Set up a CloudWatch scheduled rule to invoke a Lambda function to copy the daily data from the source bucket in us-east-1 region to the destination bucket in us-west-1 region. Provide AWS KMS key access to the Lambda function for encryption and decryption operations on the data in the source and destination S3 buckets
-
Enable replication for the current bucket in us-east-1 region into another bucket in us-west-1 region. Share the existing AWS KMS key from us-east-1 region to us-west-1 region
-
Change the AWS KMS single region key used for the current S3 bucket into an AWS KMS multi-region key. Enable S3 batch replication for the existing data in the current bucket in us-east-1 region into another bucket in us-west-1 region
이미 존재하는 KMS key를 다른 리전에 공유할 수 없다. multi-region key를 만들어야 함.
Overall explanation Correct option:
Set up a new S3 bucket in the us-east-1 region with replication enabled from this new bucket into another bucket in us-west-1 region. Enable SSE-KMS encryption on the new bucket in us-east-1 region by using an AWS KMS multi-region key. Copy the existing data from the current S3 bucket in us-east-1 region into this new S3 bucket in us-east-1 region
AWS KMS supports multi-region keys, which are AWS KMS keys in different AWS regions that can be used interchangeably – as though you had the same key in multiple regions. Each set of related multi-region keys has the same key material and key ID, so you can encrypt data in one AWS region and decrypt it in a different AWS region without re-encrypting or making a cross-region call to AWS KMS.
You can use multi-region AWS KMS keys in Amazon S3. However, Amazon S3 currently treats multi-region keys as though they were single-region keys, and does not use the multi-region features of the key.
Multi-region AWS KMS keys: via - https://docs.aws.amazon.com/kms/latest/developerguide/multi-region-keys-overview.html
For the given use case, you must create a new bucket in the us-east-1 region with replication enabled from this new bucket into another bucket in us-west-1 region. This would ensure that the data is available in another region for backup and recovery purposes. You should also enable SSE-KMS encryption on the new bucket in us-east-1 region by using an AWS KMS multi-region key so that the data can be encrypted and decrypted using the same key in both AWS regions. Since the existing data in the current bucket was encrypted using the AWS KMS key restricted to the us-east-1 region, so data must be copied to the new bucket in us-east-1 region for replication as well as multi-region KMS key-based encryption to kick-in.
To require server-side encryption of all objects in a particular Amazon S3 bucket, you can use a policy. For example, the following bucket policy denies the upload object (s3:PutObject) permission to everyone if the request does not include the x-amz-server-side-encryption header requesting server-side encryption with SSE-KMS.
{ “Version”:“2012-10-17”, “Id”:“PutObjectPolicy”, “Statement”:[{ “Sid”:“DenyUnEncryptedObjectUploads”, “Effect”:“Deny”, “Principal”:"", “Action”:“s3:PutObject”, “Resource”:“arn:aws:s3:::DOC-EXAMPLE-BUCKET1/”, “Condition”:{ “StringNotEquals”:{ “s3:x-amz-server-side-encryption”:“aws:kms” } } } ] } The following example IAM policies show statements for using AWS KMS server-side encryption with replication.
In this example, the encryption context is the object ARN. If you use SSE-KMS with an S3 Bucket Key enabled, you must use the bucket ARN as the encryption context.
{ “Version”: “2012-10-17”, “Statement”: [{ “Action”: [“kms:Decrypt”], “Effect”: “Allow”, “Resource”: “List of AWS KMS key ARNs used to encrypt source objects.”, “Condition”: { “StringLike”: { “kms:ViaService”: “s3.source-bucket-region.amazonaws.com”, “kms:EncryptionContext:aws:s3:arn”: “arn:aws:s3:::source-bucket-name/key-prefix1/*” } } },
    {
        "Action": ["kms:Encrypt"],
        "Effect": "Allow",
        "Resource": "AWS KMS key ARNs (for the AWS Region of the destination bucket 1). Used to encrypt object replicas created in destination bucket 1.",
        "Condition": {
            "StringLike": {
                "kms:ViaService": "s3.destination-bucket-1-region.amazonaws.com",
                "kms:EncryptionContext:aws:s3:arn": "arn:aws:s3:::destination-bucket-name-1/key-prefix1/*"
            }
        }
    },
    {
        "Action": ["kms:Encrypt"],
        "Effect": "Allow",
        "Resource": "AWS KMS key ARNs (for the AWS Region of destination bucket 2). Used to encrypt object replicas created in destination bucket 2.",
        "Condition": {
            "StringLike": {
                "kms:ViaService": "s3.destination-bucket-2-region.amazonaws.com",
                "kms:EncryptionContext:aws:s3:arn": "arn:aws:s3:::destination-bucket-2-name/key-prefix1*"
            }
        }
    }
]
} Incorrect options:
Change the AWS KMS single region key used for the current S3 bucket into an AWS KMS multi-region key. Enable S3 batch replication for the existing data in the current bucket in us-east-1 region into another bucket in us-west-1 region - S3 batch replication can certainly be used to replicate the existing data in the current bucket in us-east-1 region into another bucket in us-west-1 region.
However, you cannot convert an existing single-Region key to a multi-Region key. This design ensures that all data protected with existing single-Region keys maintain the same data residency and data sovereignty properties. So this option is incorrect.
Enable replication for the current bucket in us-east-1 region into another bucket in us-west-1 region. Share the existing AWS KMS key from us-east-1 region to us-west-1 region - You cannot share an AWS KMS key to another region, so this option is incorrect.
Set up a CloudWatch scheduled rule to invoke a Lambda function to copy the daily data from the source bucket in us-east-1 region to the destination bucket in us-west-1 region. Provide AWS KMS key access to the Lambda function for encryption and decryption operations on the data in the source and destination S3 buckets - This option is a distractor as the daily frequency of data replication would result in significant data loss in case of a disaster. In addition, this option involves significant development effort to create the functionality to reliably replicate the data from source to destination buckets. So this option is not the best fit for the given use case.
References:
https://docs.aws.amazon.com/kms/latest/developerguide/multi-region-keys-overview.html
https://docs.aws.amazon.com/AmazonS3/latest/userguide/replication-config-for-kms-objects.html
Domain Domain 5: Data Protection
Question 34
A security engineer is designing a least-privilege IAM policy for an automation script that uses the AWS CLI. The script currently assumes an IAM role that has three AWS managed policies attached: AmazonEC2FullAccess, AmazonDynamoDBFullAccess, and AmazonVPCFullAccess. The security engineer must replace these broad AWS managed policies with a more restrictive customer managed policy while using the most operationally efficient approach.
Which solution should the security engineer recommend?
-
Create an AWS CloudTrail trail for management events, run the script while the existing AWS managed policies remain attached, use IAM Access Analyzer to generate a policy from the CloudTrail activity for the role, and replace the AWS managed policies with the generated customer managed policy
-
Use IAM last accessed information for the role to identify all AWS services that the script used, manually create a customer managed policy that grants full access to those services, and then replace the AWS managed policies
-
Remove the existing AWS managed policies from the role, attach an IAM Access Analyzer policy generation role to the script role, run the script, and then use IAM Access Analyzer to generate a least-privilege policy from the resulting activity
-
Create an account analyzer in IAM Access Analyzer, create an archive rule that matches the role ARN, run the script, and then remove the AWS managed policies from the role after the analyzer confirms the role is in scope
Overall explanation Correct option:
Create an AWS CloudTrail trail for management events, run the script while the existing AWS managed policies remain attached, use IAM Access Analyzer to generate a policy from the CloudTrail activity for the role, and replace the AWS managed policies with the generated customer managed policy
IAM Access Analyzer can generate a customer managed policy for a user or role based on the access activity captured in AWS CloudTrail. AWS documents that policy generation works by analyzing CloudTrail events for a specified role or user over a chosen date range and then producing a policy template based on the actions that were actually used.
This makes option A the most operationally efficient solution. The engineer can leave the current broad managed policies attached temporarily, run the script so the real access pattern is captured, and then use IAM Access Analyzer to generate a tighter customer managed policy from that observed activity. That avoids the trial-and-error process of repeatedly breaking the script and adding permissions back manually.
It also aligns with least privilege better than simply choosing narrower AWS managed policies or relying on service-level summaries. IAM Access Analyzer can generate action-level permissions for many supported services, including Amazon EC2, which helps the engineer move from broad full-access policies to a much more targeted policy.
IAM Access Analyzer policy generation: via - https://docs.aws.amazon.com/IAM/latest/UserGuide/access-analyzer-policy-generation.html
Incorrect options:
Remove the existing AWS managed policies from the role, attach an IAM Access Analyzer policy generation role to the script role, run the script, and then use IAM Access Analyzer to generate a least-privilege policy from the resulting activity - Removing the existing AWS managed policies before running the script defeats the purpose of policy generation based on observed successful access activity. If the role no longer has the permissions needed to run the script, the script may fail before the relevant activity can be captured in CloudTrail. IAM Access Analyzer policy generation depends on CloudTrail events that reflect actual service usage by the entity. Starting by stripping away the current permissions is not the most efficient way to build a least-privilege replacement policy and can interrupt the workload unnecessarily.
Create an account analyzer in IAM Access Analyzer, create an archive rule that matches the role ARN, run the script, and then remove the AWS managed policies from the role after the analyzer confirms the role is in scope - Archive rules in IAM Access Analyzer are used to suppress or filter findings for analyzers, such as external or unused access findings. They are not the mechanism used to generate a least-privilege policy from CloudTrail access activity. This option also confuses Access Analyzer findings workflows with policy generation workflows. Creating an account analyzer and archive rule does not help produce the replacement customer managed policy required for the script.
Use IAM last accessed information for the role to identify all AWS services that the script used, manually create a customer managed policy that grants full access to those services, and then replace the AWS managed policies - IAM last accessed information can help identify which services were used, but it does not provide the same detailed CloudTrail-based policy generation workflow as IAM Access Analyzer. It is also coarser and may lead to broader-than-necessary permissions if the engineer grants full access to each service that appears in last accessed data. This option therefore falls short of true least privilege. The requirement is to replace the current broad managed policies with a tighter policy, and granting service-wide full access based on last accessed information is still too permissive.
References:
https://docs.aws.amazon.com/IAM/latest/UserGuide/what-is-access-analyzer.html
https://docs.aws.amazon.com/IAM/latest/UserGuide/access-analyzer-policy-generation.html
https://docs.aws.amazon.com/IAM/latest/UserGuide/access_policies_last-accessed-view-data.html
https://docs.aws.amazon.com/IAM/latest/UserGuide/getting-started_reduce-permissions-edit-policy.html
Domain Domain 4: Identity and Access Management
Question 39
A Security Engineer has created a web ACL using an AWS Firewall Manager AWS WAF policy. Still, the web ACL isn’t correctly associated with its in-scope resources.
What could be the underlying reason for this issue?
Your answer is correct
-
If
auto remediate any non-compliant resourcesisn’t turned on, then the Firewall Manager created web ACL won’t be associated with in-scope resources -
If
auto remediate any non-compliant resources and Replace web ACLs that are currently associated with in-scope resources with the web ACLs created by this policyis turned on for a Firewall Manager AWS WAF policy and if an in-scope resource has a Web ACL created by AWS Shield Advanced policy, then it cannot be replaced by Firewall Manager AWS WAF policy web ACL -
If
auto remediate any non-compliant resources and Replace web ACLs that are currently associated with in-scope resources with the web ACLs created by this policyare turned on for a Firewall Manager AWS WAF policy, then if an in-scope resource has a Web ACL created by Firewall Manager AWS WAF policy, then it gets replaced by Firewall Manager AWS WAF policy web ACL -
If only
auto remediate any non-compliant resourcesis turned on, Firewall Manager associates the web ACL with all non-compliant resources in the accounts irrespective of whether it has a web ACL associated with it
지금 문서상 핵심 포인트는 두 가지예요.
하나는 자동 remediation을 꺼두면 비준수 리소스에 자동 적용이 안 된다는 점이고, 다른 하나는 Shield Advanced 정책이 만든 web ACL은 WAF 정책이 덮어쓰지 못하는 예외가 있다는 점입니다.
정답은 1번으로 보는 게 가장 맞습니다.
AWS 공식 문서에 따르면 Firewall Manager AWS WAF 정책에서 Auto remediate any noncompliant resources를 끄면, web ACL은 계정에 생성될 수 있어도 기존 in-scope 리소스에 자동으로 연결되지 않습니다. 반대로 기존 in-scope 리소스에 자동 적용하려면 auto remediation을 켜야 한다고 명시돼 있습니다.
다만 2번 내용도 문서상 “예외 상황”으로는 사실입니다. 즉, 어떤 리소스가 다른 Firewall Manager Shield policy가 만든 web ACL을 이미 쓰고 있으면, Firewall Manager는 그 리소스에 AWS WAF policy의 web ACL을 적용하지 못하고 noncompliant로 표시할 수 있습니다. 하지만 이건 추가 조건이 붙는 특수 케이스라서, 문제의 일반적인 원인으로는 1번이 더 직접적입니다.
오답도 짧게 보면:
- 3번: 문서에 그런 식의 “Firewall Manager AWS WAF policy가 만든 web ACL을 또 다른 Firewall Manager AWS WAF policy web ACL로 교체한다”는 일반 규칙은 없습니다. 오히려 다른 active Firewall Manager policy가 관리 중인 association은 자동 교체 대상이 아닙니다.
- 4번: auto remediation만 켠다고 해서 기존 web ACL이 있는 모든 리소스를 무조건 교체하지는 않습니다. 기존 association 제거는 별도 옵션이며, 다른 active Firewall Manager policy가 관리하는 경우엔 영향이 없습니다.
시험용으로 한 줄로 정리하면:
“FMS WAF policy에서 web ACL은 만들었는데 리소스에 안 붙었다” → 기본적으로 먼저 떠올릴 답은 1번(자동 remediation 미사용) 입니다.
fyi) AWS Firewall Manager란?
Firewall Manager가 자체적으로 트래픽을 검사하는 방화벽 엔진이라기보다, WAF / Shield / Network Firewall / DNS Firewall / 보안 그룹 같은 보안 기능을 조직 전체에 중앙 관리하는 컨트롤 타워
AWS Firewall Manager는 AWS Organizations 환경에서 여러 AWS 계정과 리소스에 보안 정책을 중앙에서 일괄 적용하고 준수 여부를 관리하는 서비스야. 한 번 정책을 정의해 두면, 현재 있는 리소스뿐 아니라 나중에 새로 생성되는 리소스에도 자동으로 적용할 수 있어.
쉽게 말하면, 개별 계정마다 들어가서 WAF나 보안 그룹을 따로 붙이는 대신, 보안팀이 한 곳에서 표준 정책을 만들고 조직 전체에 강제하는 도구라고 보면 돼. AWS 문서 기준으로 Firewall Manager는 다음 같은 보호 대상을 중앙 관리할 수 있어:
- AWS WAF
- AWS Shield Advanced
- VPC Security Groups / NACLs
- AWS Network Firewall
- Route 53 Resolver DNS Firewall
핵심 기능은 보통 이렇게 이해하면 된다.
- 중앙 정책 배포
예를 들어 “모든 ALB와 CloudFront에는 이 WAF 정책을 붙여라”, “모든 계정의 특정 VPC에는 이 보안 그룹 규칙을 적용해라” 같은 걸 조직 단위로 배포할 수 있어. - 자동 적용
새 계정이나 새 리소스가 생겨도 정책 범위 안이면 자동으로 따라붙어서, 사람이 빠뜨리는 일을 줄여줘. - 준수 여부 감시
정책에서 벗어난 리소스를 찾아내고, 일부 정책은 자동 수정도 가능해. 또한 비준수 리소스나 탐지된 공격 관련 내용을 Security Hub로 보낼 수 있어.
주의할 점은, Firewall Manager가 자체적으로 트래픽을 검사하는 방화벽 엔진이라기보다, WAF / Shield / Network Firewall / DNS Firewall / 보안 그룹 같은 보안 기능을 조직 전체에 중앙 관리하는 컨트롤 타워에 가깝다는 거야. 실제 웹 요청 필터링은 WAF가 하고, DDoS 보호는 Shield Advanced가 하고, 네트워크 레벨 필터링은 Network Firewall이 하는 식이야.
보통 이런 경우에 많이 써:
- 계정이 여러 개라서 보안 정책이 자꾸 제각각일 때
- 새 계정/새 VPC/새 ALB가 자주 생길 때
- 보안팀이 중앙에서 표준 WAF 정책이나 보안 그룹 정책을 강제해야 할 때
- Security Hub와 연계해서 조직 전체 보안 준수 상태를 보고 싶을 때
그리고 전제 조건으로는 보통 AWS Organizations를 사용하고, Firewall Manager 관리자 계정을 지정해서 운영한다.
한 줄로 요약하면:
Firewall Manager = 여러 AWS 계정에 흩어진 WAF/보안그룹/Network Firewall 같은 보안 정책을 중앙에서 강제·배포·감시하는 서비스야.
Overall explanation
Correct option:
If auto remediate any non-compliant resources isn’t turned on, then the Firewall Manager created web ACL won’t be associated with in-scope resources
The web ACL association behavior for the Firewall Manager AWS WAF policy depends on the following:
-
How auto-remediation is configured
-
If your in-scope resource already has a web ACL associated
If auto remediate any non-compliant resources isn’t turned on, then the Firewall Manager created web ACL won’t be associated with in-scope resources.
If only auto remediate any non-compliant resources is turned on, then the following happens:
-
For non-compliant AWS accounts that are within the policy scope, Firewall Manager creates a web ACL whose name starts with FMManagedWebACLV2 . This web ACL contains the rule groups that are defined in the policy.
-
Firewall Manager associates the web ACL with all non-compliant resources in the accounts. However, if an in-scope resource already has a web ACL associated with it, then it won’t replace the existing web ACL with the Firewall Manager policy web ACL.
Incorrect options:
If auto remediate any non-compliant resources and Replace web ACLs that are currently associated with in-scope resources with the web ACLs created by this policy are turned on for a Firewall Manager AWS WAF policy, and if an in-scope resource has a Web ACL created by Firewall Manager AWS WAF policy, then it gets replaced by Firewall Manager AWS WAF policy web ACL
If only auto remediate any non-compliant resources is turned on, Firewall Manager associates the web ACL with all non-compliant resources in the accounts irrespective of whether it has a web ACL associated with it
If auto remediate any non-compliant resources and Replace web ACLs that are currently associated with in-scope resources with the web ACLs created by this policy is turned on for a Firewall Manager AWS WAF policy and if an in-scope resource has a Web ACL created by AWS Shield Advanced policy, then it cannot be replaced by Firewall Manager AWS WAF policy web ACL
All three options are incorrect. The web ACL association behavior for the Firewall Manager AWS WAF policy for the above use cases is described below.
The web ACL association behavior:
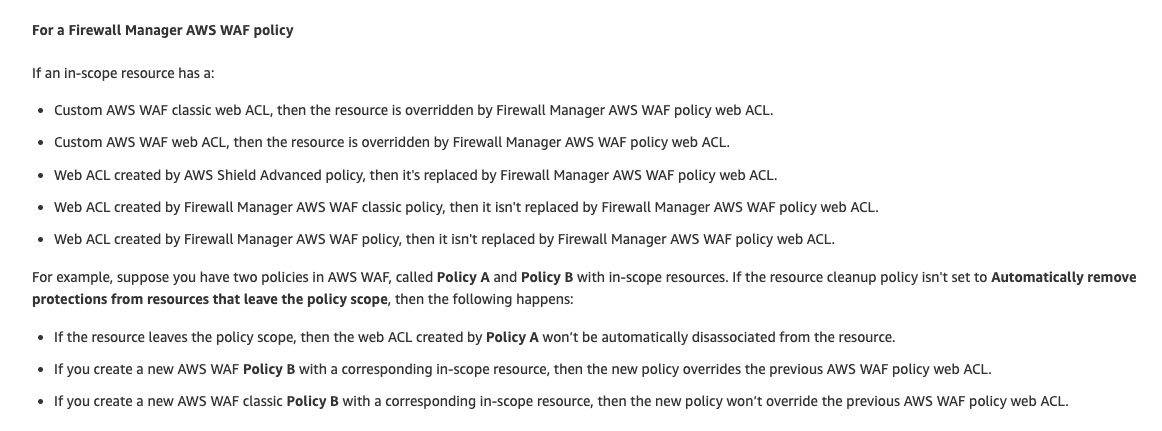
via - https://aws.amazon.com/premiumsupport/knowledge-center/waf-web-acl-association-behavior/
Reference:
https://aws.amazon.com/premiumsupport/knowledge-center/waf-web-acl-association-behavior/
Domain
Domain 5: Data Protection
Question 41
As part of the organization-wide security best practices, a company has mandated that all software installed on the EC2 instances should be upgraded to its most recent authorized version every 30 days. For this requirement, the Security Administrator has to provide a weekly report that lists all the instances that do not have the latest software updates deployed.
What is the most optimal way to implement this requirement?
-
Use Patch Manager, a capability of AWS Systems Manager to automatically scan your instances and report compliance on a schedule, install available software updates on a schedule, and scan targets on demand
-
Use Change Manager, a capability of AWS Systems Manager to automatically scan your instances and report compliance on a schedule and install available software updates on a schedule through automated runbooks
-
Use Version Manager, a capability of AWS Systems Manager to automatically scan your instances and report compliance on a schedule, install available software versions on a schedule, and scan targets on demand
-
Use Amazon Inspector to determine the systems that do not have the latest patches applied after a time of 30 days and configure Inspector to redeploy these instances with the latest AMI version
Version Manager 같은건 없다.
SSM에 Change Manager가 있긴 한데, 이건 software update에서 사용하는게 아니다.
AWS Systems Manager의 Change Manager는 운영 변경을 “아무나 바로 실행”하게 두지 않고, 요청 → 검토/승인 → 실행 → 기록/감사 흐름으로 통제하는 엔터프라이즈 변경관리 프레임워크입니다. 애플리케이션 설정이나 인프라 변경을 더 안전하게 처리하려는 용도이고, AWS 리소스뿐 아니라 온프레미스 리소스에도 사용할 수 있습니다. 또 AWS Organizations를 쓰면 위임 관리자 계정에서 여러 계정·리전에 걸친 변경을 중앙에서 관리할 수 있습니다.
핵심은 “변경 요청서”와 “표준화된 실행 절차”를 붙여서 운영 변경을 거버넌스화하는 데 있습니다. 보통은 미리 만들어 둔 change template 안에 승인 절차와 실행 대상 Automation runbook을 넣어 두고, 사용자가 변경 요청을 만들면 그 템플릿을 따라 승인받은 뒤 runbook이 실행됩니다. 즉, Change Manager 자체가 직접 서버를 바꾸는 엔진이라기보다, Automation을 승인 프로세스와 감사 체계로 감싸는 상위 관리 계층에 가깝습니다.
- Automation: 실제 작업을 수행하는 runbook 실행 도구
- Change Calendar: 지금 변경 가능한 시간대인지 통제
- Change Manager: 누가 어떤 변경을 왜 요청했고, 누가 승인했고, 어떤 runbook으로 실행했는지 관리하는 승인·감사 레이어
하나 중요한 현재 상태가 있습니다. Change Manager는 2025년 11월 7일부터 신규 고객에게 더 이상 개방되지 않았고, 기존 고객만 계속 사용할 수 있습니다. 그래서 지금 새로 도입하려는 상황이라면, “지금도 신규 사용 가능한 기능”으로 설명하면 틀릴 수 있습니다. (시험에 아예 안나오겠지?)
Overall explanation Correct option:
Use Patch Manager, a capability of AWS Systems Manager to automatically scan your instances and report compliance on a schedule, install available software updates on a schedule, and scan targets on demand
Patch Manager, a capability of AWS Systems Manager, automates the process of patching managed nodes with both security-related and other types of updates. You can use Patch Manager to apply patches for both operating systems and applications. You can use Patch Manager to install Service Packs on Windows nodes and perform minor version upgrades on Linux nodes.
Patch Manager uses patch baselines, which include rules for auto-approving patches within days of their release, in addition to a list of approved and rejected patches. You can install patches regularly by scheduling patching to run as a Systems Manager maintenance window task. You can also install patches individually or to a large group of managed nodes by using tags.
Patch Manager provides options to scan your managed nodes and report compliance on a schedule, install available patches on a schedule, and patch or scan targets on demand whenever you need to. You can also generate patch compliance reports that are sent to an Amazon Simple Storage Service (Amazon S3) bucket of your choice. You can generate one-time reports, or generate reports on a regular schedule. For a single managed node, reports include details of all patches for the node. For a report on all managed nodes, only a summary of how many patches are missing is provided.
Patch Manager integrates with AWS Identity and Access Management (IAM), AWS CloudTrail, and Amazon EventBridge to provide a secure patching experience that includes event notifications and the ability to audit usage.
How AWS Systems Manager works: via - https://aws.amazon.com/systems-manager/
Incorrect options:
Use Amazon Inspector to determine the systems that do not have the latest patches applied after a time of 30 days and configure Inspector to redeploy these instances with the latest AMI version - Amazon Inspector is an automated vulnerability management service that continually scans Amazon Elastic Compute Cloud (EC2) and container workloads for software vulnerabilities and unintended network exposure. Amazon Inspector removes the operational overhead associated with deploying and configuring a vulnerability management solution by allowing you to deploy Amazon Inspector across all accounts with a single click. Amazon Inspector, however, does not cater to patch management requirements.
Use Version Manager, a capability of AWS Systems Manager to automatically scan your instances and report compliance on a schedule, install available software versions on a schedule, and scan targets on demand - There is no such feature as Version Manager within AWS Systems Manager. This is a made-up option, meant to serve as a distractor.
Use Change Manager, a capability of AWS Systems Manager to automatically scan your instances and report compliance on a schedule and install available software updates on a schedule through automated runbooks - Change Manager, a capability of AWS Systems Manager, is an enterprise change management framework for requesting, approving, implementing, and reporting on operational changes to your application configuration and infrastructure. From a single delegated administrator account, if you use AWS Organizations, you can manage changes across multiple AWS accounts and AWS Regions. Change Manager is not meant for managing software updates via patching.
References:
https://docs.aws.amazon.com/systems-manager/latest/userguide/systems-manager-patch.html
https://aws.amazon.com/about-aws/whats-new/2017/11/aws-announces-aws-systems-manager/
Domain Domain 6: Security Foundations and Governance
Question 48
The development team at an e-commerce company has recently migrated to AWS Cloud from its on-premises data center. The team is evaluating CloudFront to be used as a CDN for its flagship application. The team has hired you as an AWS Certified Security Specialist to advise on CloudFront capabilities on routing and security.
Which of the following would you identify as correct regarding CloudFront? (Select three)
-
Use geo-restriction to configure CloudFront for high-availability and failover
-
CloudFront can route to multiple origins based on the price class
-
Use field-level encryption in CloudFront to protect sensitive data for specific content
-
Use an origin group with primary and secondary origins to configure CloudFront for high-availability and failover
-
Use KMS encryption in CloudFront to protect sensitive data for specific content
-
CloudFront can route to multiple origins based on the content type
‘CloudFront to protect sensitive data for specific content’는 field-level encryption이다. KMS encryption이 아님.
CloudFront가 multiple origin에 route하는건 price class에 따른게 아니라 content type에 따라 하는 것이다.
Overall explanation Correct options:
CloudFront can route to multiple origins based on the content type
You can configure a single CloudFront web distribution to serve different types of requests from multiple origins. For example, if you are building a website that serves static content from an Amazon Simple Storage Service (Amazon S3) bucket and dynamic content from a load balancer, you can serve both types of content from a CloudFront web distribution.
Use an origin group with primary and secondary origins to configure CloudFront for high availability and failover
You can set up CloudFront with origin failover for scenarios that require high availability. To get started, you create an origin group with two origins: a primary and a secondary. If the primary origin is unavailable or returns specific HTTP response status codes that indicate a failure, CloudFront automatically switches to the secondary origin.
To set up origin failover, you must have a distribution with at least two origins. Next, you create an origin group for your distribution that includes two origins, setting one as the primary. Finally, you create or update a cache behavior to use the origin group.
Use field-level encryption in CloudFront to protect sensitive data for specific content
Field-level encryption allows you to enable your users to securely upload sensitive information to your web servers. The sensitive information provided by your users is encrypted at the edge, close to the user, and remains encrypted throughout your entire application stack. This encryption ensures that only applications that need the data—and have the credentials to decrypt it—can do so.
To use field-level encryption, when you configure your CloudFront distribution, specify the set of fields in POST requests that you want to be encrypted, and the public key to use to encrypt them. You can encrypt up to 10 data fields in a request. (You can’t encrypt all of the data in a request with field-level encryption; you must specify individual fields to encrypt.)
via - https://docs.aws.amazon.com/AmazonCloudFront/latest/DeveloperGuide/field-level-encryption.html
Incorrect options:
Use KMS encryption in CloudFront to protect sensitive data for specific content - This option has been added as a distractor. You can use field level encryption in CloudFront to protect sensitive data for specific content.
Use geo-restriction to configure CloudFront for high-availability and failover - You can use geo-restriction, also known as geo-blocking, to prevent users in specific geographic locations from accessing content that you’re distributing through a CloudFront distribution. Geo restriction is not used to configure CloudFront for high availability and failover.
CloudFront can route to multiple origins based on the price class - CloudFront edge locations are grouped into geographic regions, and AWS has grouped regions into price classes. The default price class includes all regions. Another price class includes most regions (the United States; Canada; Europe; Hong Kong, Philippines, South Korea, Taiwan, and Singapore; Japan; India; South Africa; and Middle East regions) but excludes the most expensive regions. A third price class includes only the least expensive regions (the United States, Canada, and Europe regions). CloudFront can only route to multiple origins based on content type and not based on the price class.
References:
https://docs.aws.amazon.com/AmazonCloudFront/latest/DeveloperGuide/field-level-encryption.html
https://docs.aws.amazon.com/AmazonCloudFront/latest/DeveloperGuide/PriceClass.html
Domain Domain 3: Infrastructure Security